Of Floor Plans and Hobbit House Elevations.

I think our cat is related to the Romans somehow. I guess over the years people have brought cats and pets from all over the world with them to their new homes in foreign lands. Our cat Tuco is definitely related to the Romans somehow.(Tuco…a strange name for a cat you say? ….Tuco was named after the ugly guy from the movie “The Good the Bad and the Ugly” starring Clint Eastwood. One of my all time favorite movies.) You  remember the Romans and who they were at the height of their prominence back in the day. I hope your high school history senses are tingling. Anyhoo we all know the Romans got a little to full  of themselves at one point and would have these huge parties where they would just eat and eat and eat and eat. And when they could not eat anymore they would ….well…you know what they would do. This is what our cat does every day. It’s fun having pets isn’t it? This cat is going to drive me to drink.

Do Hobbits have pets?

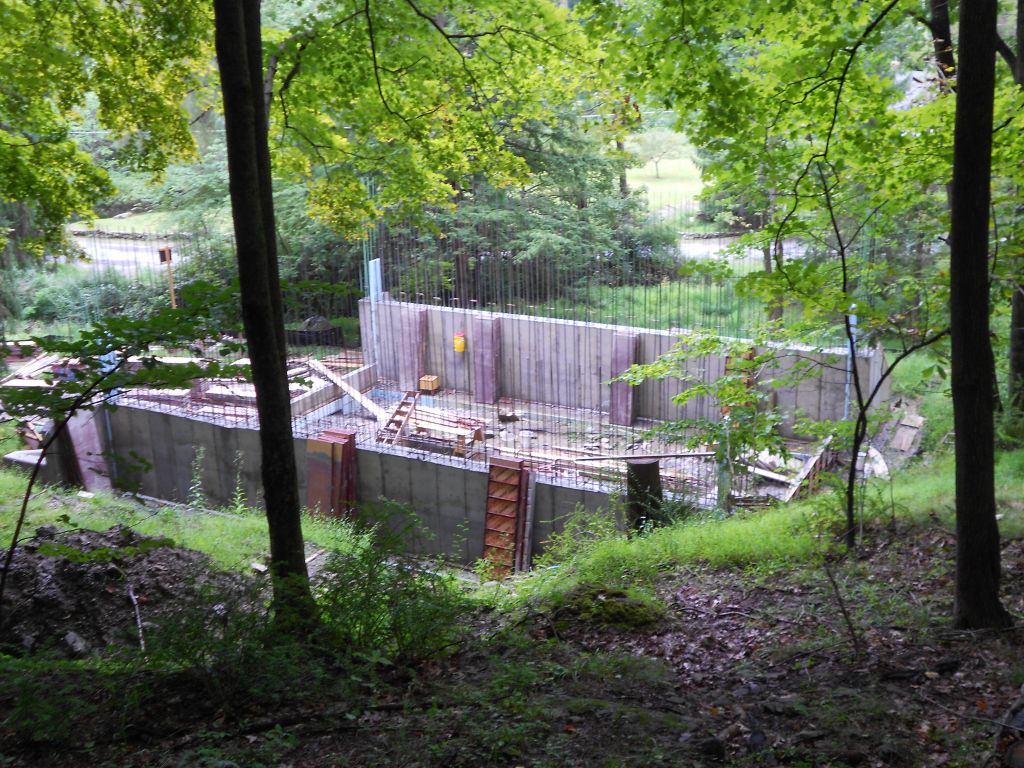
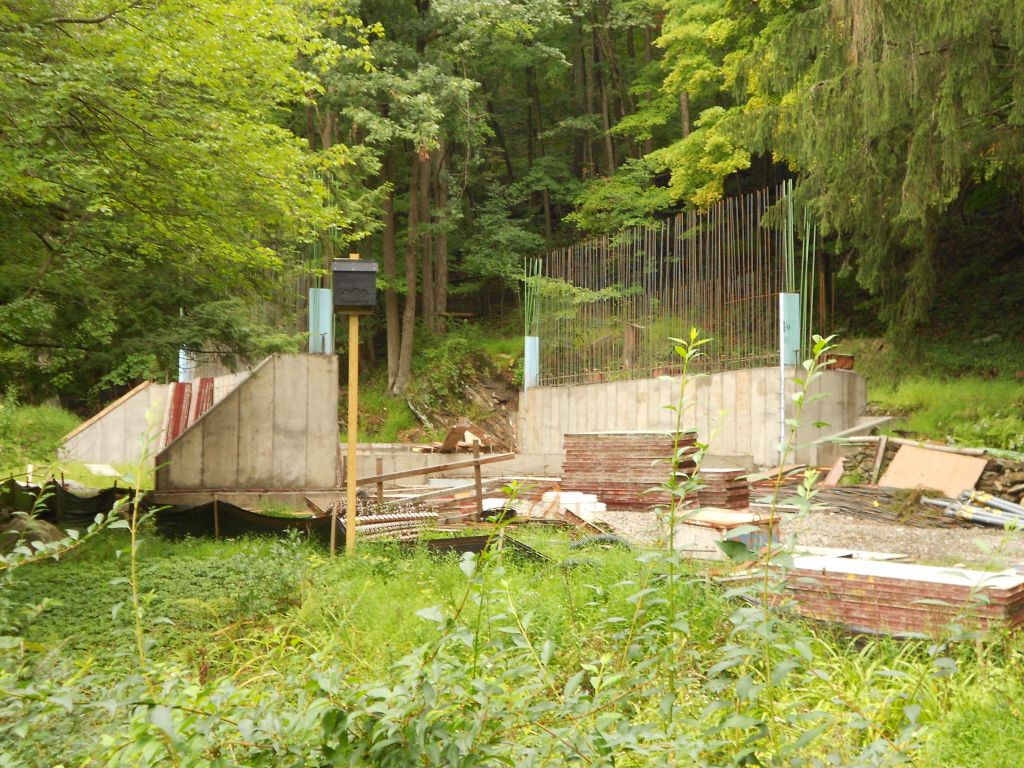
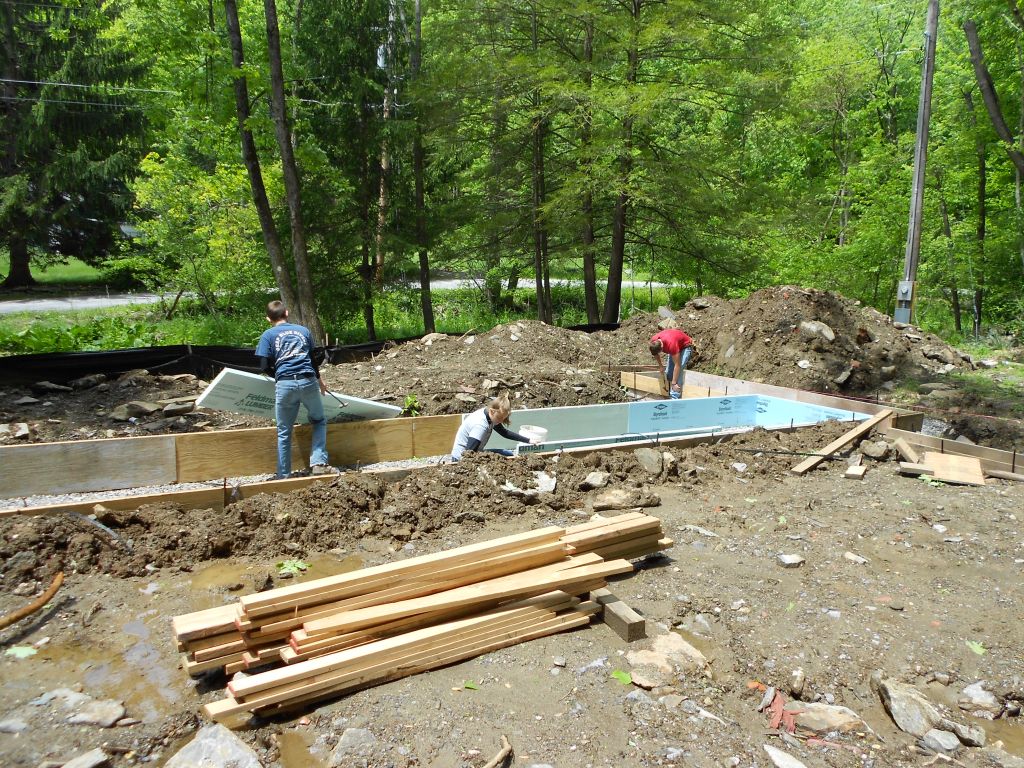
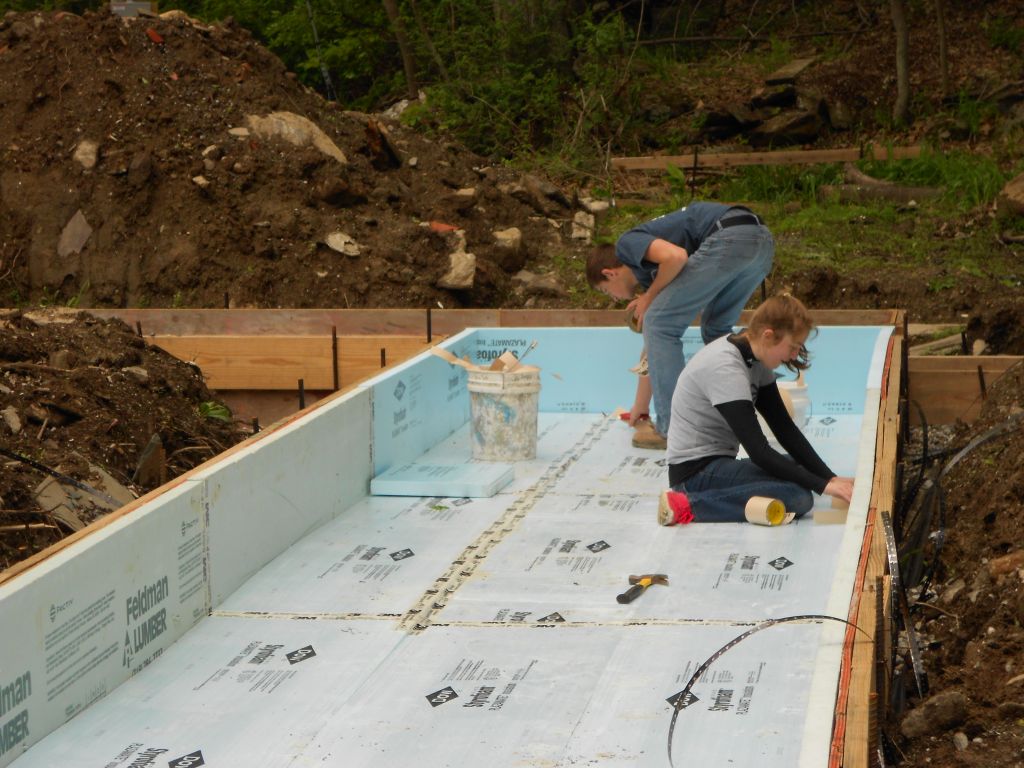
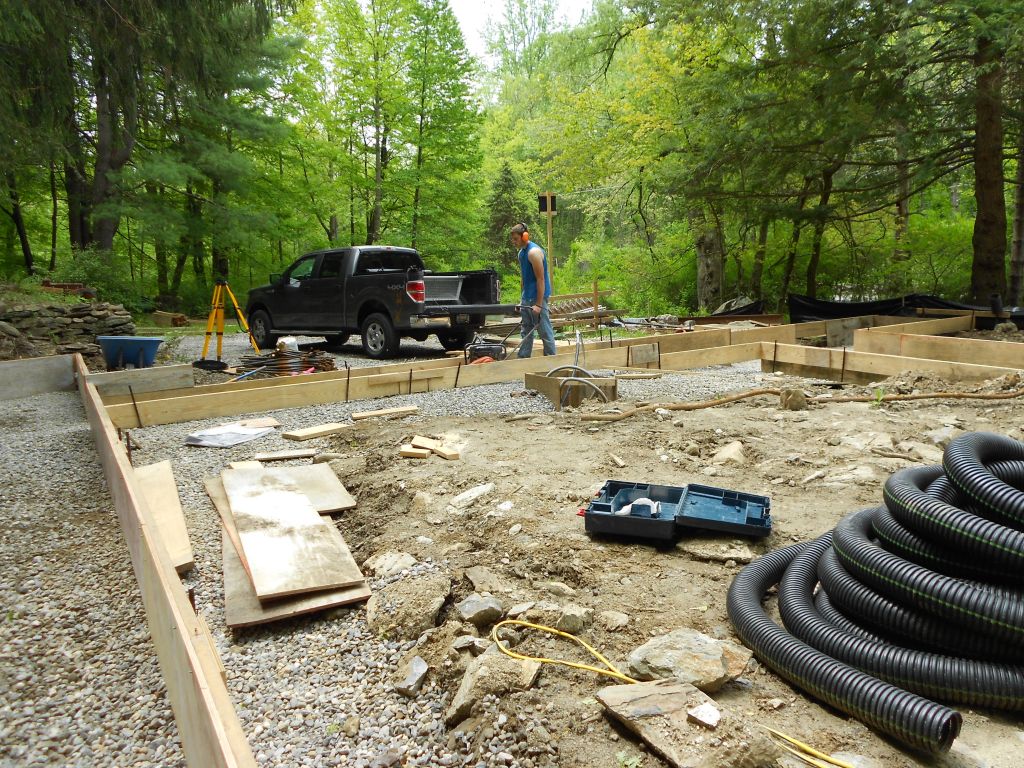
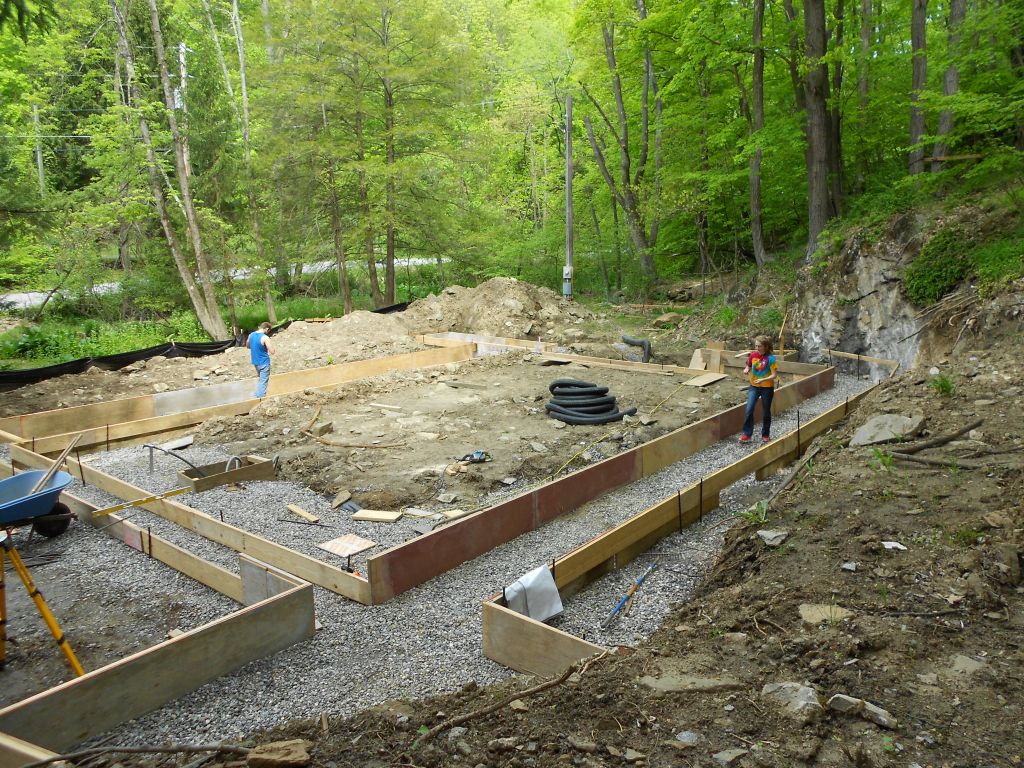
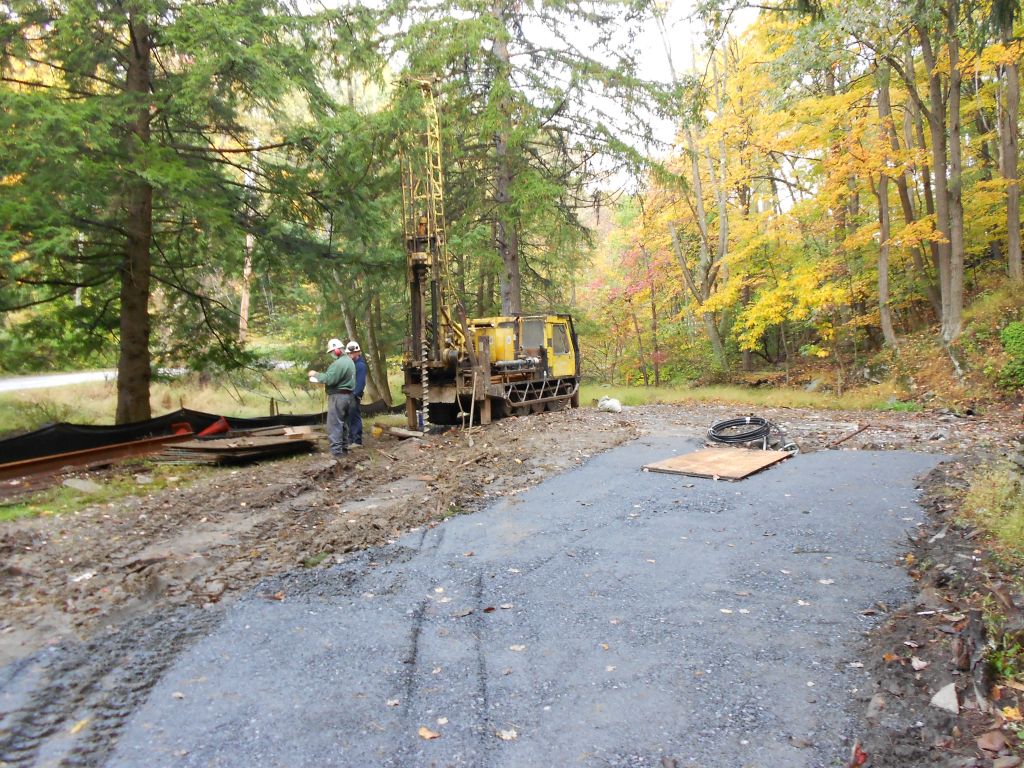
Well back to building a Hobbit house. I wasn’t able to do any work this weekend. For good reasons of course. My son Terence got confirmed in the church this Saturday. We were pretty busy all morning getting ready. After confirmation ( which was a really wonderful ceremony) we had my mother and that battle ax of a mother in law of mine  over to the house for lunch. Jude had a football game after that and then we had a little dinner get together after the game with family. It was fun.I don’t have Columbus day off either like I usually have so that was a bust. Everybody at work was depressed when we found out we had to work Monday. Including yours truly.

So fortunately I had a comment from a woman named Sally who would like to see what the Hobbit house floor plans are like. So I thought that this would be a good weekend to do something a little different. Check it out.

Hobbit house floor plans.

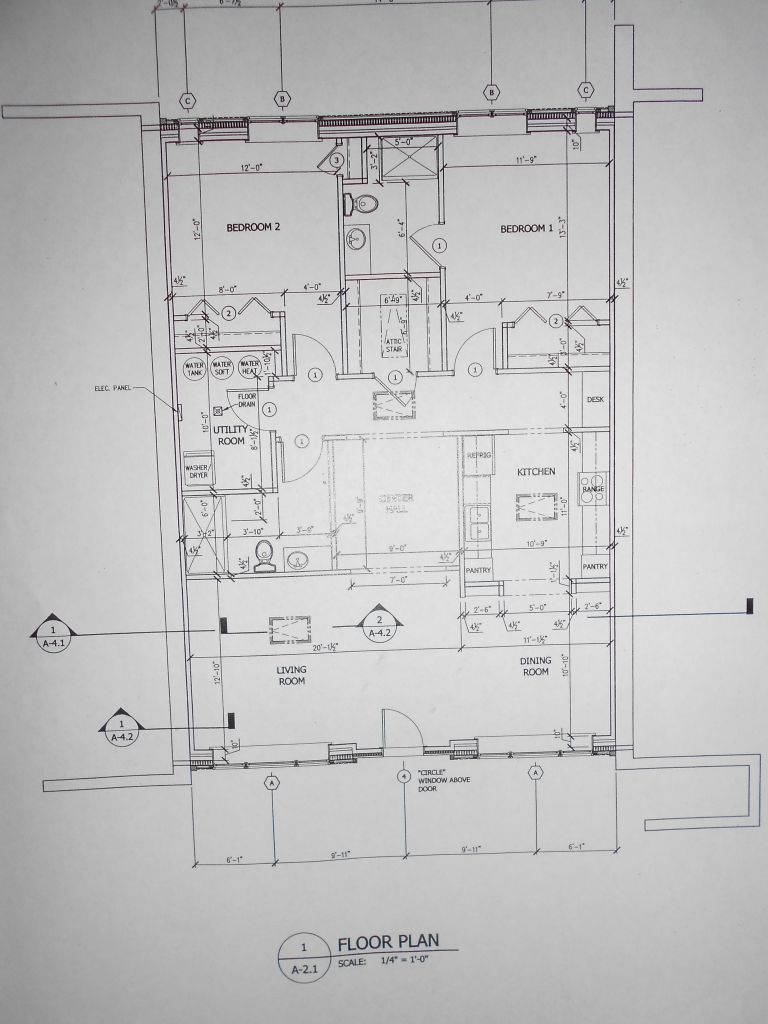
Hmmm. Not really sure how in depth I should go. To begin with this is what we call  an architectural floor plan. It is a cut away section of the floor showing the rooms and their wall locations etcetera…from a bird’s eye view. Just the basic rundown. Living and dining rooms are in the front of the house, galley kitchen to the right. Through the kitchen we come to a hallway with a desk next to the kitchen. Walking from the desk down the hall we have our mechanical room with a common bath next to it. (For visiting Hobbits) The back of the house has two bedrooms one with its own bath and one which uses the common bath outside its door. The architect who did this drawing mislabeled the center hall. ( I did all of the original drawings and in order for them to sign off on them they wanted to redo them with their CAD program) Anyway that label is supposed to say circular hallway not center hall. We all know that Hobbits love their circular halls and I really want to put one in here. If you look at the floor plan you can see that the circular hall seems to be taking up quite a bit of space. And it does. You  have to keep in mind in order to get the right feel to the hallway you have to use quite a large radius to make a hallway this size. Although it’s not in stone yet I figured I’m going to need a hallway with a diameter of at least 8 feet in order to get the right height and feel I want for this house. So obviously one of the drawbacks to this is that we lose valuble floor space for either closets or the kitchen in this particular design. Just so you know a typical hallway is about 3 feet wide.

A few other things to note. The rectangles with the triangles in them are skylights. There is one in the living room, kitchen, and the back hallway. I wanted the interior of the house to be fairly bright with natural light. I’m not sure these are the final locations. I might add one over the desk area. I know quite a few people have seen the movie “The Hobbit” and will undoubtedly say that Bag End (The hobbits home in the movie) has no skylights and so on.  If only I had an unlimited budget to work with. But alas I do not. Therefore we must make a few adjustments to make a real Hobbit house work for big folk. A lot of the things that are in the movies are done with especial effects and the like. We all know this. So some of the aspects we really like in Bilbo’s house aren’t really do-able or practical for that matter. Like I said all of the circular hallways in the movie house were unbelieveable but there was no real practical way for me to add another circular hallway.

 Another matter of practicality are the windows of a Hobbit house. I know…..Hobbit houses have round windows. The only problem with round windows is you have to be Bill Gates to afford them,,,,and I’m not Bill Gates I’m Hobbit Hollow Jim. But really the round window thing looks good in the movies but as far as letting light into a house and so on they really aren’t what you are looking for. I’m still not one hundred percent sure what I’m going to do with the windows. I drew about 8 million sketches to come up with something that would look good and still be kind of Hobbitesque. This next picture is an elevation view of the Hobbit house. It kind of gives you an idea of where we are going. Check it out.

Elevation drawing of Hobbit House.

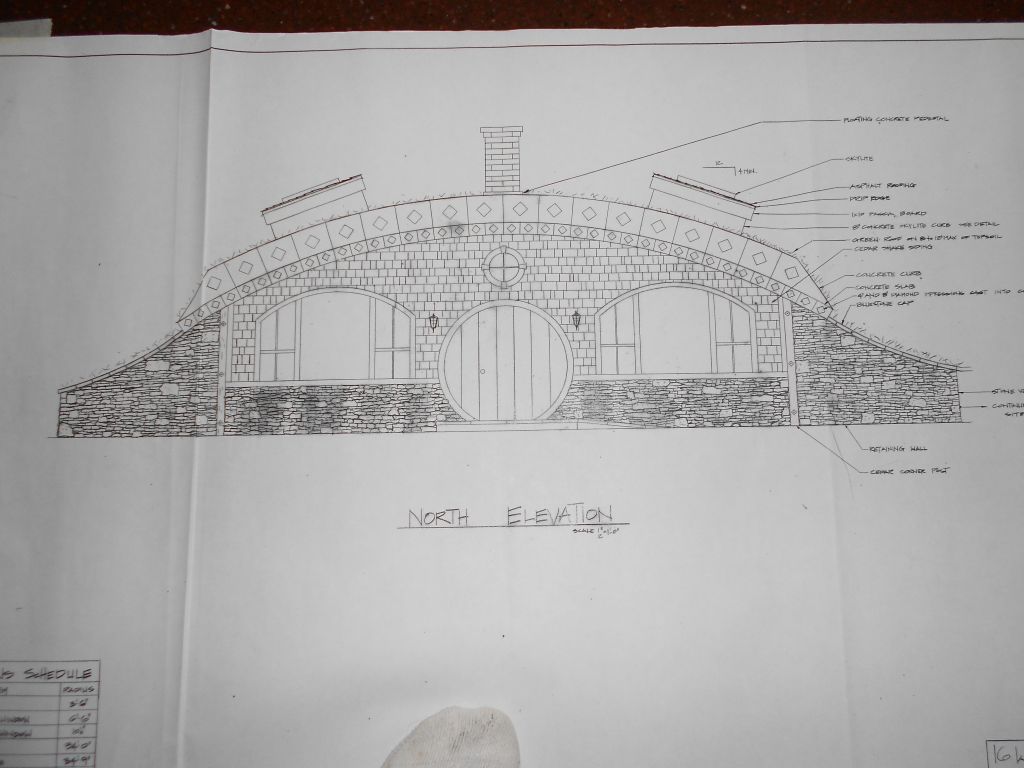
I actually have changed this drawing a couple of times since I originally drew it but this is the nuts and bolts of where we are heading. I didn’t think the door looked right. I have a rough sketch of what I’m going to do. I actually made the door larger and changed the curvature of the windows. And I don’t think the circular window is going to work either. (Sorry round window fans.) The other problem from a passive house standpoint is that passive house windows are really expensive to begin with so I’m a little nervous about pricing out arched windows that are passive house certified. We’ll cross that bridge when we get to it.

Well I hope this post was informative at the very least. The Jets just lost and I think Tuco threw up again. I gotta go.

Enjoy your week!

Jim


Hobbit Houses and the Art of Motorcycle Maintenance?


Interesting. Yes? Let’s face it home maintenance is a drag. I’ve never really been a good home maintenace guy. That being said I’m not going to go on a rant about Zen and the Art of Motorcycle Maintenance. On the contrary, I don’t want to do any maintenance at all. (I tried reading that book but really struggled with it. I guess I’m never going to be a Zen Buddist.)

So now that you know that I’m not such a great maintenance guy let’s get back to maintenance and Hobbit Houses. This topic all came to me when my master bath toilet sprang a leak last Monday. It’s summertime  and sometimes your toilet sweats and me being a low maintenance kind of guy I happened to notice that this toilet seemed to be sweating  quite a bit this summer. (Just so you know this particular toilet never really sweated in previous summers.) Ok so the toilet is sweating away. Then on Monday I noticed a small puddle on the floor next to the toilet.( Maintenance man senses are tingling.) I look under the toilet and see a stream of water coming out from the bolt that attaches the bowl to the tank. I’ve never seen a toilet leak from this spot before but here we go. Anyway the short version is it took me till Sunday to get around to fixing it. It’s a long story but  lets just say there were complications getting the bolts out etcetera and some of my plumbing tools were broken.(The little hacksaw blade with the plastic handle). One day after work I tried fixing it but began to sweat profusely so I canceled and had butter pecan ice cream with whipped cream and two cherries.(With a little extra cherry juice on top). So I guess you’re wondering what this all means?

Well one of the aspects of this particular Hobbit house is that it will be a relatively low maintenance home. The structure is reinforced concrete. No rotting or deterioration.  It should last about 1000 years. The roof is going to be vegetation. Just let whatever you plant grow and grow. No reroofing to worry about or gutters to clean. The small amout of siding that exists will be sheltered by the roof eaves and is only one story high.If you do want to repaint you’ll only need a step ladder. This particular Hobbit house will also have stone veneer siding as well which is totally maintenance free. Another huge aspect of this Hobbit house is that it will not have a conventional boiler or air duct system. The Passive house aspect of the home (Superinsulated and air tight) eliminates the need for a large conventional type boiler. No oil deliveries and yearly maintenance checkups on your boiler. All we are going to put into this house is what they call a ductless minisplit heat pump. This will provide your winter heat and your summer air conditioning. Where’s the hammock?…Lets take a nap!

The other reason I was thinking about maintanence was the stripping of the concrete forms which we started in earnest this Labor Day Weekend. I mean when you see these walls it’s just like a thing of beauty. Who has 16 inch thick concrete walls for their home?  Its gonna take an M-1 Abrahms tank to knock this thing down. When I see concrete like this- it’s just like we’re never going to have to worry about this. Ever.

So I got started Saturday around 8 AM. Stripping is pretty simple. Begin where you finished, end where you began. More or less anyway. It can get a little tricky depending on the complexity of the formwork. But this was pretty straight forward. First order of business was to strip the top waler off and any form ties that were above the scaffolding. After that I took down the 2×4 protection and the planking. Here’s a picture.

Walers and scaffold stripped off.

I don’t know how it was over the weekend in your neck of the woods but over in New York it was disgustingly humid. I mean all you had to do was start breathing and you were sweating like a pig. Thank goodness I put in good drainage around the perimeter of the site. With the amount I sweated I think I would have washed most houses right off their foundations.

Forget about P90X, the Cleanz, Weight Watchers or whatever else you’ve been doing to lose weight. And totally forget about the gym.Stairmasters, treadmills,free weights. Just come to the Hobbit house and help me strip symmons forms and you’ll have the workout of a lifetime. Symmons forms weigh in at about 90 pounds. Move those suckers around all day and that is one hell of a workout. I was a mere shell of a man by the time I finished on Monday.

It is fun to see what is behind the forms though. I was especially looking forward to seeing how the retaining walls came out. If you remember we had some trouble getting the concrete to flow into this area during the pour. I was really happy with the way it came out. Check it out.


Retaining wall stripped.

You have to look really close to see the joint where we poured the two lifts of concrete. The boys did a really good job.

One of the things I was worried about was air pockets at the top of the form here at this particular location. You might not think that air would create a void in the concrete but it does all the time. That’s one of the reasons you need a good vibrator man on a concrete job. But at this location it was hard to get the vibrator underneath the top form. So I drilled 5/8″ air holes 16 inches on center into the form to let the air out as the concrete filled up the form. I don’t know if you can see it but there are only very small air pockets in the topface of the retaining wall. Check it out.

Top face of retaining wall

If you look closely at the above picture you will see an outline of a little rectangle. I cut out that rectangle in the form to allow the vibrator to go into the form on the first lift of concrete. Once the concrete filled up to that opening we stopped and I screwed the little plywood block back in place. Hmmmm…smarter than the average concrete guy wouldn’t you say! The skewbacks on the edges were a nice touch too.

Ok I did forget one thing. I forgot to check all of the locations where I had the 4 inch styrofoam for our thermal break. I was supposed to tell the guys while we were pouring to put a little concrete on each side of the styrofoam. This will equalize the pressure on the styrofoam so we don’t have a blowout. I actually put a form tie 6 inches from the bottom to prevent this from being an issue but I forgot one corner. Look what happened.

Styrofoam moved during the pour at the very bottom of the form.One location only.

We got lucky here. The styrofoam didn’t break so our thermal barrier is still intact.Whew! It just goes to show you how important the little things are in a concrete pour. Oh yeah check out how the electrical boxes came out. This was sweet.

Exterior electrical box and thermal break at exterior wall assembly.

Jude had a football scrimmage Saturday and Terence was at a friends so I didn’t have any help. I asked Jude  if anyone might want to work for two hours on Sunday popping pins out. He got a hold of RJ and they both came over Sunday at 11. It was great.There are literally thousands of pins that have to come out and it is time consuming and hard work to boot. You have to remember all the pins are now in tension after the concrete has been poured so you really have to bang the pins hard to get them out. Here’s a picture of them working away.

Rj and Jude popping pins out Sunday morning.

We got a lot done Sunday.Here’s a picture of the Northern retaining wall before I stripped off the top form. It kind of gives you a better idea of what we did at this location.

Norhern retaining wall before the top form was removed.

So the big picture this weekend was to try and get all the wall panels off and stacked. This way next Saturday we could load out the truck and get all these forms off the site and move onto phase 7 b of the project. I knew that was a tall order so I decided to just try and get the panels off. I figured if I did that I could probably stop by after work and stack panels for a half hour to 45 minutes a night. This way we would be ready for Saturday trucking.

I employed Jude and Terence Monday for about an hour popping pins and that was the trick. We’re all ready for next weekend….well almost.Here are a few pictures with all the forms off.

End of the day Monday

From the bridge.

I’m sick of looking at these forms though. I can’t wait to get rid of them. Which brings me to another conundrum. Who’s going to help me put these panels on the truck? Jude and all his football player friends start playing next Saturday. Lightweights need not apply. This is heavy work so I just can’t use anyone. We’ll have to scour the Shire for some help. I’m sure we’ll find some. Hobbits are quite strong actually and are always up for a good days work as long as they’re well fed.

Enjoy your week!

Jim


Ready, Set, Pour….Oh, Noooooo!

“It’s a dangerous business going out your door. You step onto the road and if you don’t keep your feet there’s no knowing where you might be swept off to.”-Bilbo Baggins. The concrete business is a dangerous business…I hope I’m being swept in the right direction.

I met the building inspector Thursday afternoon at 2:15. I had to leave work early but this was the latest appointment I could get with him. It wasn’t too bad work wise because we had gotten rained out around 10:00AM so I really didn’t have to be there for anything special. I got up to the site around 2 and had a bunch of things I needed to finish for the pour anyway so I got set up while I was waiting for the inspector.

The inspector arrived promptly at 2:15 and proceeded to walk to the edge of the site. He turned and looks at me and says, “It looks like you know what  you’re doing, pour away.” That was music to my ears. The final step before pouring is in place.I also asked him about the under slab plumbing. Did it really need to be cast iron pipe under the slab? He said no and that I must have gotten an old checklist from the building department. More music to my ears. That would have been such a pain to take on a cast iron job. At least for me it would have been. If you make a mistake with PVC you just cut it out and reglue a new piece on.

Once the building inspector left I really got into it. I started finishing off the little things I needed to do before this Saturday’s pour.I called the concrete plant and set up concrete for 8AM Saturday and called the pump company and set them up for  7:30. It takes about a half hour to prep the pump before concrete arrives.

One of the things that I really wanted to do was lock up this area where there is a step in the footing. I used #9 wire at the top of the footing and through the footing about 9 inches off the bottom. I put 3X4 stongbacks on either side of the forms and wrapped these with the #9wire. Once this is done you take your handy dandy lineman pliers and twist the #9 wire to tighten it up. Here’s a picture.

# 9 wire twisted to hold 3X4 strongback.
# 9 wire twisted to hold 3X4 strongback at step in footing.

The other thing I did Tuesday after work was pin the rock where it’s exposed to the footing. I didn’t have my camera that day but basically what you do is take a Hilti drill with a 3/4 inch bit on it and drill 8 inches into the rock. Once the hole is drilled you take a vacuum blower and blow any dust that is in the hole out. I brought a tube of Hilti HY150 epoxy with me from work and using the dispenser for it you squirt the epoxy into the drilled hole and insert a #5 bar. On a warm day the stuff sets up in less than a half hour. (You can use non-shrink grout in lieu of epoxy.The epoxy is a snap though) It was raining when I did this so I just did one hole at a time. I also epoxied some 1/2 inch coil rod in place as well. I used the coil rod to help brace a couple of the forms for safety reasons.Here’s a picture.

#5 bar pinned into the rock using Hilti HY150 epoxy.

By the end of the evening on Thursday I was pretty much ready for a Saturday pour. I had about two hours of work left to finish things up which I was planning to do Friday night or early on Saturday.

Forms ready for Saturday's pour.
Forms ready for Saturday’s pour.

Then something happened on Friday that was most unexpected…and also quite unusual. We lost power to the placeing boom at work while we were pouring.This is a placing boom.

Placing boom: Concrete is pumped up the building and placed with this machine.

We actually lost power to the placing boom right before we started to prepour the columns on this job. As soon as I heard that I called the plant and told them to stop shipping concrete until they hear back from me. That part was fine. They had only shipped the grout truck that’s used to prime the pump and two ten yarders of 5950 psi concrete aka 5950 (pronounced fiftyninefifty in the business if you want to sound like you know what your talking about.) The electrician foreman Tony was working on it already so that was great and Johnny aka Johnnie Chiz, aka Chisel,aka Super Chiz was with him monitoring the situation. There was an electrical connection on the 15th floor that had gotten “fried” because water had run down into the fitting during the rain storm the day before. There was a slightly heated discussion about whose fault it was for not leaving a rain loop in the line but we were able to get past that. It took about twenty minutes to fix it and we were back in business and started to pump the concrete up the building. I called the plant back and released the balance of the concrete for the day which was only seventy yards. I also reminded them to put retarder in the last truck because it takes a while to clean out the line once you’re done pouring.( Retarder in a concrete mix slows the set time of the concrete once it is mixed. We use this in the summer all the time.)

Placing Boom 101:

For the uninitiated the concrete goes into a hopper in the street and gets pumped into a 5 inch riser pipe that goes straight up the building into the placing boom turret and into the placing boom itself. When you finish pouring you put a round sponge into the tip of the placing boom and blow it back down the riser pipe with compressed air into a box in the street. This cleans out the pipe for the next pour and you wind up with a box full of concrete that gets thrown out the next day.

What happens to the placing boom if the concrete starts to get hard? That’s when trouble really begins.

And things cease to be fun.

This is the short version: We lost power to the pump when we were almost done pouring 60 yards. The electrician was on it right away. He was on the deck. I met him on the 13th floor.”I found the problem and it will be fixed in ten minutes.” OK. You should have power. We still don’t have power. ..Let me try something else. It’ll take 5 minutes. I call Johnny Boo and tell him we have to get ready to move fast if this doesn’t work because the concrete is going to start to set up in the line.The next thing Tony the electrician tried didn’t work either. The placing boom can’t move we are totally screwed now. I waited too long to make a move. So much went on in the next half an hour I could write a book on it. (I keep forgetting that this is the short version.) When we went to blow back the line they couldn’t switch the diverter valve over.( The diverter valve is used for the blowback so the concrete goes into the box I mentioned before.) I broke open the line in the street before the diverter valve and the concrete started to come out of the line like 5 inch diameter sausages two to three feet long.(It really did look like sausage albeit concrete sausage) The concrete really started to pile up. I thought we were going to be a able to clear the line. At that moment I thought we were going to be fine.

Why didn’t the sponge ball come through at the bottom? Because the concrete in the boom never moved. The concrete that I had gotten in the street was all from the 22 stories of concrete in the riser pipe(It was a lot of concrete). Gravity had forced it all down the line.  The last position of the boom was completly horizontal. The worst possible position. We lost the boom. We were doomed. I couldn’t believe it. We were done, finished, game over. What a mess. I called and cancelled  the footing pour for the Hobbit House for Saturday. To say I was upset is an understatement…so were my wife and kids.

Saturday was spent taking the boom down to the street replacing all the lines and then reinstalling the boom. It took six hours. There were a couple of gliches during the day but we got it to work and everything seems to be OK. Here are some pictures.

Sending the placing boom into the street.
Sending the placing boom into the street.( Freedom Tower in the backround.)
Replacing the pipe on the boom.


Reinstalling the placing boom on the turret.
Reinstalling the placing boom on the turret.Johnny “Deck” signaling with Jeff the Hick assisting.

Well, we are ready to rock and roll for next weekend. Hopefully the weather will cooperate! (And my day job will go a little more smoothly!)  Enjoy your week!

Jim


Insulate the footings?…Why? Ask the Dwarves from the first age of Middle Earth.

Memorial Day weekend 2012: Saturday morning 3AM. It’s raining so hard I think the  skylight in my bathroom is going to implode. Here we go again,. Best laid plans of mice and men, right? I thought I was going to hit a homerun over here this weekend but I’m getting the feeling that’s not going to happen. I went back to bed. I actually fell back to sleep so Saturday wasn’t so bad after all. I did go over to the house late Saturday with my son Ethan. He cut some rebar up for the footings for about an hour while I did some miscellaneous stuff. It was productive.

The water was pouring into the site. The footing drain is working like a charm though. You would never know that it rained like over an inch here.

Water running down the hill and into the site.


Best part of Saturday: We all went to see “Star Trek:Into the Darkness”. It was great. Everyone in my family liked it. We all highly recommend it. You gotta love Spock.

I’m supposed to be building a Hobbit house. Ok, so Saturday was a bust. How did we do Sunday–> much better. I started the day insulating the footing forms. I’ve never insulated footings before so I wasn’t exactly sure how to approach it. I just put a general note on the drawings about insulating the footings. I thought that if I got a little too detailed it might get a little to confusing. Like I said, I didn’t even know how I was going to do it so why bother. Experience has taught me over the years that once you start, usually a good idea becomes apparent or somebody comes up with a good way of doing it. Why the heck are we insulating the footings to begin with? That’s a good question.

The dwarves of the first age began experimenting with footing insulation and eventually passed their knowledge of footing  form insulation on to the Hobbits. So that’s why I decided to do it. Pretty simple.

Behind door number three we find the real answer to this question. This is one of the main facets for passive house compliance. No thermal bridging. If the footings are not insulated they could create a huge thermal bridge into the house. The short version: This would allow the warmth of the building to pass through the footing and into the cooler soil during the winter months.  The same holds true for the slab. That will be insulated as well. What we are trying to create here is a huge thermos. Whatever is in the thermos be it hot or cold will have no egress to escape or be influenced by the temperature outside of the thermos. Another positive of footing insulation is it prevents condensation from forming on the walls. Just like a cold drink on a hot summer day water condenses on the outside surface of your glass where the cold glass and warm air meet. The same holds true for your basement. That’s one of the reasons why people have moisture issues in their basements.

So back to Sunday. How do I begin? The Hobbit house we are building is basically two long parallel walls that are supporting a concrete arch. So it’s important that the footings for these walls are insulated. This is where I began; keeping an eye on the thermal envelope of the structure is critical. Here is a picture of where I started. Notice the string line. That line represents the outside edge of the slab. I need to have my insulation on the outside of that line. (Just so you know I transferred the  batter board lines to the footings…it makes things easier). It’s hard to see from this angle but the line is right over the inside edge of the foam.

Main footing insulation.I used 3M 8067 flashing tape to hold the corners togther.

There really is so much to talk about and I know I’m going to leave something out. There are two different types of insulation that we are using right now. The insulation that is directly under the footings is 60 psi (pounds per square inch) extruded polystyrene or XPS insulation. This is critical because the weight of the house is going to be bearing on this insulation. If you put the 25 psi insulation in there it might crush which would lead to settlement issuses. 60 psi translates into 8640 pounds per square foot of footing. I own a Toyota Corolla. It weighs about 2700 pounds. So just for perspective you can park  three Toyota Corollas on every square foot of this footing and the insulation will not crush. Impressive…most impressive. (Say it the way Darth Vader said it in the Empire Strikes Back and you’ll get my meaning.) The other insulation is 25 psi XPS which I used on the sides of the footing. Here there is really no strucural  issue it is solely thermal.

Once I had the tricky parts done the hired help arrived and we went into production mode. Sides first then the bottoms.

Insulating the footing forms.

The next step (which I’m not sure was entirely necessary) was to tape the seams of the insulation. At the very least this keeps the individual pieces together and hopefully keeps moisture out if I complete the rest of it properly. I don’t know if any passive house people are out there but some feed back would be nice (and educational as well). It was pretty windy out on Sunday and boy is this tape sticky. Once Georgia and Terence got going though they motored through it.

Taping the seams.
Taping the seams.

Just a quick note on footings. I don’t know if you’ll be able to see this from the picture I took. The next picture is of a step in the footing. This occurs when there is an elevation change in the path of the footing. When I was digging the footing on the East side I hit solid rock. That footing is about 16 inches higher than the footing on the west side. To connect the footings I had to step it down from east to west. I’ll try and take a better picture later on.

Step in footing.
Step in footing.

When we lock up the footings prior to the pour this will be a critical location. This has blowout potential written all over it.  We will pour it a certain way when we make the pour.

Monday was my wonderful wife’s birthday. I did a small amount of work in the morning with Ethan and then spent the rest of the day with my lovely wife and family. Grilled for the first time for dinner. Burgers were excellent. Happy birthday Jo! …Love, Jim.


Footings Continued: Are these things the hallways?

Welcome back. I hope all the free folk of Middle Earth are doing well. It sure seems like a long time since my last post. At least for me it does. Last Sunday was Mother’s Day here in the United States and we had two birthdays as well last weekend. My son Jude on Friday and Terence on Monday. So it was quite busy here last weekend and I didn’t really have a lot of time to spend on writing a post.(It really does take me a long time) Oh yeah, I almost forgot,we also had my wife’s family over for Sunday brunch. About 16 of us altogether. I cooked the eggs and bacon. I thought two pounds of bacon would be more then enough. I was wrong. Three pounds would have been more like it. I could not believe how much bacon these damn kids ate. I bit my tongue and said nothing. I mean it’s Mother’s Day. I mean the last thing I need is that battleaxe of a mother in law of mine yelling at me for not letting the kids have what they want. And bacon isn’t cheap either! This post is really starting to spiral downward. So let’s get started shall we. (And actually get along really well with my mother in law, I just had to throw that in there to break chops a bit.)

Where were we.The last post showed the begining of the footing forms etc. For all intents and purposes last Saturday was just a continuation of the same thing. I worked  a full day last Saturday but boy what a miserable day it was. Overcast light rain on and off right from the start. I probably could have gotten more done if it was nicer out.Around 3:00 o’clock it started to rain pretty hard. When I heard thunder I knew it was time to wrap it up.

This weekend  I wanted to finish the footing forms.. I was up early and got a good start. I was pretty much done by 10:30. I had my daughter Georgia go to the rental store and pick up the flat plate tamper again. Why? Well as I was setting the footing forms I noticed that in a lot of spots I had to excavate some of the gravel to get the form to the correct elevation. This means we placed the gavel too high. So what we had to do is remove gravel in some spots and add it to others. Once that was done we raked it level and then had to retamp the whole thing.

Retamping the gravel after fine tuning the gravel bed.

 My daughter just returned from college this past week so it was her first day back at the site. She was pretty surprised at how much we had done since she was last here. One of the reasons I started this construction blog was to show people what building a house is really like. Most people just don’t know or understand how a house is built. So my daughter gets to the site and I had her and her brother wrap up the string lines I had up. She’s walking inside the formwork and says, “Wow this is so cool! So what are these things? Is this like where a hallway is going to go? ” Here’s a picture of where she was walking.

Is this a hallway?
Is this a hallway?

I don’t know if that was a location joke (You had to be there.)but I got a kick out of it. Even though I thought it was funny it gets back to people really not understanding how things are put together. There’s a lot of dirty work to do out there and somebody has to do it. This is one of the functions of this blog.

One of the things I spoke of in a previous post was the problem of bracing the forms to withstand the pressure of the concrete.We are going to be doing a number of different things but as I said before we want to make sure everything is secure so we avoid having a “blowout ” during the pour. Some of this “securing ” is going to seem like overkill but I want to sleep well the night before the pour so we are going to be extra careful.

I used D-stakes to brace the forms but I don’t have enough of them to brace everything I need to. I used #5 rebar instead of them in other areas and clinched two 16 penny double head nails around them. At the bottom of the form I put a block and wedge to make up the space difference where the plank didn’t extend to the ground. This is important because this is where the most pressure will be when we pour the concrete and the plywood will move outwards until it hits the stake. Here’s a picture.

Rebar stake used to support form. Nails haven't been clinched yet.
Rebar stake used to support form. Nails haven’t been clinched yet.Wedge has to be installed between block and rebar at bottom too.

Securing the top of the form is imortant as well. I’ve seen a number of forms bend outwards as the concrete was poured. We are not going to secure the top just yet. What we are going to do is set up for it now. Before we put in the insulation and the rebar we are going to place perforated banding wire on the bottom of the footing and leave enough overhang so we can loop it around the whole form. After we do all our work we will take this loop and tension it with what we call a banding machine and clip it tight. This is a picture of what it is going to look like when we use the tensioner.

Banding wire looped around footing form with tensioner pulling the wire tight.

Banding wire is really strong and great in tension. There are a couple of other areas we will use this later on.

Here’s a picture of the site at the end of the day Saturday.


Formwork 95% done!
Formwork 95% done!

Next weekend I’m hoping to install the insulation and get the rebar going! Have a great week!

Jim


Foundation Sub-base: Hobbit houses need lots of gravel. 93 tons to start.

I forgot all about my Hobbit calendar for April. April is the scene where Bilbo opens the door and the dwarves come falling into Bag End. Gandalf is behind them laughing. It’s an interesting picture architecturally. The door is much bigger than it needs to be for a Hobbit. I would say Bilbo is about half the size of the door, yet Gandalf is leaning over to see in through it. It’s interesting to me because my original doorway for this Hobbit house was basically a typical 6 foot 8 inch door, rounded over to make it look circular. (We’ll get into the door later this year I suppose if all goes well) But every time I looked at the drawing I could tell something was not quite right. So I oversized the door on paper and it really made quite a difference in the look of the front of the home. I think you are going to like it.

Well, if you are keeping score you will remember I had to make  some phone calls after my last post. I had really made a disaster of the site with the excavator I had rented. There’s just something about operating an excavator that is very compelling for me. I called Steve who owns an excavating company in town here. I tell him what happened and that I need some help. He calls me back when he’s at the site and asks me who made the mess. I confess and say I need him to bail me out. I wind up meeting him over at the site after dinner and he comes up with some great ideas. He fixes the site digs the rest of the foundation and makes a ramp so that when we put the soil on the Hobbit house a year from now we’ll be all ready to go. He  did it in like one day. It was unbelieveable. Here’s a picture of the excavation. It had rained the day before so it’s a bit flooded.

Site prepped and ready for subase.
Site prepped and ready for sub-base.

Saturday April 14 6:30 AM: I begin the dreaded ditch digging for the footing drain. For those of you who are not learned in the ways of footing drains I will explain. The footing drain is basically a 4 inch diameter perforated pipe that runs along the side of your typical house footing. The drain is installed usually after the footing is poured on the outside edge of the footing. Builder’s usually pour the foudation walls and after that install the footing drain and then put crushed stone or gravel over the drain. A good builder would then put filter fabric over the gravel. The fabric allows water to get through but not soil this prevents the drainage system from clogging.So what we have in place is a gravel bed that allows water to travel through the dirt and escape into this layer of gravel. The 4 inch diameter perforated coil pipe I used is a facilitator for the water. If there is a lot of water in the soil it will drain much faster going throgh the pipe than just through the gravel alone.

The key element of the footing drain system  is running the pipe to daylight. Which is the task I had to start with on Saturday. The key to this task is getting the right pitch for the drain to daylight. I set up the laser level. I take a reading  at the low point of the footing excavation which happens to be in  exactly the place I need it to be. I don’t know how that happened but it wasn’t by design. (I guess the gods of Hobbit housess were watching over me.) I figure I need about a 6 inch difference in elevation to make this work and I find my starting point.

6:45 AM. I get my digging tools: long handled shovel, pick, tree branch cutters (for roots), long pry bar (for rocks). It had rained the nite before and was kind of misting out when I started. I was soaking wet by 6:50. As my wife would say “I’m sweating like Paddy’s pig”.  They say the human body is made mostly of water, this body had significantly less water by the time I was finished. 452 roots later I reach my destination. Thankfully it wasn’t too rocky.

I had some 6 inch perforated coil pipe left over from the curtain drain so I wrapped this in filter fabric and set it in the trench shown here.

Perforated pipe wrapped in filter fabric in hand dug trench.

You can see in this picture how much water there is in the excavated area just from a little rain. I always liked watching water flow from stuff like this. I waited till my sons got there before I broke the dam. It took about 10-15 minutes for all the water to drain out. The pitch I made worked ot really well.

After the draining of the excavation I got into the real work of the day, the foundation sub-base. One of the issues the engineers brought up was differential settling of the two main support walls for the Hobbit house. One wall is sitting on solid rock the other is sitting on soil. What they wanted me to do was put down stabilization fabric before putting the gravel sub-base down. What this does is put a barrier between the gravel and soil so that the gravel does not separate and get mixed in with the soil.They use stabilization fabric for roadwork. You have to purchase it by the roll so I decided to put it down wherever I didn’t have rock. It really is such a good idea especially for a house like this where there is going to be heavy loading. It kind of makes everything act as one unit and will really help minimize settling. What we did was layout the fabric and then install the footing drain around the entire perimeter before adding the gravel. We wrapped the 4 inch coil pipe with filter fabric as well so it won’t silt up in the future. Here’s a picture.

Men of Bree installing footing drain and stabilization fabric.

During the week I had  Mike the local trucker bring over the washed gravel to the site. I originally figured I would need about 80 tons of material but I had him bring exta because I need it under the slab as well so it wouldn’t go to waste.He brought about 93 tons of stone…we didn’t have any left over. We used a Kubota skid steer to move the material.

Roughing in the subase with the skid steer.
Roughing in the sub-base with the skid steer.

The skid steer never stopped once we started.

What we had to do is work our way aroung the foundation with a rough gravel grade. Once we got all the way around we backed our to the begining with a finish grade. We did this using the laser level and a benchmark that I had set on the telephone pole where the electric meter was.


Laser level set to transfer elevations.

What is the benchmark? The finish floor elevation as per our drawings is 506 feet. The original house first floor elevation was at 504 feet. So our finished floor height will be 2 feet above the original floor. So before I chopped out the first floor slab I took the laser level and transfered the original floor height to the telephone pole and put a 16 penny nail there so I wouldn’t lose the spot. This is our benchmark. Our bottom of footing elevation is 502. The laser level spins so you can get a 360 degree reading around the level once it is set up. The laser level comes with a reciever that picks up it’s signal and tells you if you are high or low. Here are the young men of Bree using the laser level to get the final grade for the subase.

Men of Bree setting the final grade for the subase using the laser level. And some muscle.
Men of Bree setting the final grade for the sub-base using the laser level. And some muscle.The receiver for the laser level is attached to the wood on the right.

We really got a lot done in a day. The only thing left to do is tamp the subase with a flat plate tamper. Then we can begin the footings!

Before the “Men of Bree” got to the site I called and asked them to pick me up “Two eggs on a roll with bacon”. I want you to think about that for a moment  mull it over and think what did I mean by that statement? Next week I will explain what I actually got in the bag from the deli. I think you will find it a tad interesting. Till then enjoy your work week.

Jim


Building a Hobbit House: More than meets the eye or the eye of Sauron.

To the free folk of Middle Earth: Thank God the winter is almost over!

Hobbit shed in winter.

March is finally here and I can see the light at the end of the tunnel. I keep thinking of the time in Moria when Gandalf didn’t know which way to go. He restarted his journey with the Fellowship following his nose. The air seemed different in a certain direction. Sometimes during the winter months I get a little lost, if you will, but once March comes around I can see the light or smell the change of the new season coming. This particular winter wasn’t such a bad one for me though. But I digress.

I turned to a new page on my Hobbit calendar. It  is the classic one inside of Bag End looking out of the front door, I believe by John Howe. This picture was one they tried to replicate in the movie and is remarkable for its architectural beauty.

Hobbit houses are beautiful but the fascinating thing about them is what you don’t see. There is much more to a Hobbit house than meets the eye . The engineering that goes into it is significant and was much more of a challenge than I had anticipated. The passive house aspects of the design created a different set of challenges to the structure that I usually mulled over on my commute to my job in the city every day. I came up with some great ideas while heading to work. Lets just stick with the structure today.

The structure. The Hobbit house I will be making is essentially an arched highway overpass. I wanted to make the span 32 feet across and about 46 feet deep. Now instead of cars going over this bridge we have dirt and snow. These loads are substantial. Soil weighs in at about 109 pounds per square foot (psf),concrete is 150 psf and the snow load I used was 70psf. I wanted to use a 9 inch concrete slab. When you add the numbers up you are talking about a structure that has to support almost 300 psf. That equates to a vertical load of almost 440,000 pounds!  I don’t want to get too technical here but on a regular house the roof system is basically a triangle on top of two outside vertical walls.The vertical weight of the  roof and the snow load come down on the roof  and try to “flatten” it out,pushing the two outer walls away from each other. This force is resisted by the bottom chord of the triangle which are usually in the form of ceiling joists or collar ties. I did not want any collar ties in my Hobbit house. What I did was create a series of concrete buttress along the walls to resist the lateral force pushing the walls out. (You see buttresses on the outside walls of churches and cathedrals a lot) I  also made  the footings four feet wide to spread the vertical load on the soil. I wanted to keep the soil load under 3000 psf.

Here in New York you need a stamped set of drawings either by  a professional engineer or architect in order to get a building permit. So I took my set of design drawings that I had completed and brought them to an engineer. There aren’t a lot of engineers out there and there aren’t a lot of Hobbit houses out there either. Their proposal was twofold. One , analyze the structure and see if it is safe. If that all checks out: redraw my design drawings and make any necessary changes to meet code.

Sort of as a side note. In my head I was always thinking that this type of house would be something that would last forever. Did you notice the house I demoed in the last post. Six years after the owner’s passing the house was ready to fall apart. I wanted to over design my hobbit  house structurally so it would last 1000 years.  That is one of the reasons why I chose heavier than needed snow and soil loads.

So I met with the design team and went over what I was doing and what my thought process was and how I came up with the design. One of the things that I didn’t really figure on was that this was going to be “their” design. In other words if the structure fails they will be liable. Which kind of gets back to what I said before about over designing the structure.

A few weeks after this meeting I got a call from the engineer working on it saying I should come in and that he didn’t think the structure was workable in this form. My heart sank. According to his calculations the horizontal force pushing the walls outward could not be overcome by the buttressess I had penciled in. They also said that because of the site conditions (the house being next to a stream) they were worried about the soil condtions where the footings would go. They wanted to have soil borings done to make sure that the soil could withstand the snow and soil loads that would be placed on the footings.

If I remember correctly I think he said that horizontal force was on the order of 10,000 pounds per linear foot of wall. He wanted to put collar ties in or supports in the center of the building to mitigate the loading. But I didn’t like this at all.  We also tried larger buttresses but they were massive and complicated the building of the walls even further.

So the wheels started turning.I had to find another solution. I talked to my brother and he had a couple of good ideas. We are both civil engineers  but wound up getting into NYC  high rise concrete construction. Then an engineer who we know gave me the number of another engineer who he said is a concrete genius. I talked to the guys I had hired and they said  they would have no problem working with someone else to come up with a solution.

This guy was unbelieveable. He came up with a solution within a week and that is what we did. Thanks Nat T! What he came up with is a tapered slab. The slab would start at 9 inches and thicken to 16 inches over the walls.The walls would also thicken to 16 inches. Originally I had 10 inch concrete walls. The intersection of the walls and arched roof would be considered a rigid frame. The only other thing I had to add was horizontal rebar through a 6 inch concrete floor slab which would be tied to the walls. This is essentially the collar ties but you won’t see them. This design eliminated the buttresses  and will make building the footings and walls ten times easier. So the structure was really a collaborative effort and very satisfying.

By the time all this was said and done another almost 3 months had passed and it was nearly November!  So I took a pass on getting my building permit and decided to wait until spring to start. That’s where I am now.

I did have soil borings done. Here’s a picture of the rig they used to do them.


Soil boring rig getting test samples of the soil

The borings actually came back OK. The only problem was on one side of the house I had rock and the other was soil. The engineers were worried about  a difference in settlement between the two. In other words, where the footings sat on rock there would be almost zero settling over time and on the side where the footings sat on soil there might be an inch or two of settlement. This could ultimately cause cracking in the roof which we obviously don’t want. The solution, a six foot wide footing on the soil side. It’s a little extra concrete but that will let us sleep better at night.

I’ve had a number of people ask about building a Hobbit house. It’s not to be taken lightly. There are some serious forces at work here that are considerable and could be dangerous if not considered by someone who is not trained in this kind of work. Those forces can change significantly depending upon the span and support system you or your engineer choose. The one thing that I like about my design is that it is a completely open floor plan. When the structure is finished you will basically be left with one gigantic room with no intermediate supports.This enables you to arrange the rooms however you want.

There were a number of other items that were problematic during the course of design but most of them would be hard to describe without sitting down with paper and pencil. So for now lets just call it a day. L ike I said there’s more to Hobbit houses than meets the eye.

Enjoy your weekend and week!

Jim