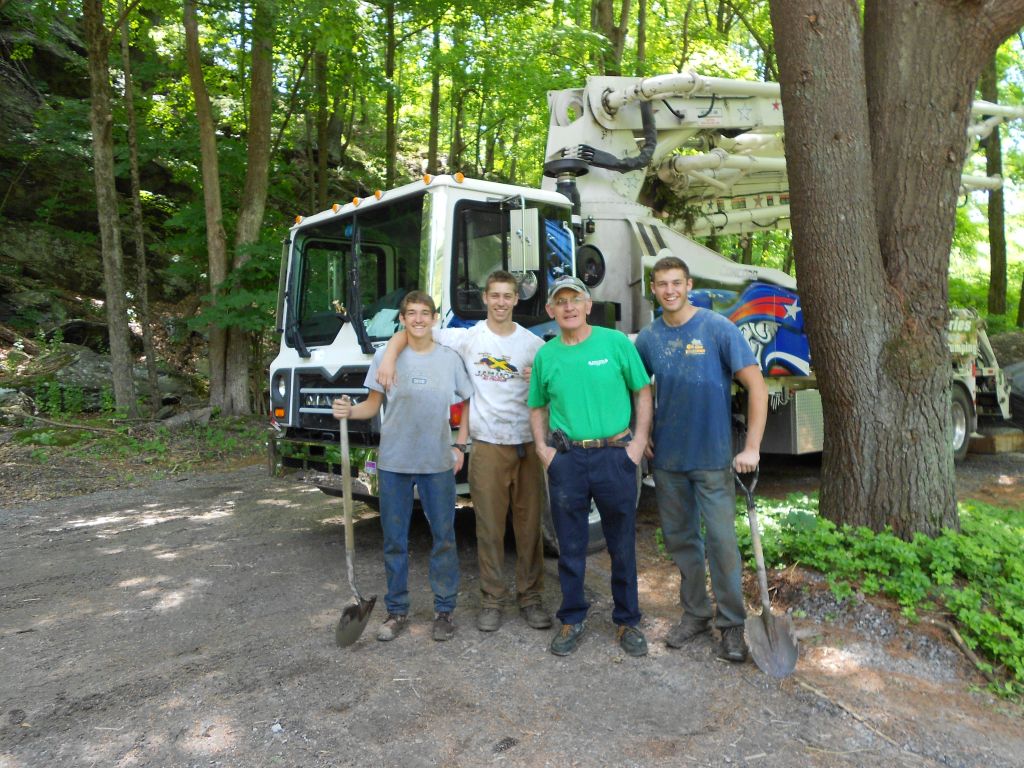
Yes,even a guy who is building a Hobbit house needs a vacation. I don’t know why but I keep thinking of an old Bugs Bunny cartoon where Elmer Fudd goes on vacation to get “west and wewaxsation.” Grand Cayman…what a place for west and wewaxsation. I think I took about fifty naps on the beach. It was great. Did a bit of scuba diving as well….that’s why some people call me Scuba Jim. We had a lot of laughs, too. I mean check out the veiw from our room.
Seven Mile Beach on Grand Cayman. Wow.
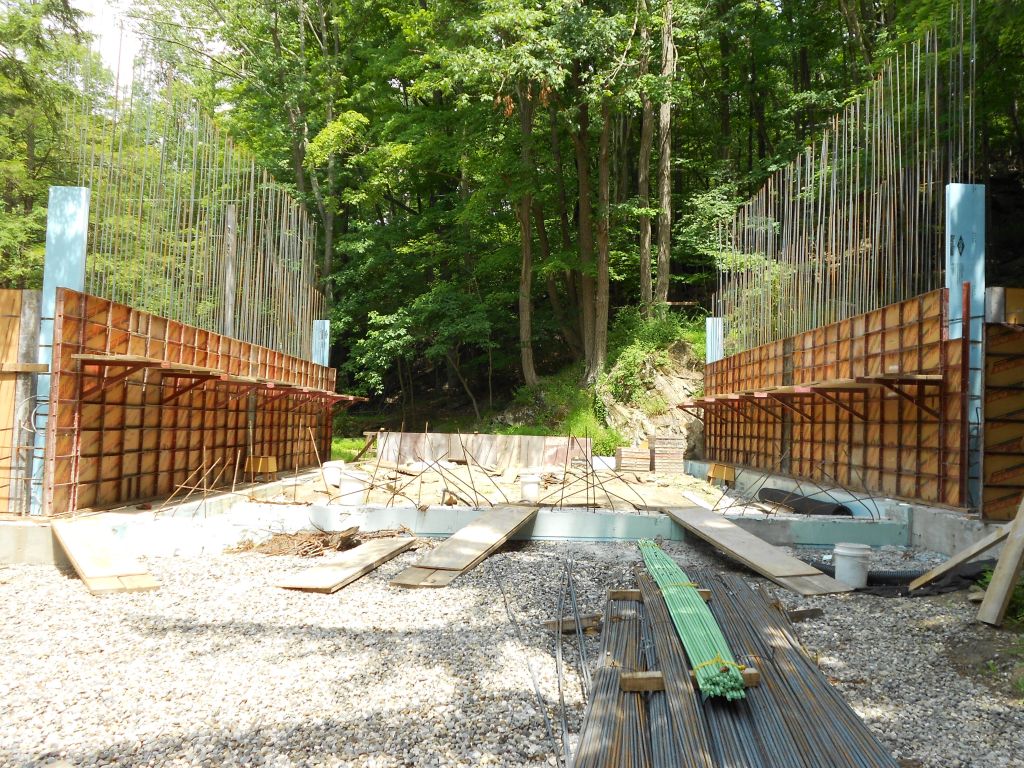
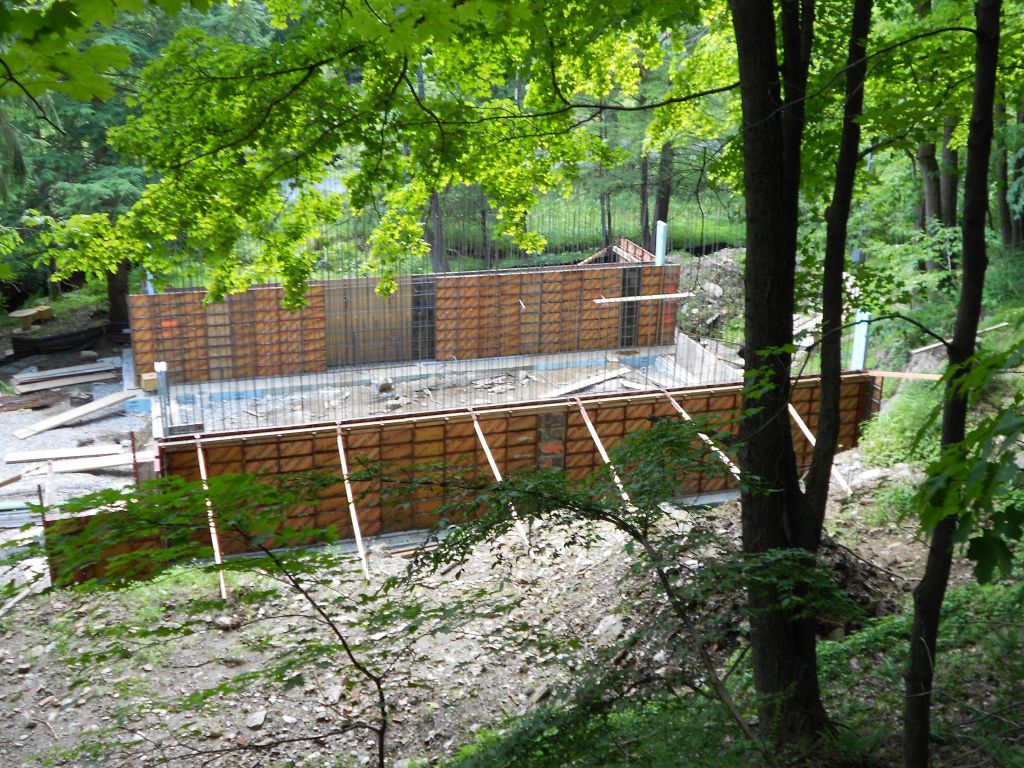
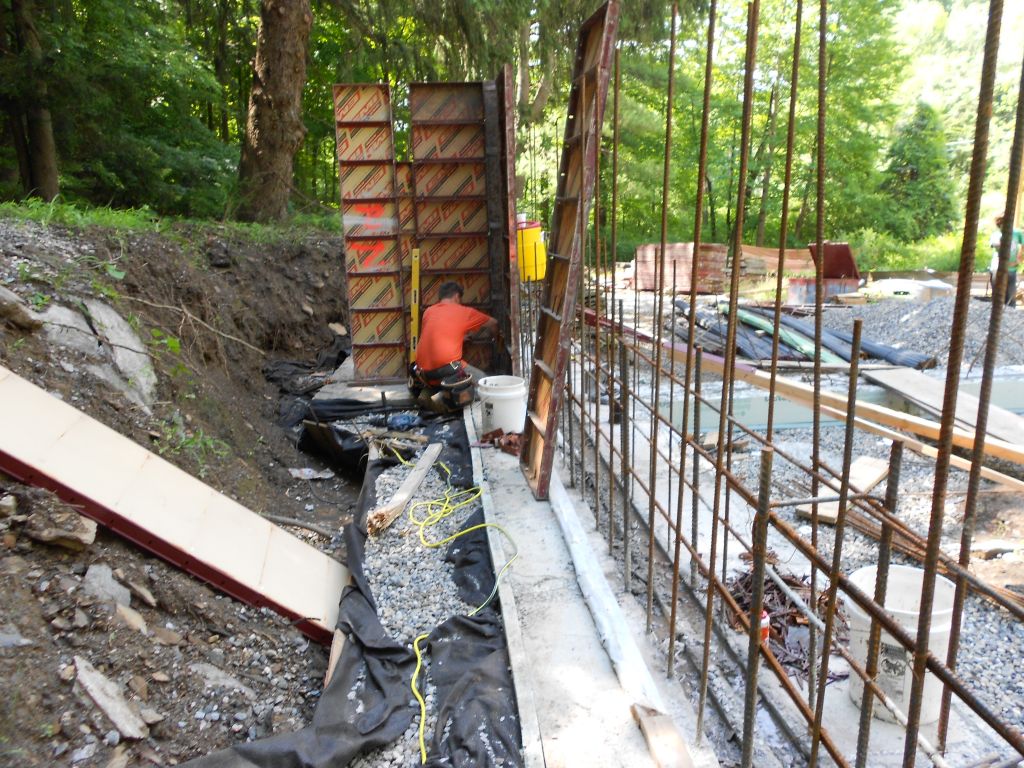
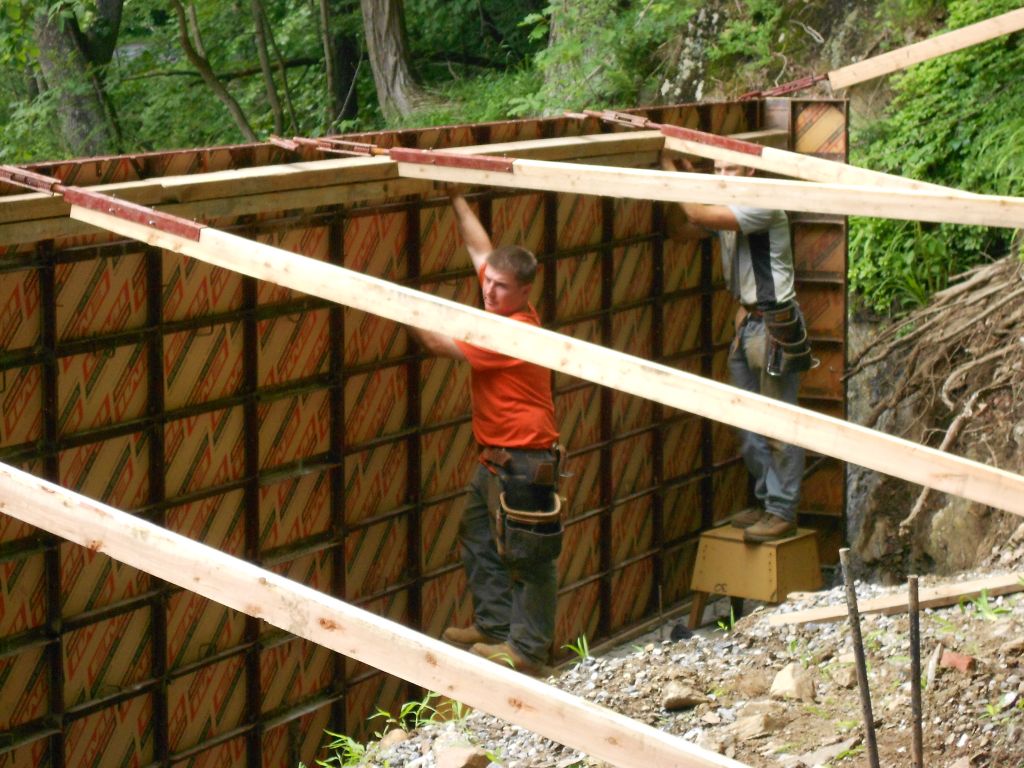
It was good to get away for a while. We got home late Saturday night around 10 PM so there is not much new to share with you. The crew did some miscellaneous form close up and installed the scaffold for the pour. Here’s a picture of how they finished up before we left for vacation.
East and West wall forms in place. Scaffold brackets with planking also in place.
One of the things I wanted to incorporate into the pour was some exterior outlets. I don’t know about you but most houses never seem to have an exterior outlet where you need one. So I wanted enough exterior outlets on the house so I would never have to drag extension cords all over the place. It’s a little hard to explain but the exterior GFI outlets will be in the four outside corners of the house where there will be exposed concrete. These outlets are going to be outside the thermal envelope of the structure. I don’t know if you remember the poly coated BX electrical cable I put in the footing pour, but I set that in place so that there would be no air sealing issues with the exterior electric. Keep in mind Hobbit houses are Passive houses so the devil is in some of these small details that are in general taken for granted.
This electrican foreman ,Tony, on the job I was on set me up with connecting all of this together. It worked really well. I’ll show you with a few pictures.
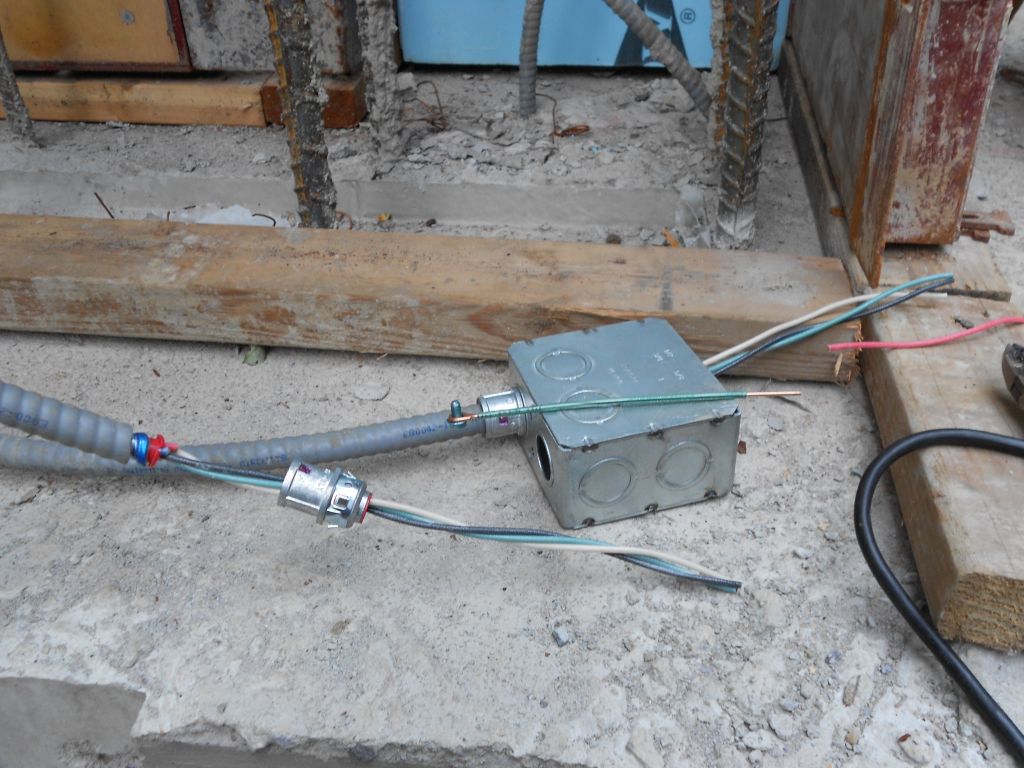
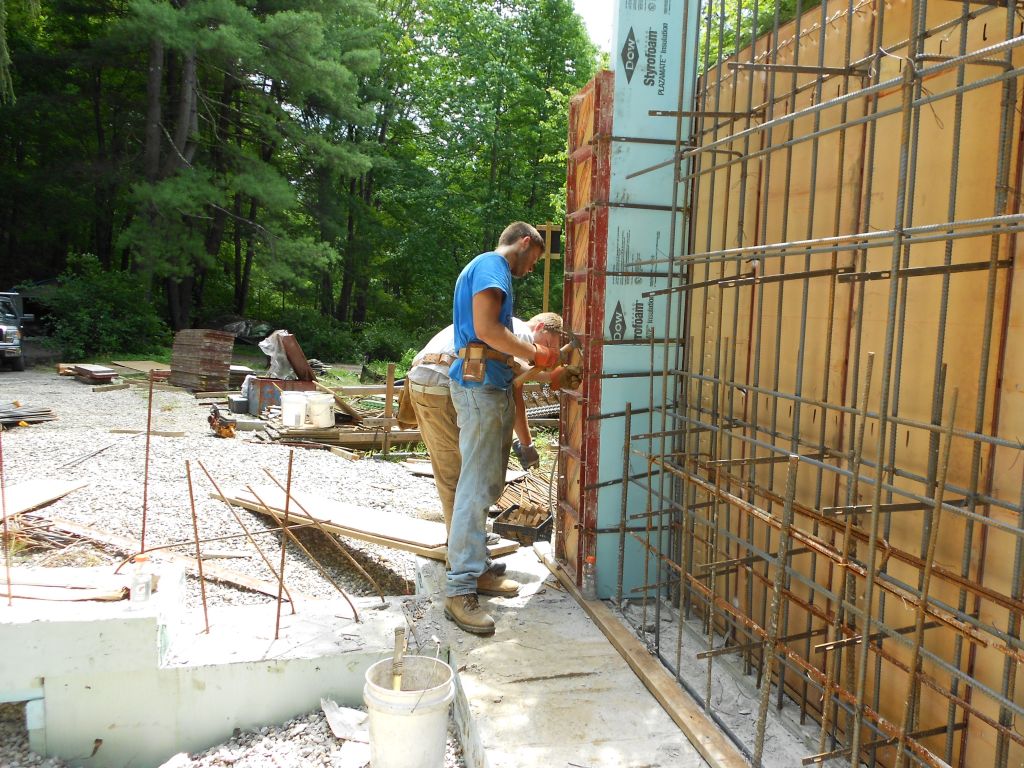
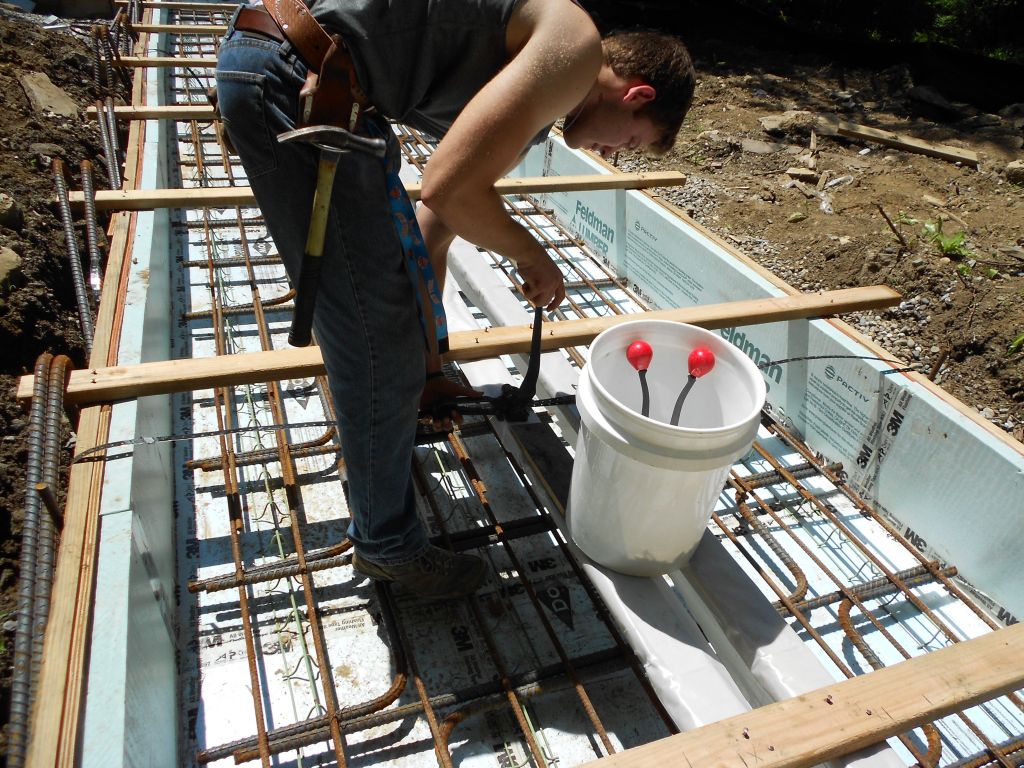
Wiring the exterior electrical box.
This shows the box for the exterior outlet being wired. Tony gave me these special snap on connectors you push onto the end of the cable.Once they’re on the connector just snaps into the box and you are good to go. Don’t forget the red bushing on the left. It helps insulate the wires from any sharp edges the metallic BX sheathing might have. Tony said I didn’t need it but I also added a ground wire to each box, too.(The green wire on top of the box with the screw attached to it.) You just screw that into the inside of the box. You can also see the two wires coming out of the footing. They’re both on the outside of the blue insulation which is the thermal envelope barrier.
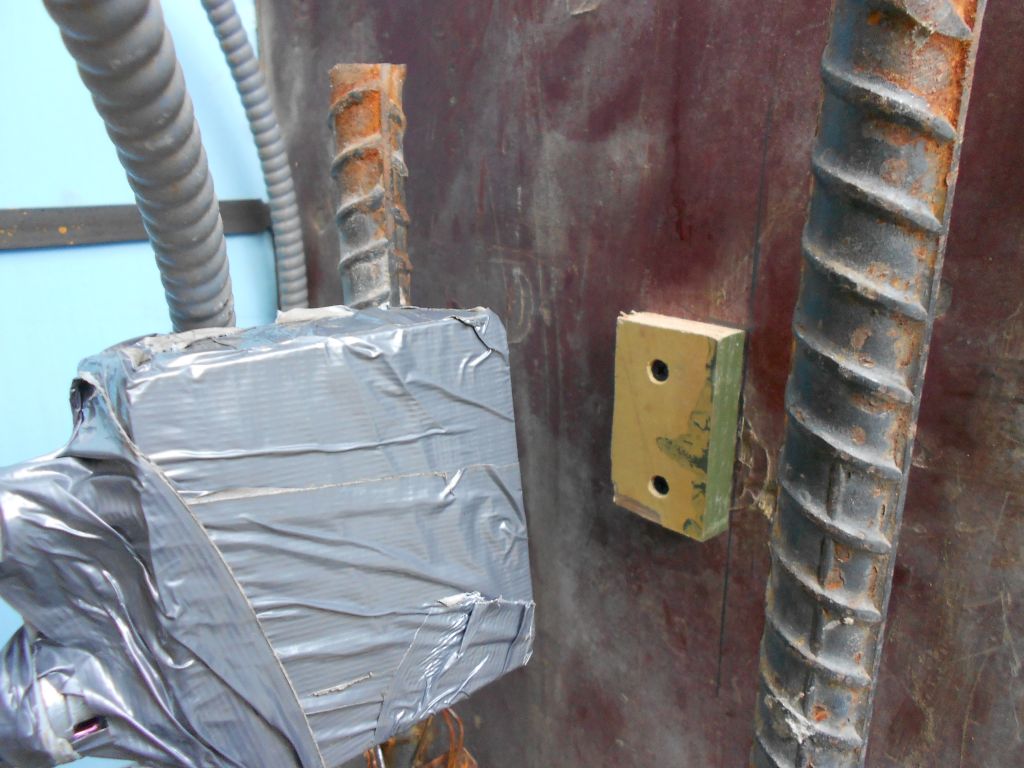
Little block of wood to hold the box in the right place.
This is how I attached the box where I wanted it. Just cut a piece of plywood a little smaller than the box opening. Figure out the elevation you want the box at and screw it in place. Tony told me to wrap the box in duct tape so concrete doesn’t get in there when you pour. I think I went a little overboard with the duct tape.
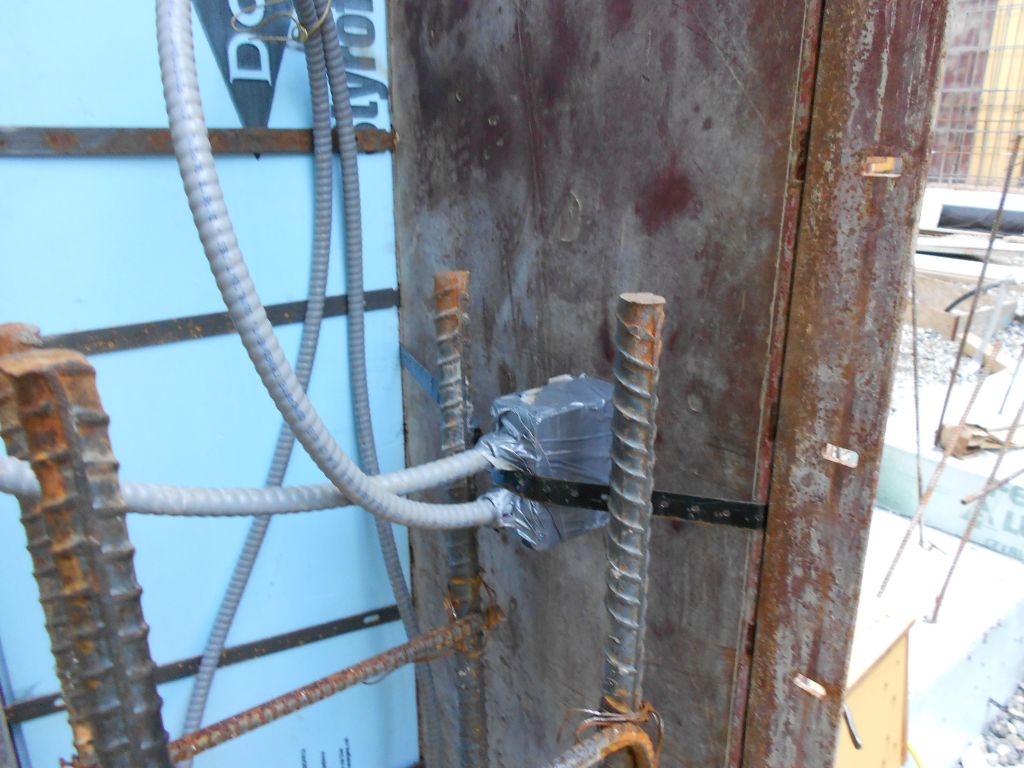
Box secured with banding wire.
Ah yes our old friend banding wire sure comes in handy doesn’t he? Once I tensioned this banding wire around the box and the wall form an elephant couldn’t move it.
It took me about two hours to do these boxes by the time I set up and put everything away. It is amazing how long the little stuff takes some times.
Well that’s all for now. There is a lot of little stuff that needs to get done next weekend. I’m hoping to pour the walls by August 10th if all goes well.
One last picture from Cayman:
Green tree iguana that ate my mother in law while on vacation.
It’s funny how you see something and then your mind goes off on some sort of tangential shift. I have a chain across the bridge at Hobbit Hollow so I have to get out of the truck to undo the lock to get over the bridge. When I got out of the truck I noticed a tiger lily. Which I have never noticed before at the site.When I left later on I kind of noticed that there seems to be an extraordinary number of tiger lilys in our town this year. I don’t know if it’s all the rain we’ve had or what? Maybe something happened last year? I don’t know but this flower was really beautiful and it got me to thinking of gardening and our old friend Samwise Gamgee from the Hobbit. We’re definitely going to need a gardener. Sometimes you really do have to stop and smell the lilys.Here’s a picture of the flower.
Tiger Lily next to the stream at Hobbit Hollow.
Oh yes where was I. So much to tell you about and so little time.
During the week I had the crew take care of a few things and prep the sight for the wall steel installation. We finished putting in the wall ties fixed some of the pins and did a few miscellaneous chores. I didn’t get a picture of it but some of the pins for the Symmons forms have to go in a certain way. Once the concrete gets poured the form ties go into tension and the pins tighten up. If the corner pins aren’t put in in a way that you can hit them out they are very hard to get out. The frustration factor can be substantial especially on a hot day.
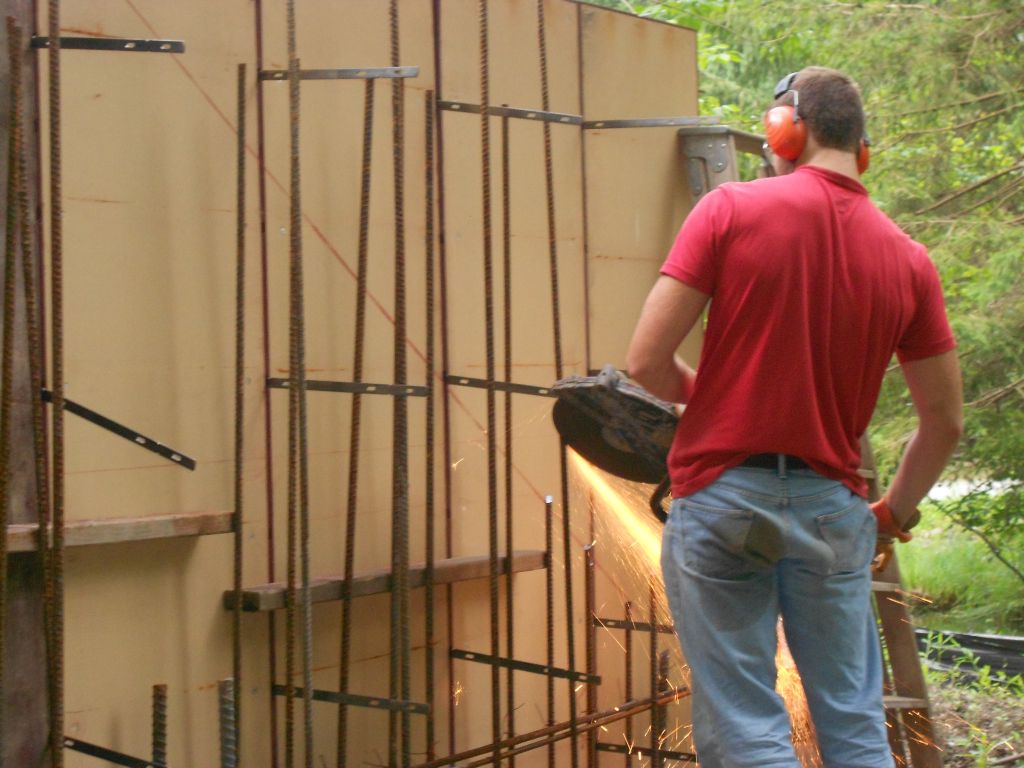
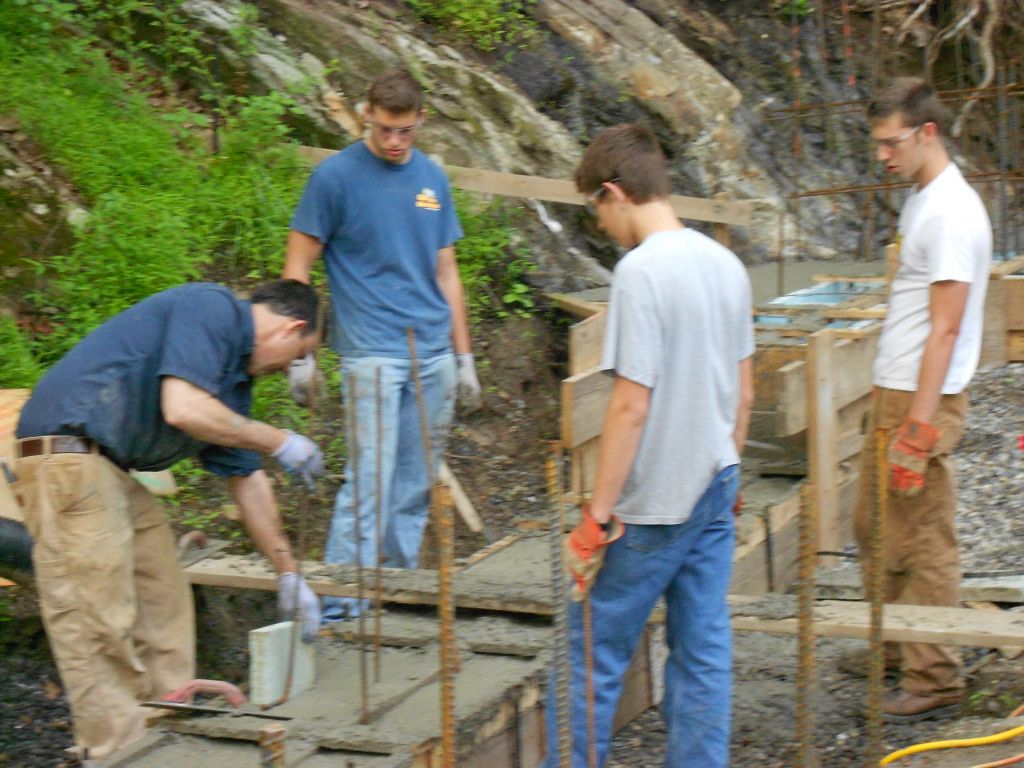
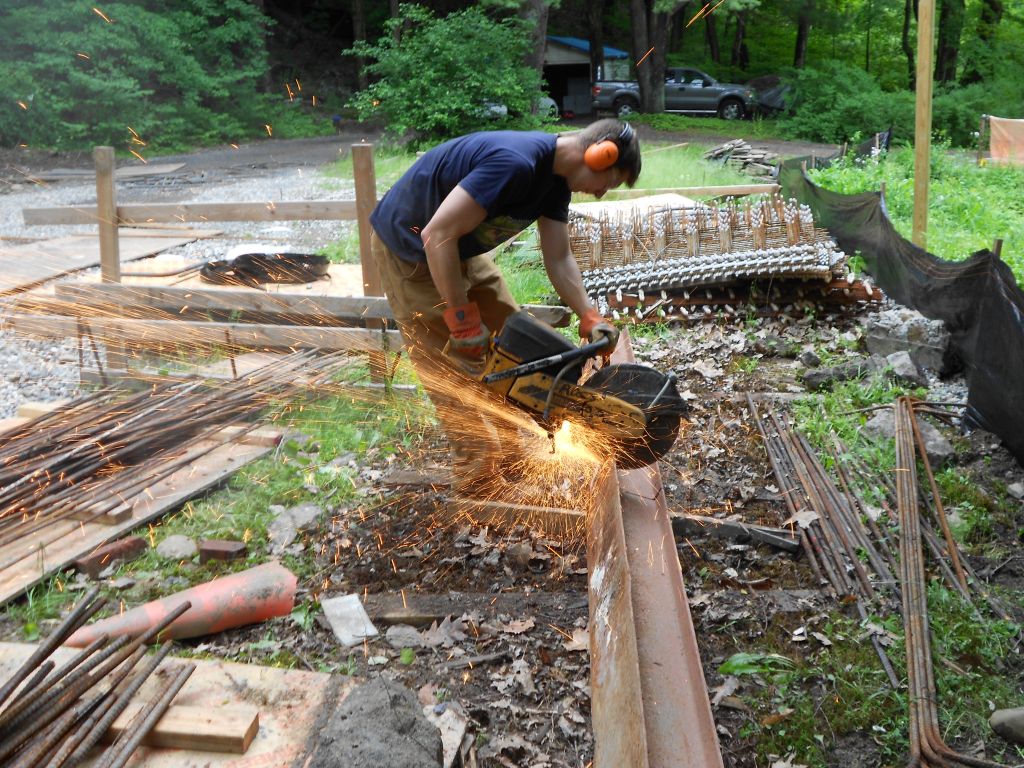
We came in on July 4th because I had the day off and we worked from 8 till noon. One of the main things I wanted to accomplish was to set the grade and slope of the retaining walls on the sides of the hobbit house. It’s a little tricky because you kind of have to visualize how you want the house to look when it’s completed. Where you want pathways to be,where a stone retaining wall might work well and so on. I hope I got it right. After I snapped the grade in I had Jude cut back the rebar so the rebar will be below the final grade. It’s actually pretty hard to do what he did.Here’s a picture. You can see the final grade snapped on the wall if you look close.
Jude cutting back the rebar at the retaining wall.
When you cut rebar at an angle like Jude is doing it gives the rebar a super sharp edge which is extremely dangerous. I’ve seen some really bad cuts from rebar that has been cut like this. I’m not sure but it looks like Jude’s ass is wet.
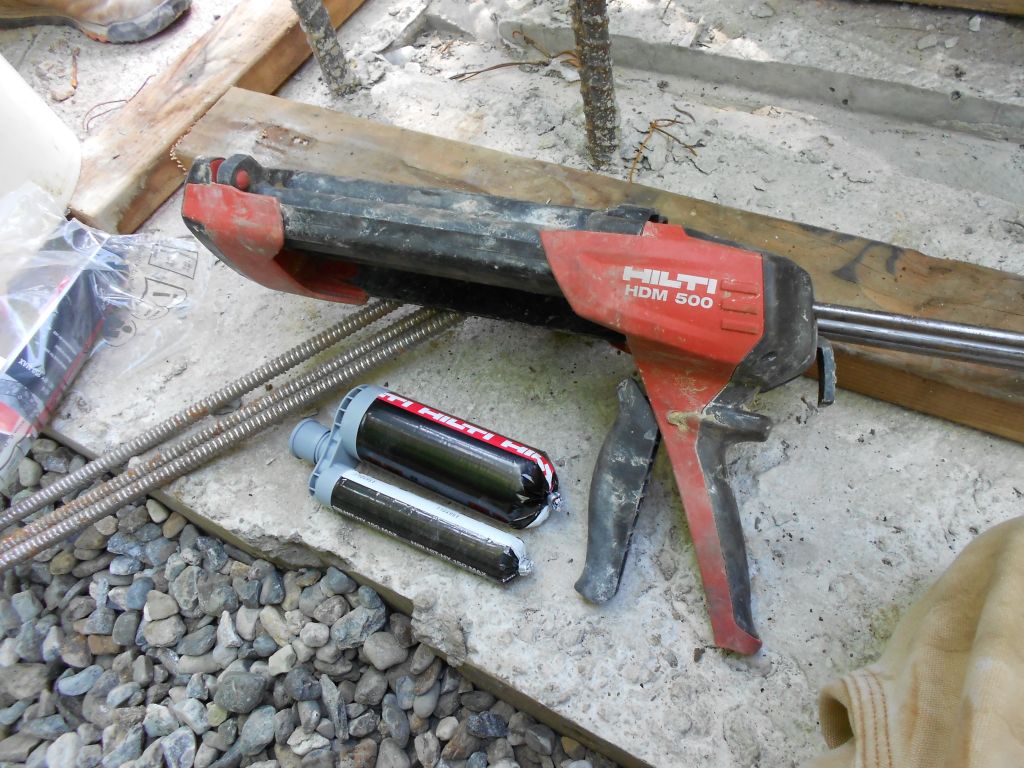
Another item I wanted to show you is some of the equipment and material we use to add in additional rebar in spots where we might have missed it.
Tube of Hilti HY 150 two part epoxy and a epoxy dispenser.
Once you drill a hole into either the concrete or rock you blow or vacuum the dust out of the hole and you use this epoxy to glue the rebar in place. Very convienient if you’ve left rebar out or the inspector decides he doesn’t like what he sees.
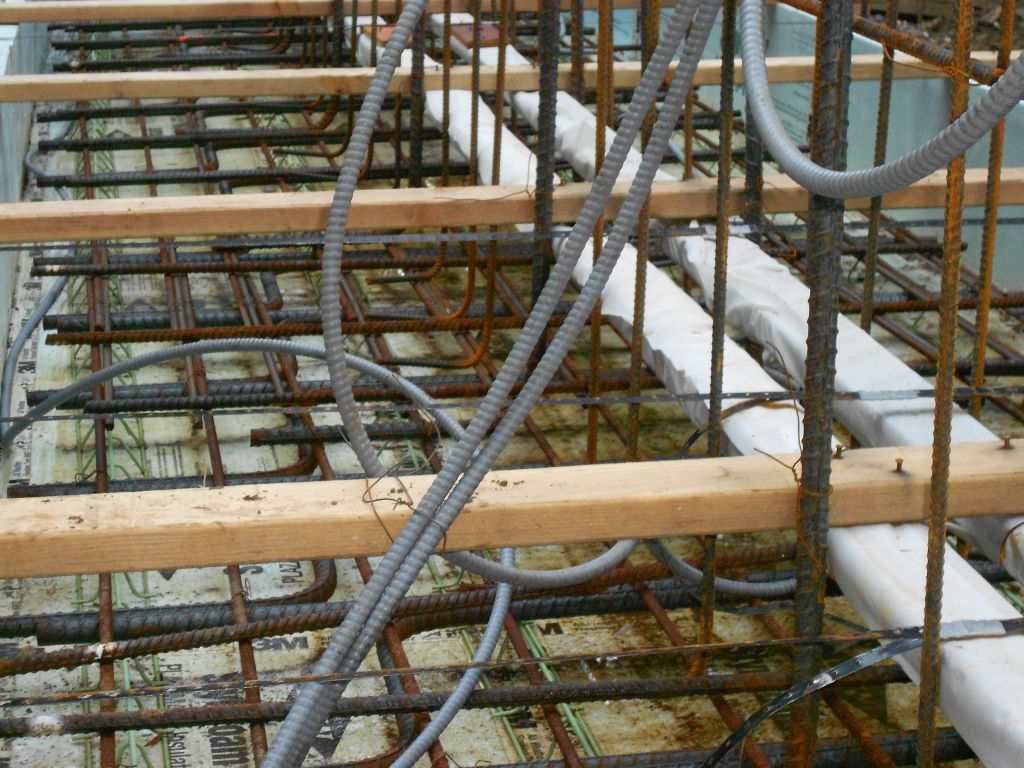
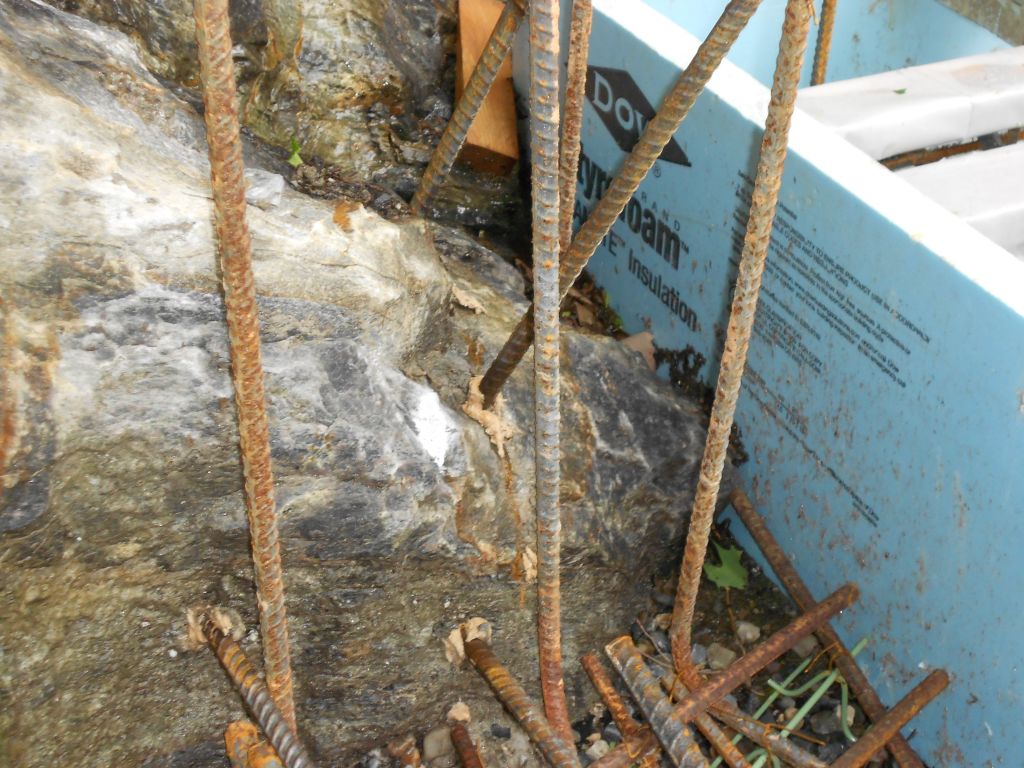
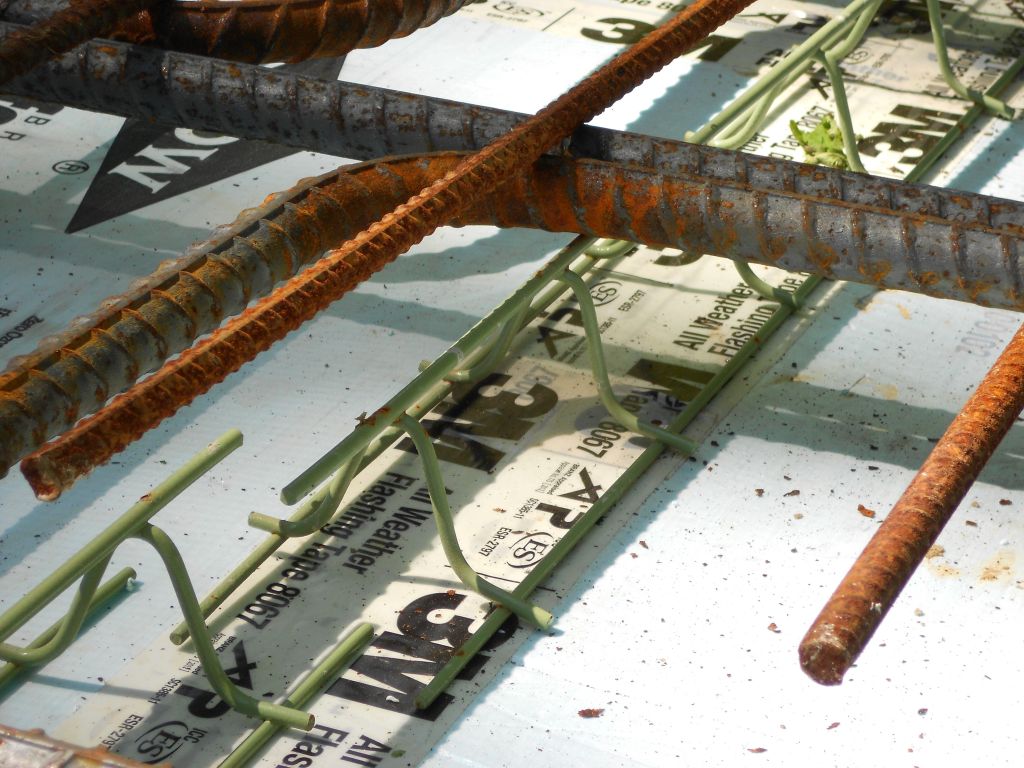
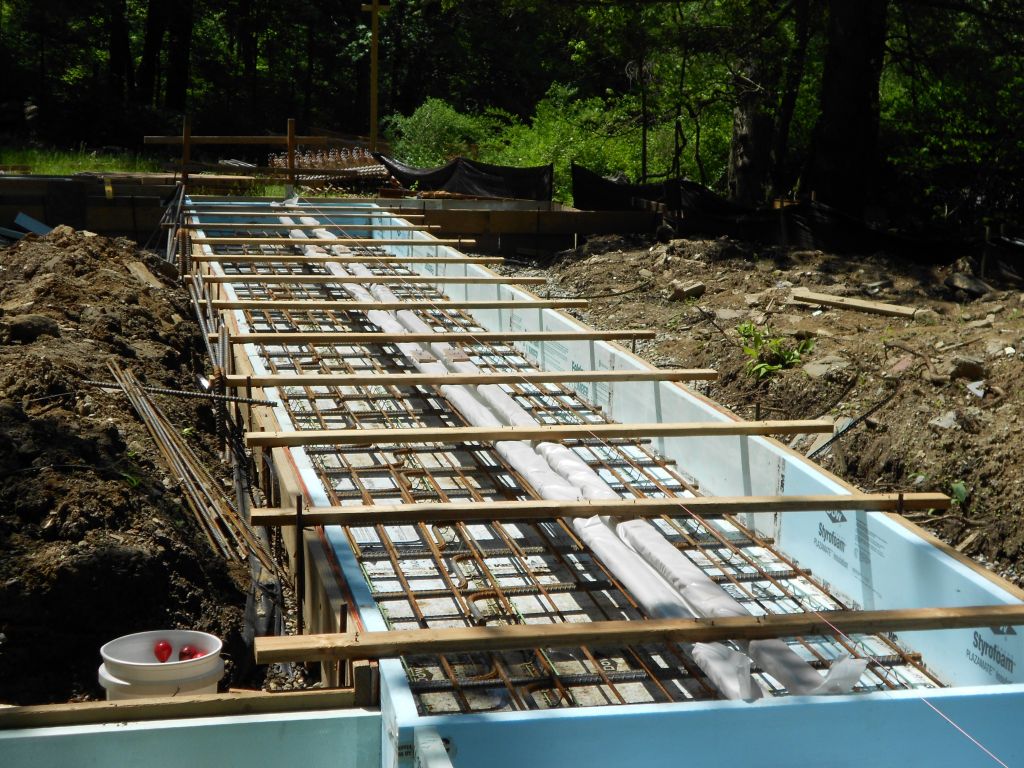
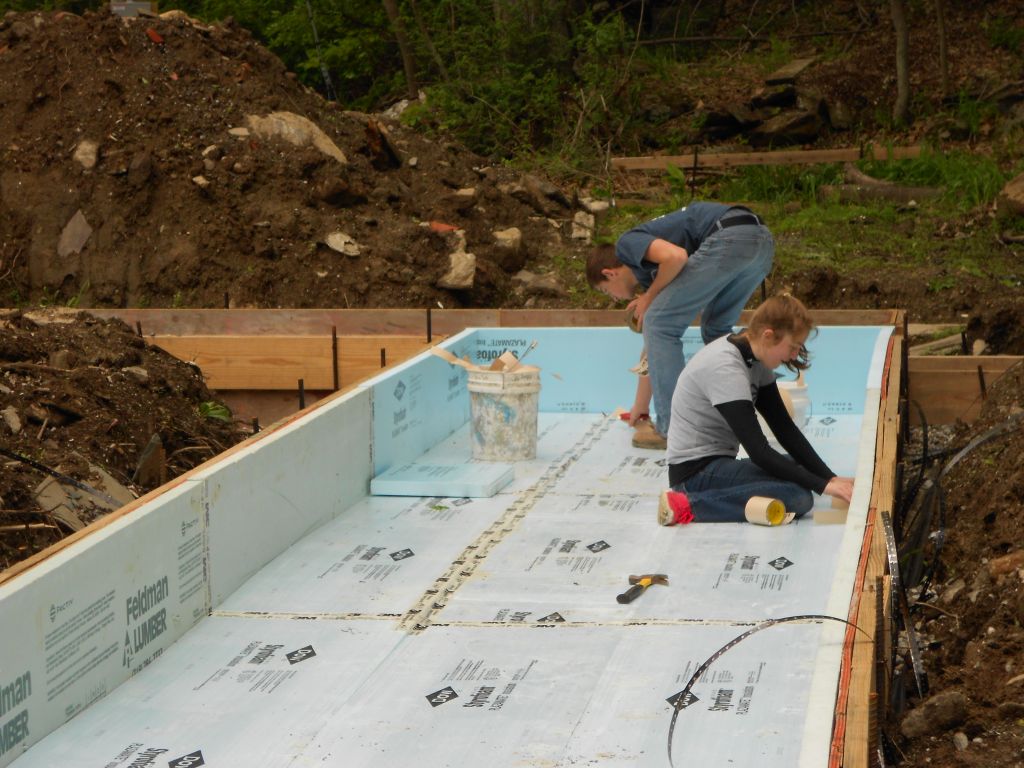
I hope you haven’t forgotten that a Hobbit house is a passive house,right? So one of the elements that is critical in a passive house is there cannot be any thermal bridges in the exterior envelope of the house. So what you see in the next picture is the thermal barrier installed at the exterior face of the building. What this does is prevent the exterior concrete that will be exposed to the weather and the hot and cold cycles to pass its temperature into the concrete on the other side. Check it out.
Insulation creating a thermal break in the wall assembly.
I’m sure you’re wondering why the insulation is way higher then the forms,right? I’m not going to tell you. I’ve changed my mind. It will have to wait for another post .You’ll understand it better with an accompanying picture that I have yet to take. A picture is worth a thousand words right? And I type slow so it means a lot to me. You can’t see it here but this insulation is directly over the thermal break insulation that I installed in the footing. This is super important for the passive house aspect of this house. Did you see the tree branches on the ground there? The pump truck broke them off during the footing pour. I can’t believe that is where I put them. I don’t know what I was thinking.
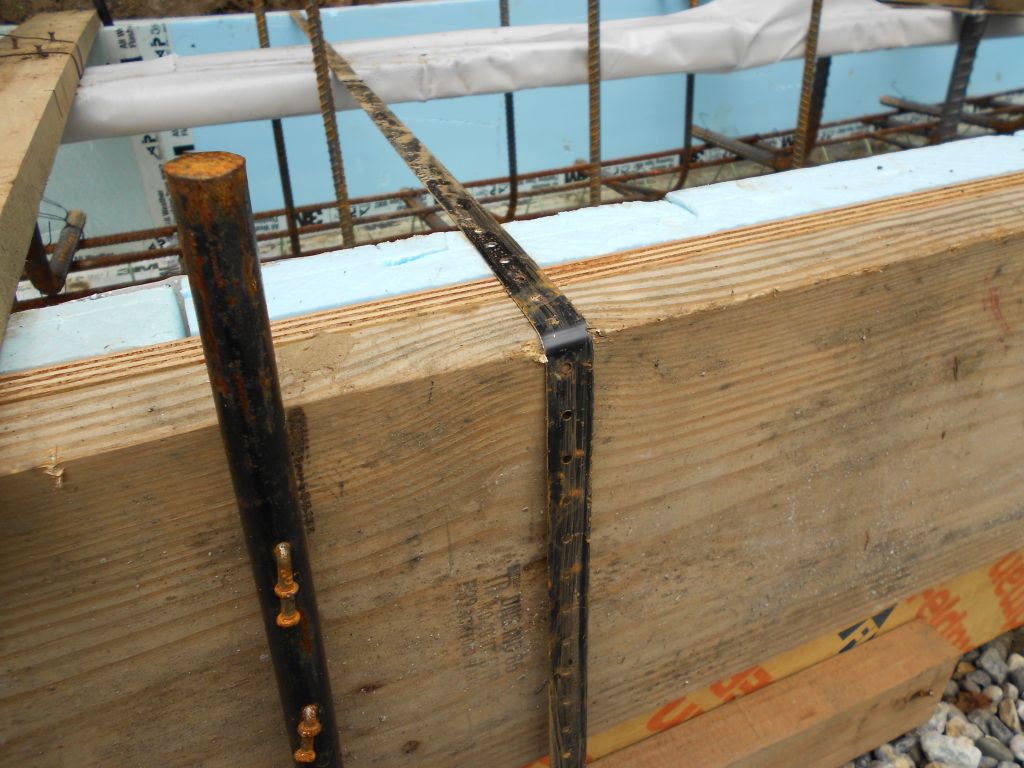
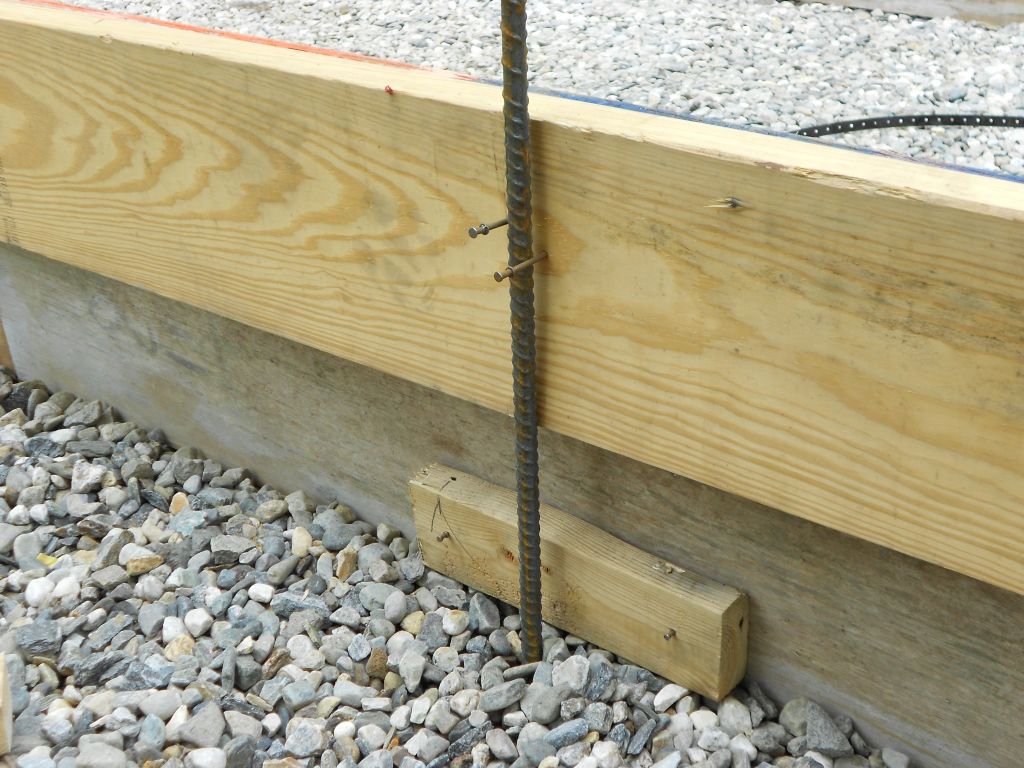
Remember the shear key? It was the 2×4 I had wrapped in plastic in the footing pour. The shear key helps “Lock” the wall concrete to the footing concrete. Maybe this picture will help you understand what it does. I had wrapped 90% of the 2×4 shear keys in plastic. I kind of rushed at the end with the last couple. I wished I hadn’t, the ones I didn’t wrap with plastic had to get chopped out with a chopping gun. An ounce of prevention is worth a pound of cure,right.
Shear key with 2×4 stripped out of the footing.
So lets get into Saturday!
I had a friend of mine from work who is a wire lather come up to help me tie the rebar in the walls. His name is Leary and he is originally from Jamaica. He owns some property down there and says he’s going to build a place on it someday so he can retire there. Sounds like a plan. I told him I’d give him a hand. Now that’s what I call a working vacation. Anyway wire lathers place and tie the rebar on reinforced concrete jobs and Leary is an ace. I got there early,around 5:30AM and started to get a few things set up so we could go right to work when he got there. He’s from Long Island and had a pretty long drive up to the site. I really appreciated him coming up to help. We got so much done it was unbelievable.
Anyway, I showed him what I was thinking as far as setting up for the rebar and what I had set up wasn’t going to work so well so we decided to change it. I was thinking we would use the beam chairs shown in the picture below to tie the steel to but Leary said that the nails will pull out once we start tying the steel to it. He was right so we tied a set up bar right to the form tie and tied the verticals right to the setup bar. Here’s the picture.
Set up bars for the vertical wall steel.
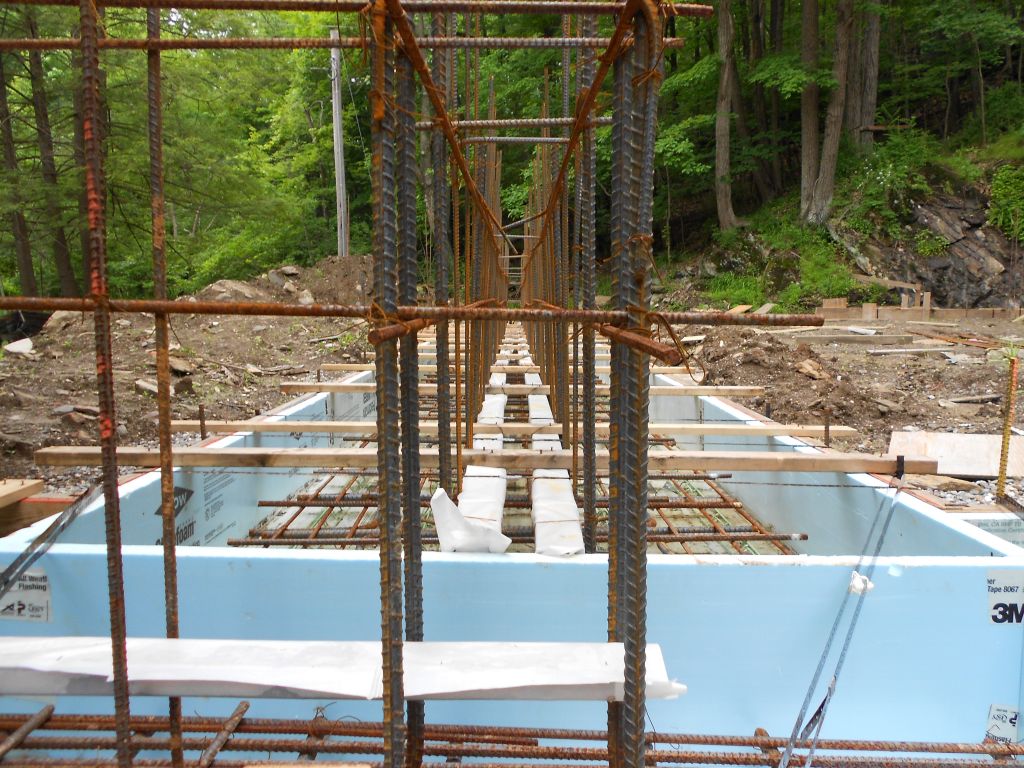
Once we had that set up we began the vertical rebar installation on the back face of the wall. It was a three man team.One guy walking the steel in, two guys placing it, and then one guy holding it steady as Leary tied it. Now these are twenty foot number five bars at 6 inches on center so it was a pretty serious endeavor. Once everyone got a hang of the system it ran like clock work and they started to motor. ..or Rock and Roll as we say in the States….I think they say it’s Irie in Jamaica. Here’s a picture of Leary,Jude and RJ doing there thing. Yeah mon!
Installation of the back faced verticals.Jude Leary and RJ.Passing the rebar up to get it into position.
So while these guys were doing that I was setting up the other wall for them. There were over 200 bars for them to install so I had a little time.Once I had finished that I started the interior vertical layout which consists of #5 rebar fourteen foot long at 12 inches on center.We used a U-bar to hold the correct spacing on the bars which worked out great.(Sorry I forgot to take a picture) Leary showed me how to set it up. Once we had a couple of set ups done we “snaked” in the horizontal bars and tied them in place. The horizontal bars were #5’s at 18 inches on center. It was a lot more work than I thought it would be. But once I had the first twenty feet done I started to put in the 14 footers which went in pretty quickly.
Once I had about 10 feet of verticals in I had Kevin and Ethan start closing up the wall forms. It takes a little getting used to but once you get the hang of it it’s a snap.If you look closely you can see the setup u-bar we used to set up the outside face of the wall. Upper left corner.
Wall rebar complete in this section and begining to close up forms.
Those things haging off the wall are called scaffold brackets. Once all the forms are up you place planking across them so you can pour the concrete from a comfortable position. Of course I cracked my head into one of these while I was walking by and man did it hurt. I thought I might have gotten cut. Luckily I didn’t.
Once Leary was done with the heavy verticals he started working on the East wall setup bars and horizontals. This freed up Jude so I put him and Ethan on wall panel close up and had Rj and Kevin did some miscellaneous Symmons forms stuff.
Jude and Ethan working on the West wall.
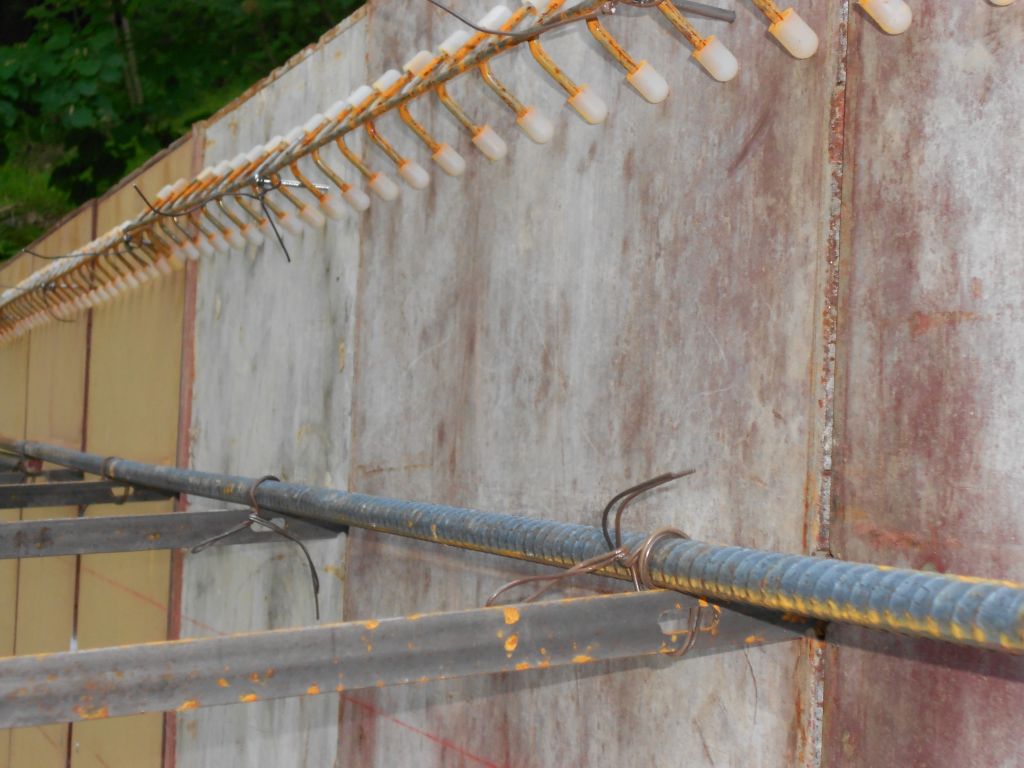
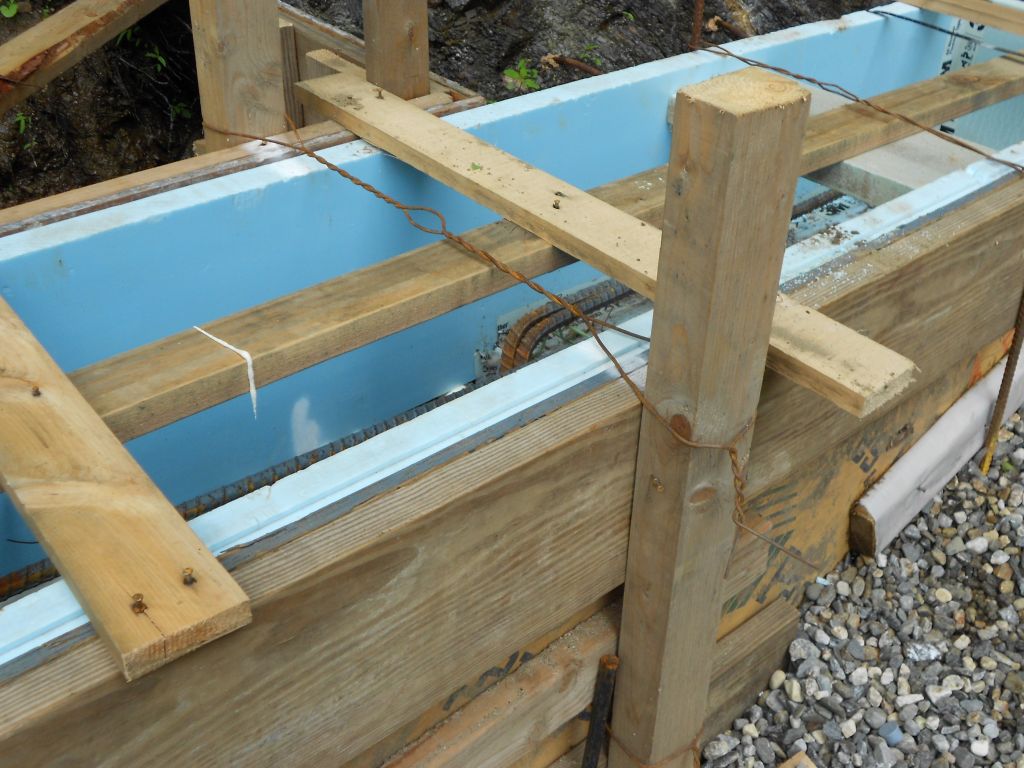
A couple of things are important here. One is that the corner form is plumb. If it isn’t you use a nail or a Symmons form pin underneath the bottom corner of the form to plumb it up. The other thing in this particular picture is the extra ties we added at the insulation. What we don’t want to have happen is the insulation to move or snap when the concrete starts to push against it. You try to pour the concrete evenly on both sides of the insulation when you do pour but it isn’t always that easy. I’m also going to add another tie 6 inches from the bottom here. That’s where the pressure will be the greatest.
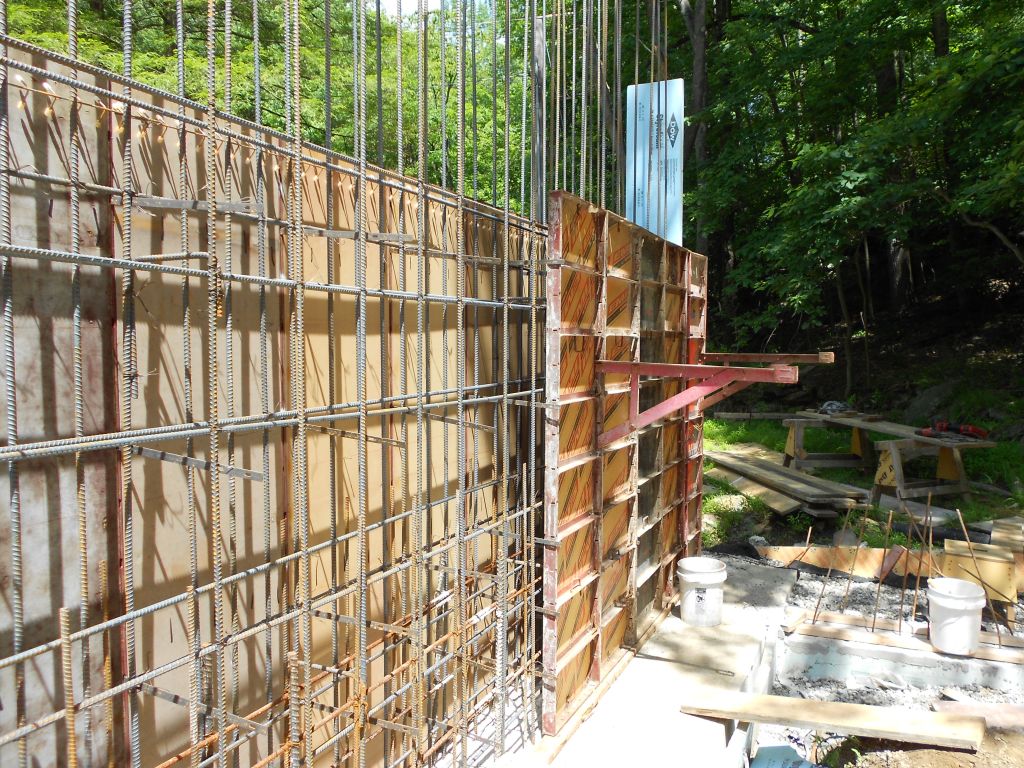
Here’s a couple of more pictures taken at the end of the day Saturday.
East wall steel installed and corner close up started.
Impressive…..Most impressive.
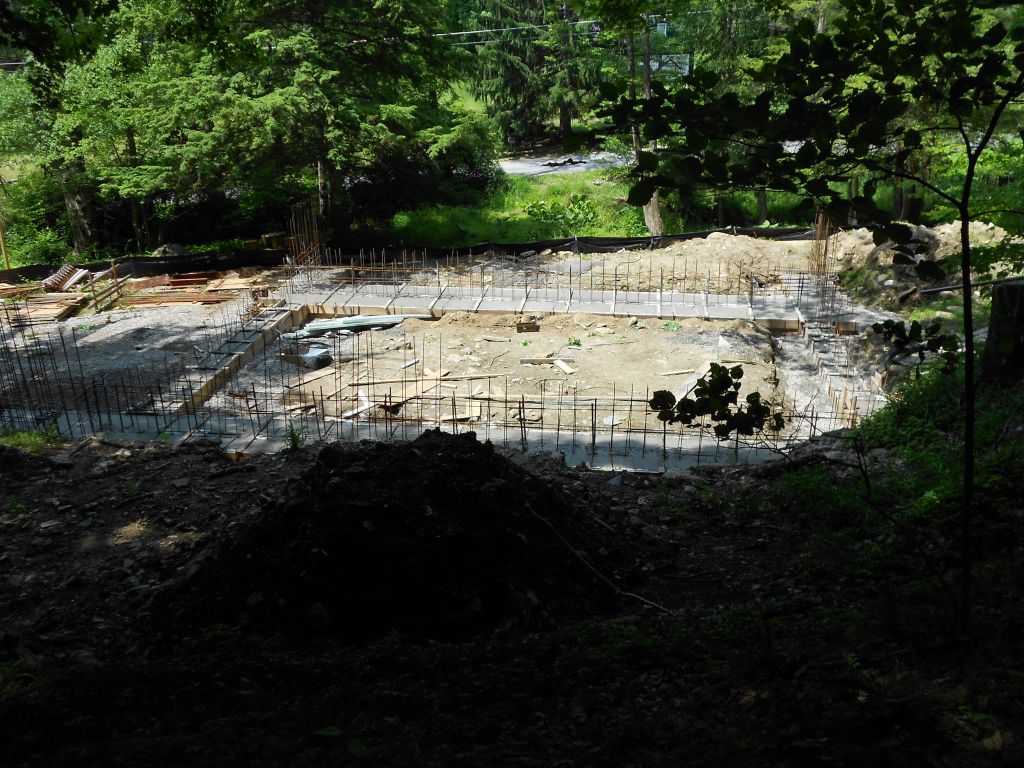
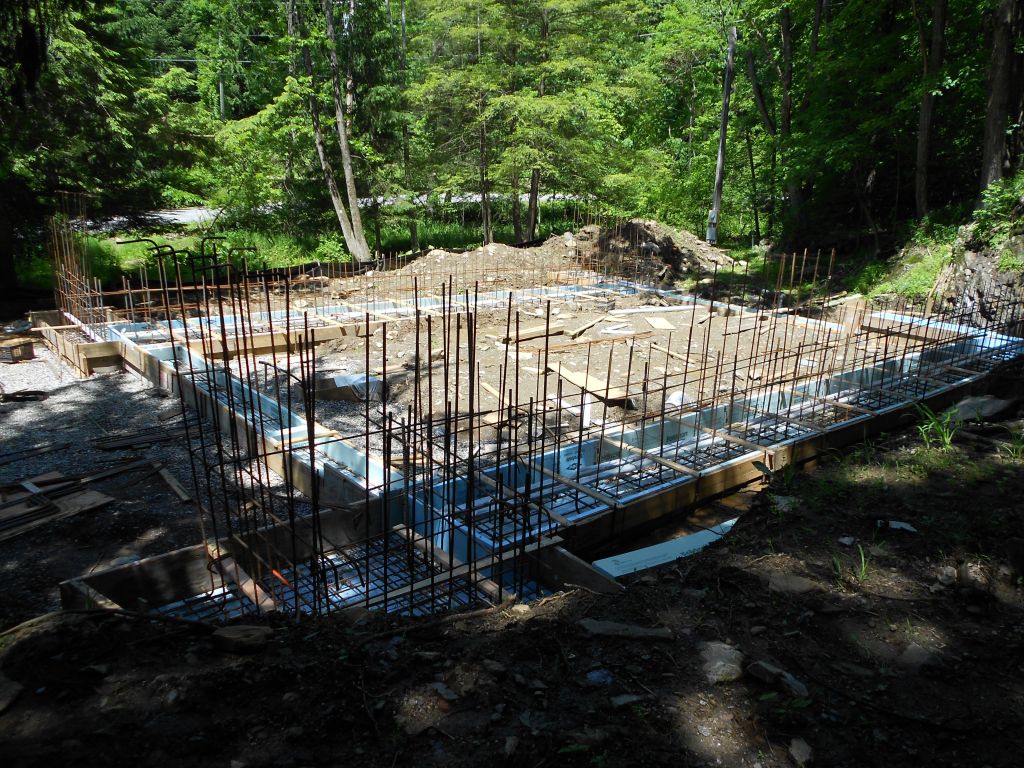
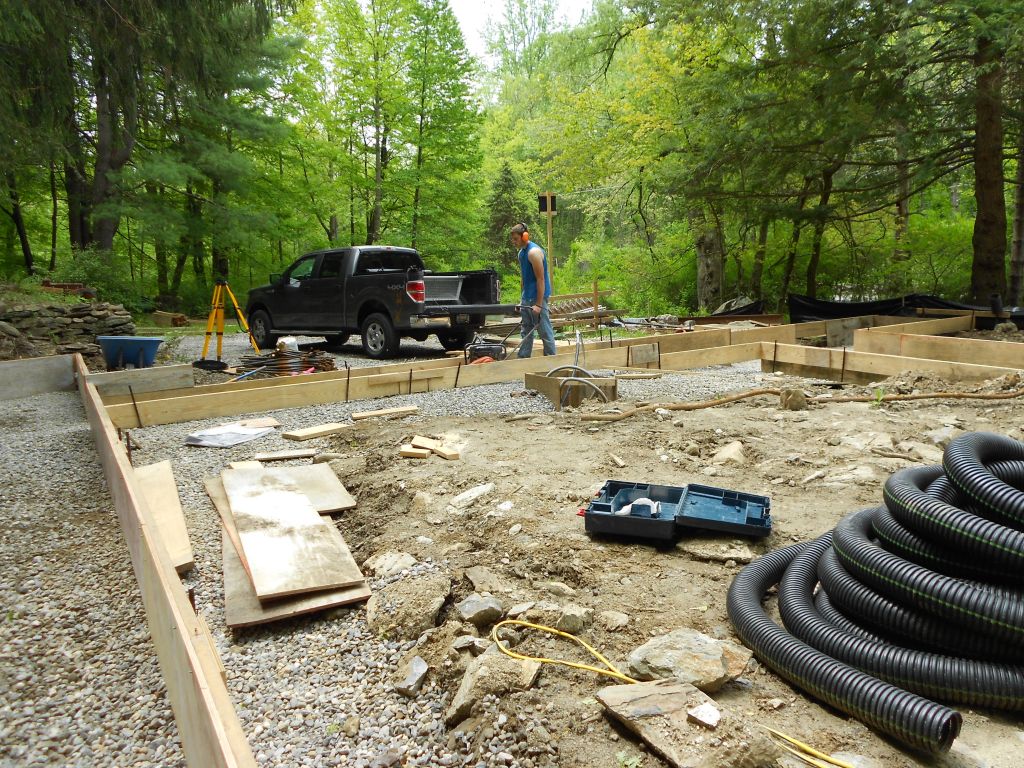
Overall site at the end of the day Saturday.
We worked 8 till 2:30 Saturday. It was like 92 degrees out and man was it hot in the sun. The sight is really nice out in the morning on a hot day.It’s pretty much 100% shade till noon. But the afternoon is total sun. The boys held up remarkably well under the conditions. They worked hard all day. I’d just like to thank Leary and of course the other guys who gave up their free time to come and help me. It means a lot to me. They will all get a free weekend stay at Hobbit Hollow when it’s completed and ready for business.
Did we get a lot done or what? 200 #5×20′ verticals, 100 #5×14′ verticals, 60 #5×20′ horizontals…and wall close up to boot. An awesome day …talk to you next week.
I seem to have forgotten about my Hobbit calendar. June is a picture of the Dwarves and Bilbo, the hobbit crossing a beautiful arched bridge into Rivendale (Home of the Elves) on their journey to the Lonely Mountain.
I wish I could build something like this for the Hobbit house. My wife actually inspired me to come up with some good ideas for our bridge over the stream of Nimrodel. I’ve done some sketches for an arched stone wall on either side. One that you could sit on and listen to the stream. Like my wife said you’ve got to have a stone bridge just like in the Hobbit.
Summer’s here and 17 year olds need cash. …and I need help. Lots of help. Ethan got a job at a pool complex working 40 hours a week and Georgia is working at Dunkin Donuts. It really is hard for kids to find a decent summer job. So I asked Jude to see if any of his friends might be interested in working a bit this summer. And so the Hobbit Hollow crew began to form. Of course they were all Men from the big folk town of Bree and all have served the Rangers of the North and were involved with the Battles with the Witch King of Angmar. Mike, Kevin, and RJ they were. They are all responsible for killing many Orcs. They are not to be trifled with.
We met Sunday at 7pm and went over to the house. I went over what needed to be done and had a discussion about safety with them. I think they were a bit nervous and that is a good thing.
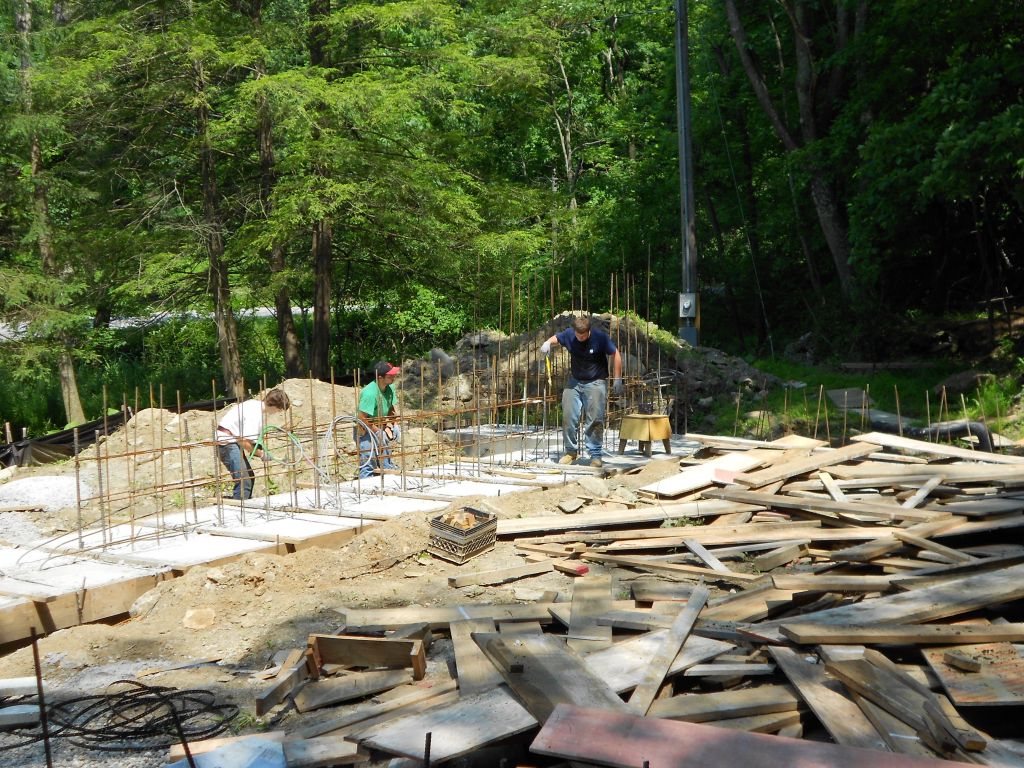
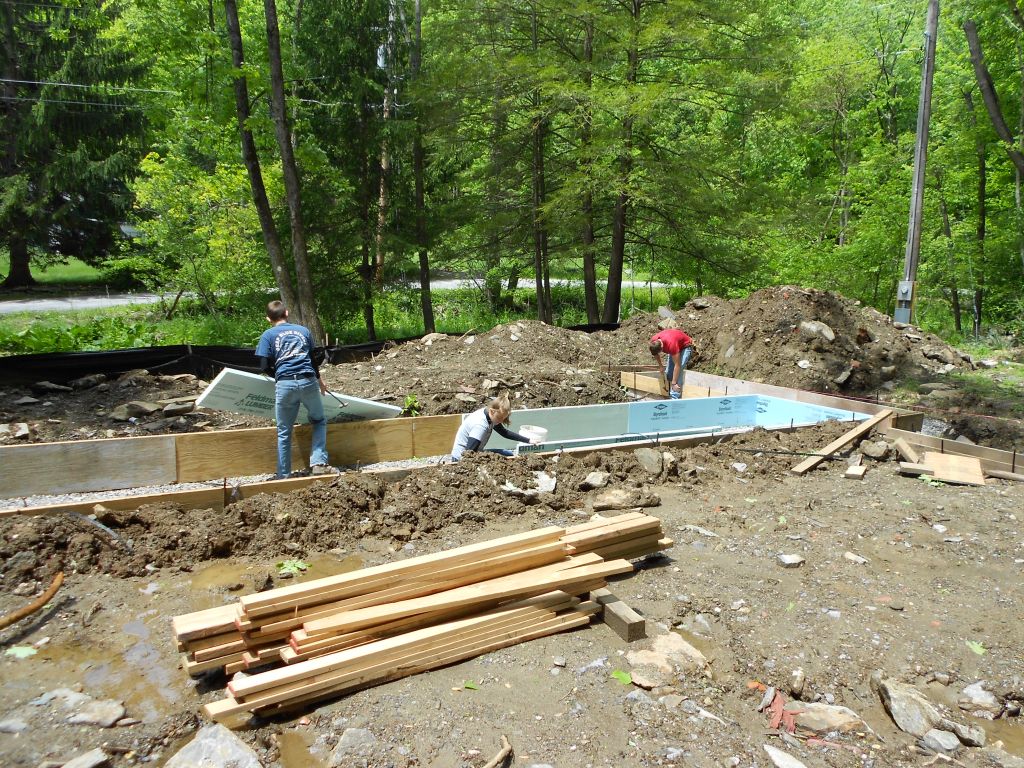
There were two main things I wanted them to do. One was to strip off all the formwork on the footings and stack it. The other was to get a delivery of stone and add an additional layer of drainage around the site before we put the wall forms up. You can do gravel around the footing after you pour the walls but we would need a machine to get it around and it really isn’t that much material. Three of the boys had football practice later in the day so I told them to only work from 8AM to noon.They really got a lot done. It’s always amazing to see how much material comes out of a footing after a pour. Here’s a picture.
Hobbit Hollow crew stripping the footing forms.Mikey, RJ and Kevin….Jude took the picture.
I have to admit I was envious that they were there and I was stuck in Queens. They did well. I met Jude at the site that night and we went over a couple of things for the next day. Organize the site a bit and finish stripping the forms. Wednesday they were basically off and I had Jude take the scrap rebar and I-beams to the scrap yard. We got $80 for the scrap. More than I thought. Jude also picked up some filter fabric and drainage pipe for Thursday. I had stone delivered late Wednesday, about 20 tons.
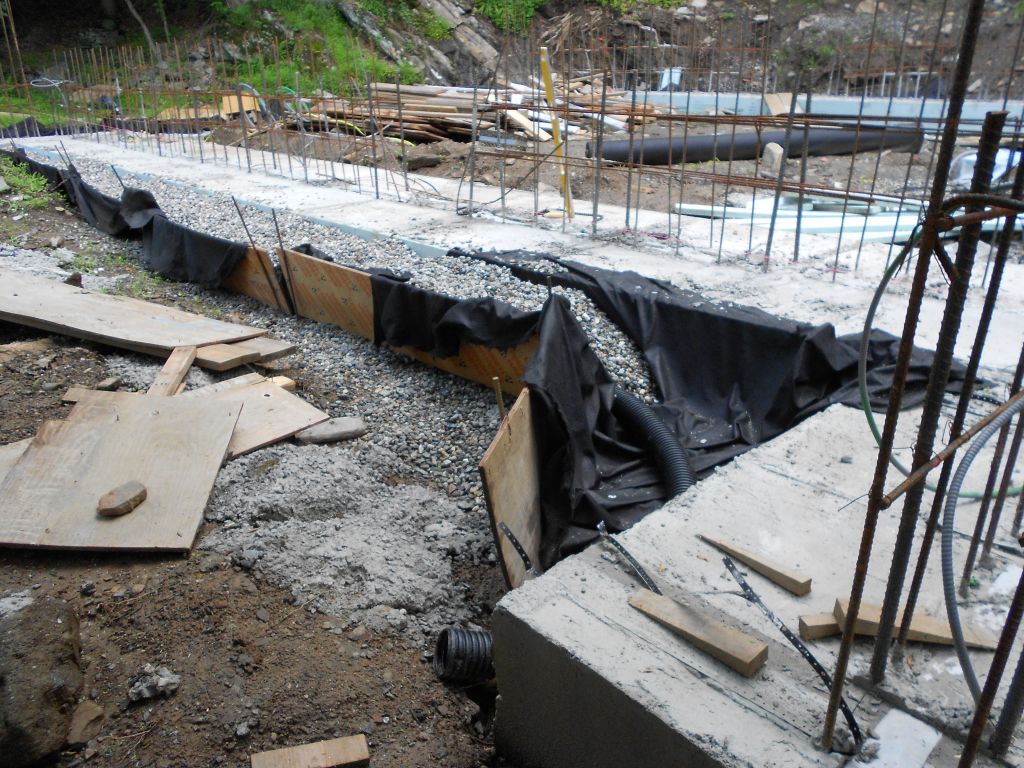
Thursday I had the boys install another layer of filter fabric and additional drainage pipe around the footing. It’s tough work and pretty labor intensive it was also hot and humid out but they did a good job. See what you think.
Additional drainage for the house. I wanted to have a gravel bed to the top of the footing.
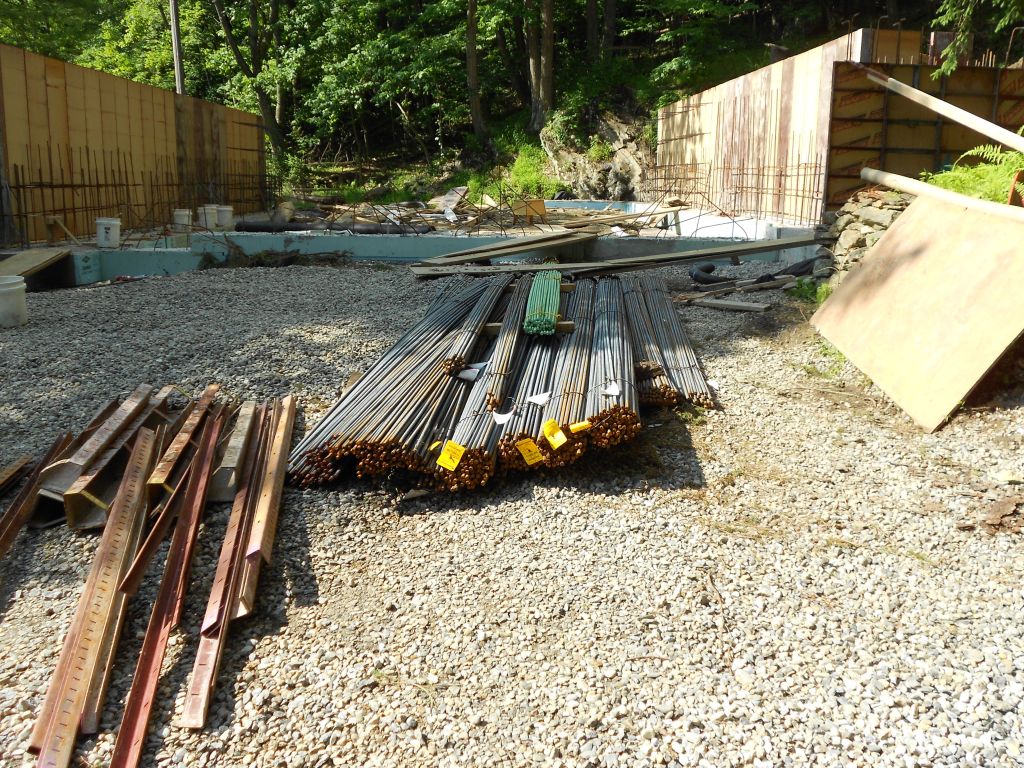
Saturday arrived. Perfect timing. I had two trucks come to the site, one for the rebar and one for the wall forms. We had to do some additional gravel work at the start so we could back the rebar truck up to where I wanted it. That took about 45 minutes or so,and then we were able to dump the 7.5 tons of rebar right off the truck.
Rebar for the upper structure.
The wall forms that we used are called Symmons forms. They are a steel framed form with a plywood face…and they weigh in at about 90 pounds a piece. This work is not for lightweights. We couldn’t dump these for fear of damaging the forms. So we had to onload the truck by hand. This actually worked out pretty well.I had a friend of mine from work come up to help me with the forms for a day. Darren is a foreman for the company I work for and he is an ace, and really good with Symmons forms. He helped me out more than he will ever know.He was also really good with the boys just as Albert was the weekend before. We had to layout the structure on the footings and snap all the lines in. So while the the Hobbit Hollow crew aka “The Crew” unloaded the truck Darren and I were able to layout the whole house. Here’s a picture of the crew unloading the truck.
Hobbit Hollow crew unloading the symmons form truck.
We finished unloading the truck and took a coffee break. It was about 10 AM. The footing was prepped and ready for forms.
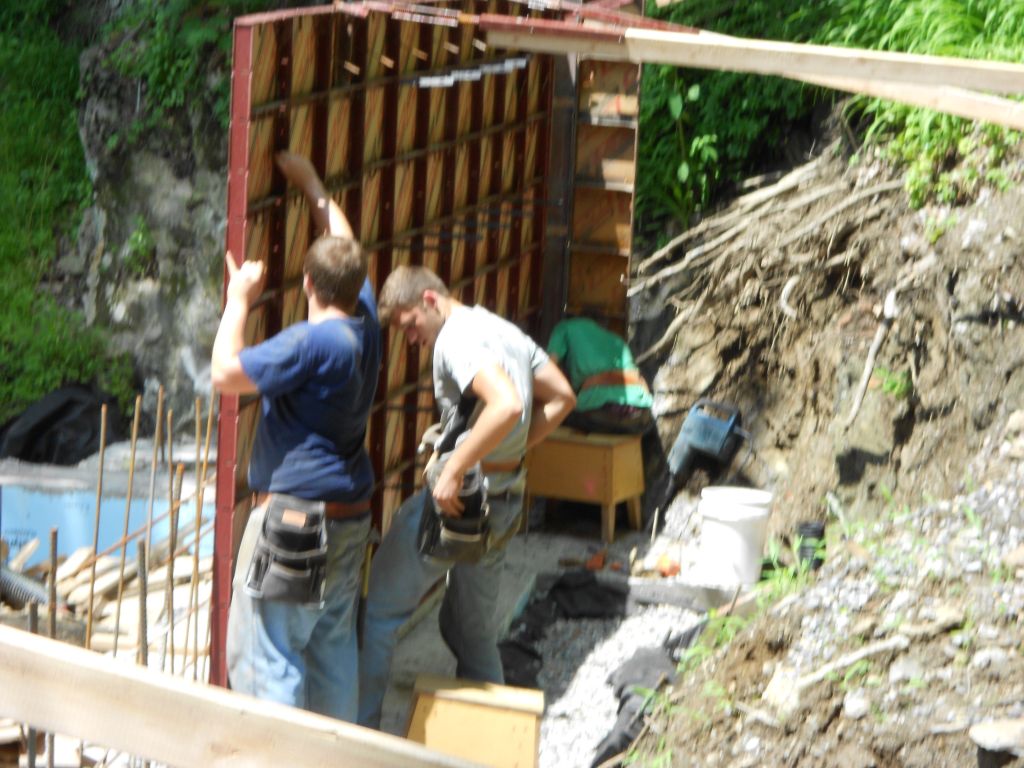
So let’s get started. It really was great. Ethan showed up just as we were finishing coffee. I put him with Darren and they started to put up the forms. Symmons forms are pretty easy to install. The tricky part is the corners. You basically pin the corners together and plumb up the forms in two directions. After that you just run the forms out pinning them together and nailing them into the 2X4 shoe that is nailed into the footing. So Darren and Ethan were the set up team and then Jude and Kevin were the follow up team. I had RJ and Mike finish up some of the drainage that needed to get done and then they started to put the form ties in. I was kind of running around showing everyone what was what and how to put things together. Here’s a few pictures over the course of the day.
Darren getting the first forms in place and plumb.Kevin and Jude putting up wall forms.RJ taking another water break.Hmmmm.
Putting up forms.Mike installing form ties and pinning them to the forms.I don’t know where RJ is. He’s supposed to be helping Mike.
After you put up about 4 forms you have to brace them so they don’t fall over. At the top of the form there is what we call a turnbuckle brace. You nail this contraption to a 2×4 and pin it to the form. Once that is done you drive a d-stake into the soil and nail it to the 2×4. The turnbuckle screws back and forth so you can get the wall perfectly plumb.
Once you have all the panels stood up, pinned and braced you add a waler across the top of the form. This helps align the forms so they are all nice and straight. Here’s a picture of the crew putting the top waler on.
Putting the top waler on the East wall.
Just talking concrete formwork here. Remember how we discussed blowouts etcetera during the footing pour. Well when you pour 8 foot high walls a blowout can really be catastrophic. As the forms are filled with concrete they want to push outwards. The only thing holding them are what we call flat ties. The ties are pinned through the walls on both sides and as the pressure builds the ties go into tension.(Remember how steel is super strong in tension). So it is very, very important that whoever pins the ties up knows what they are doing and why. I’ve seen these steel forms bend from concrete pressure resulting in massive blowouts. Symmons Form 101…Double check the ties before the pour. Here’s a picture of the form tie system.
Closeup of a flat tie being pinned to the form.
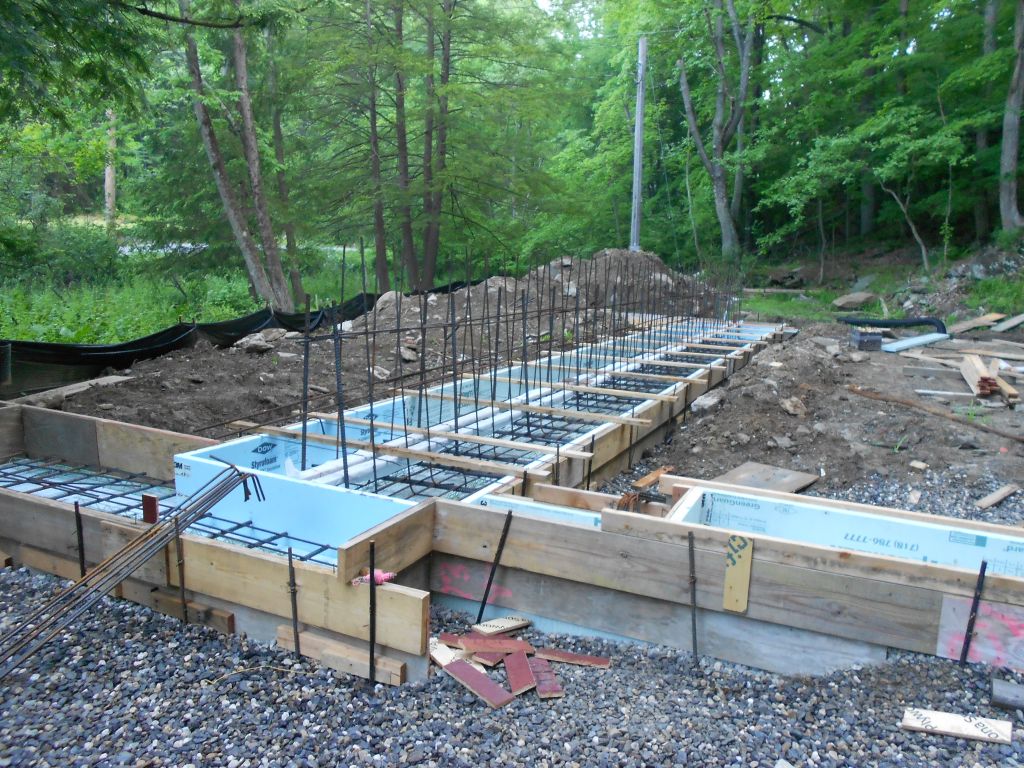
We worked till about 4 PM. We got all the stand up forms up and braced. Here’s a picture at the end of the day Saturday.
End of day Saturday.
Things are really starting to take shape here. I’m hoping to have the crew put the balance of the form ties in and prep the rest of the site for steel during the week. Hopefully next weekend we will put the wall steel in and begin closing up the forms!!!! Did we have an awesome day of work or what?
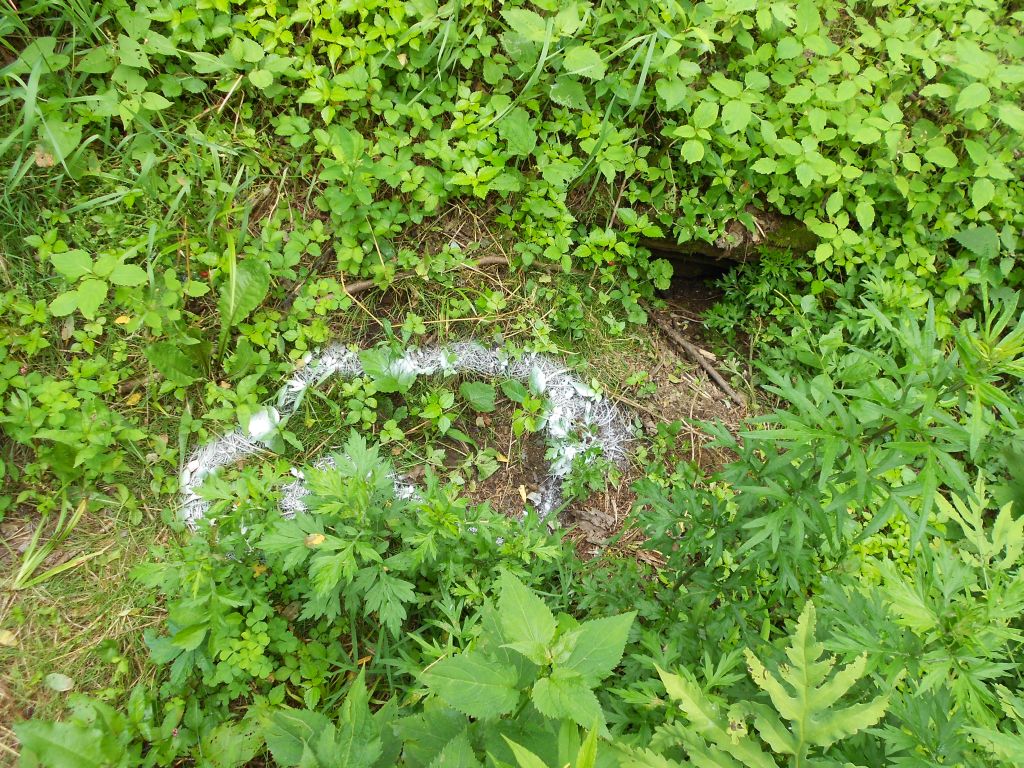
This is a bit off topic but I feel that it should be mentioned. Jude was weed whacking behind our pool last week and he found something.
Jude was shaken up but he was alright. I went out back…there was a body. Here is a picture after the body was removed.(I had a picture but my editor made me take it out of the blog….we didn’t want to upset anyone)
Outline of dead woodchuck next to his hole.
It’s funny but there didn’t seem to be any signs of foul play that we could tell of when we looked at the woodchuck. It kind of looked like he was taking a nap. On top of that Ethan, Jude, Terence, and I had walked by this spot numereous times during the week. None of us had seen anything.
Ah yes…I know what it is you’re thinking…..How did we dispose of the body? Heavy duty construction bags…double bagged of course. Terence held the bag while I did the shoveling. I was thinking….why don’t we smell anything? As soon as this woodchuck hit the back of the bag we got “The Whiff of Death” if you will. I, unfortunately, had to tie a knot in this bag…with tears in my eyes, as well. Thank goodness I can hold my breath for a long time.
I’ve been dreaming about this for years now. Building a real Hobbit house and a passive house to boot!
I was lucky I was able to sleep last night. I woke up at 12:30 and thought that I wasn’t going to be able to go back to sleep.Thank goodness I did! I was tired from the day before.My son Terence had his 8th grade graduation and invited his whole class over to our house after graduation.
I didn’t have much time.
Friday morning 4:30 AM: I get to the house and try to get some of the odds and ends done before I have to go to the graduation ceremony at 9AM. Actually one of the things I did was fix the three prong twist lock plug at the telephone pole. I had the wrong plug wired into the panel box. There are about eighty million different twist lock plugs. It’s like the chargers for all these electronic devices we all have. Our junk drawer looks like a bad spagetti western.(Why can’t they make a one size fits all charger? It’s the same thing with the damn twist lock plugs.) I needed the twist lock to plug in the concrete vibrator for the pour. (You use a vibrator to consolidate the concrete around the rebar and it helps eliminate any air pockets or voids in the concrete as well.)
Back to the little odds and ends: Remember the scene from “The Wizard of Oz” when they got to Oz and were all getting taken care of before they saw the Wizard? Remember the song? That’s the song I sang while I did my odds and ends Friday morning. Sytrofoam here, banding while there, a couple of la dee daas.
I didn’t finish all the odds and ends. I knew I still had Saturday morning so I wasn’t getting nervous. Not yet anyway.
Back home. Shower. Get dressed. Over to graduation. Terence did great. Back home to get ready for the party. It’s this social media thing. We kept asking him all week how many people are coming over? I don’t really know , only Peter texted me back so far. Well that’s great. By the end of the week it kind of sounded like 30 people were going to come over. About 60 showed up.Man was are yard loaded with kids. They were good though and I think they had a good time. We had a tug of war and a balloon toss. I think they got a kick out of it. Some of his close friends stayed later and I wound up driving them home. I stopped by the Hobbit house and had Terence and his friend Peter help me pull some wire and do a little clean up for me. We were there for 15 minutes but it was actually a big help.
The wire they helped me with is called poly coated BX. It’s a metallic sheathed electrical wire that has a plastic coating on it.It’s rated for direct burial and is OK to pour in concrete. It’s a pain to pull by yourself though. I’m going to install the outside GFI outlets right inside the concrete walls so I needed to set that up before the pour. Here’s what it looks like.
Poly coated BX for exterior outlets.
Saturday morning 4:30 AM: Well… This is the day we’ve been waiting for so let’s get started. I stop on the way to get coffee at a local deli. Finished the coffee. Started to get set up for the day. Got all the tools for the pour into the truck and started to back up to the edge of the footing. Then something happened. I want to blame the coffee but it probably was just nerves. (I always get nervous when I pour concrete. You never know what is going to happen.) I have to go back home…the coffee accelerated the digestion process and I have to go. Very badly all of a sudden…..Thank the Lord there were no cops out that early. That was the fastest I have ever made it home from the Hobbit house…..I don’t know if the editor is going to let me leave this part of the day in…we’ll see.
I’m ready. For all intents and purposes I’m ready. I have an old friend from work who helped me pour the Hobbit Shed named Albert Clark. He said he would come up and give me a hand for the day. I was really thankful that he said he could make it. He’s been doing concrete work for years and knows a lot about concrete pumps and finishing concrete as well…And I thought he would be good with my sons as well and he really was. Thanks Albert!
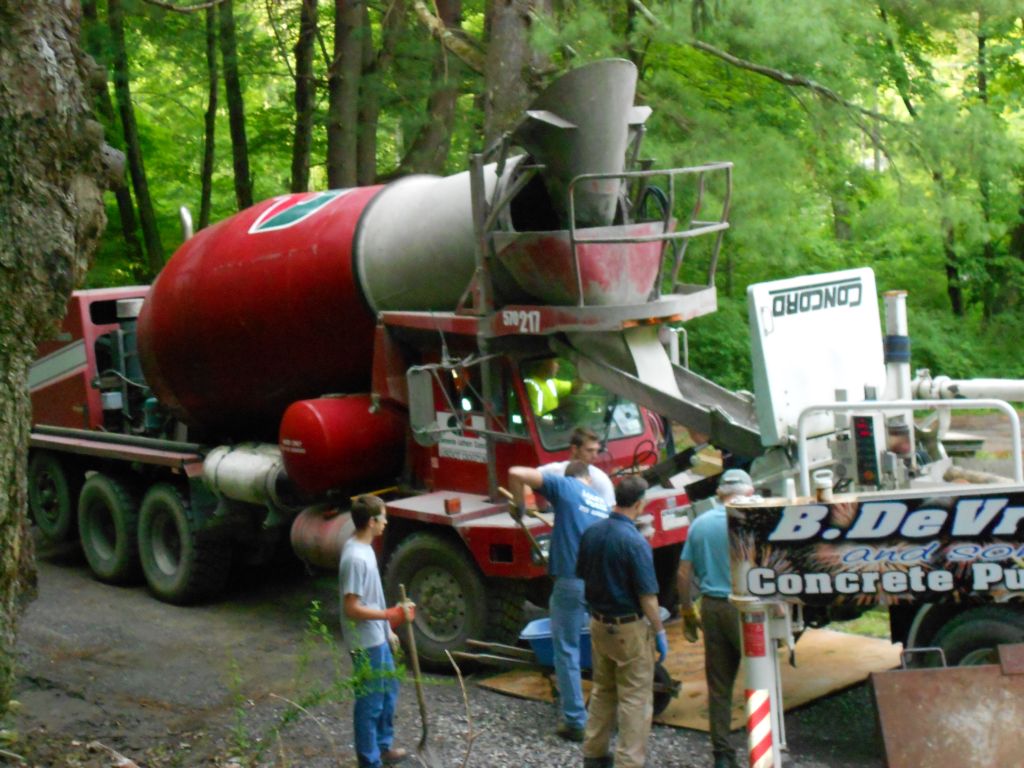
Of course the pump was late getting there. He was supposed to be there at 7:30. He got there about 7:45. When I see the pump I’m saying to myself: Man, this thing looks awful big.I really wanted like a 17 meter pump or the smallest pump they had,which the guy said was a 31 meter. The price was pretty good so I said Ok. The guy shows up with a 38 meter. This thing is long and I’m thinking he’s not gonna make the turn into the lot. I close my eyes and tell Albert to get the pump in. They got it in.
38 meter concrete pump with outriggers extended.
I know ther’s a way to blot things out of pictures but I think that is a Patriots logo on the truck.Patriot fans are not allowed on my property but I had to make an exception today. But I digress.
He unfolds the boom we pull in our first truck and start pumping. We thought we were going to start pumping but the line is jammed…and the concrete won’t come out of the free end of the hose. Great. Here we go. The longer the boom of the pump is the easier it is for the concrete to jamb.What happens is all the sand,cement and water that is in the mix gets pulled out of the mix as it initially goes through the pump and what you are left with is the stone which usually gets stuck at one of the elbows. We found the elbow and had to take it off.
Pump is jammed. We had to take off an elbow.
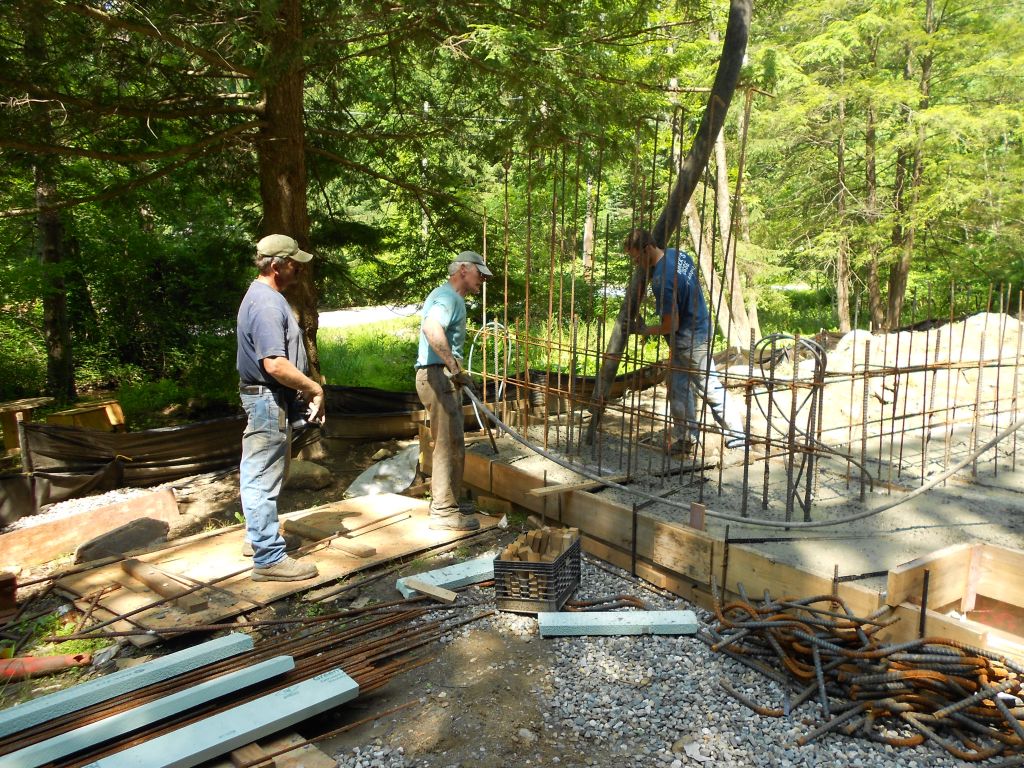
Once the line was clear we got started. It was going pretty well. The boys got the hang of what we were doing pretty quickly and we got into a rhythm. After the second truck finished we had to wait for the next truck so we dropped back and added rebar to the small footings for the knee wall that we will pour next.
Placing rebar into the wet concrete for a small knee wall. This looks like a staring contest.
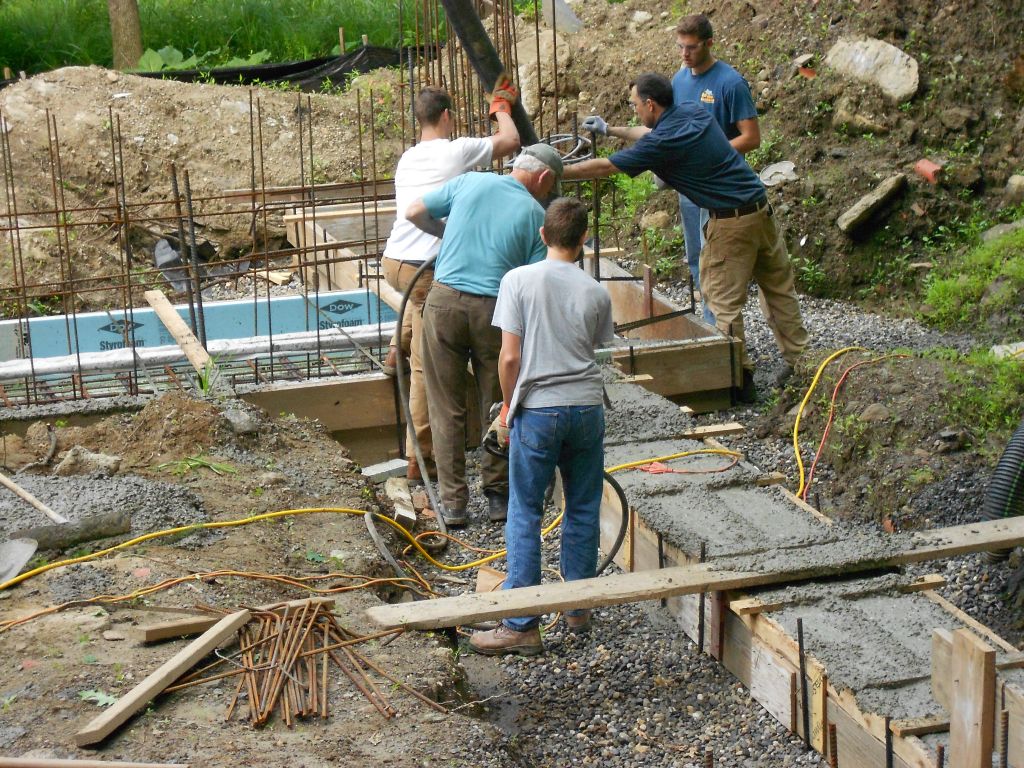
The pump operator “Lee” was a good guy. He helped a bit and had a few good suggestions along the way. The third truck shows up and we get started again….then all of a sudden Lee leaves and goes over to the concrete truck….I’m like what is going on now. I go over to the truck and he tells me the concrete is not going through the line,it’s to boney. Meaning there’s to much stone and not enough cream. It looks as if the concrete has separated. I call the plant and make sure that they sent a pump mix. The dispatcher says all there mixes are for pumps. Well I guess this one decided to change its mind because this batch of concrete does not want to go through the line.Lee tries a couple of manuevers but it doesn’t work. We have to drop the concrete out of the hopper. This is going to be a long day. We put some plywood under the hopper and let it go. I then had Ethan and Jude shovel it into a wheel barrow and dump it in the footing. Here’s a picture of the concrete under the hopper.
A half yard of concrete comes out of the hopper.
If you noticed in this picture you’ll see two concrete trucks pulled up to the hopper. What we were able to do is mix the good truck with the boney truck and use all the concrete from the truck we couldn’t put through the pump line. The only problem we had now was that we lost Ethan and Jude to shoveling up the concrete. So Albert,Terence, and I poured about 8 feet of footing at a time. We would pump a bit vibrate and level it off and then move the hose. Ethan and Jude finished faster than I thought so it wasn’t too bad. Once the concrete started coming out okay I knew we were going to be fine.
The balance of the pour went well and we now have something to work with. By the way it was 38 yards of concrete in 5 trucks.(3)8 yarders and(2) 7 yarders.I really didn’t want a ten yard truck going over the bridge. I think it would have been fine though.Here’s the crew.
Concrete crew:Terence,Ethan,Albert,Jude.
Here’s a few more pictures from the day.
Jude on the hose. Lee the pump operator is on the left.
First truck of the day.
I recognized one of the concrete truck drivers. He brought concrete way back when when we poured the bridge. My wife was talking to him and he said: “I built that bridge.” That’s funny I thought I built the bridge.
Footings poured.
We started around 7:30 and finished up by 11:00. Which was’t bad considering all that had happened. And no blow outs thank God.
By the way my wife was the photographer for the day. Thanks Jo! She somehow also managed(“accidentally”) to take a minute and a half video of her cell phone cover which killed the battery! So she’s a photographer slash movie director! (NOT!)
P.S. Ethan found a frog jumping through the footings right after we dumped the first truck. He couldn’t catch him but luckily my wife was able to get him safely out before he ended up with a little set of concrete frog shoes! We figured it would be bad luck to have a frog cast in mafia block in our foundation.
I’m hoping to get the forms delivered next weekend so pray for good weather and enjoy your week!
“It’s a dangerous business going out your door. You step onto the road and if you don’t keep your feet there’s no knowing where you might be swept off to.”-Bilbo Baggins. The concrete business is a dangerous business…I hope I’m being swept in the right direction.
I met the building inspector Thursday afternoon at 2:15. I had to leave work early but this was the latest appointment I could get with him. It wasn’t too bad work wise because we had gotten rained out around 10:00AM so I really didn’t have to be there for anything special. I got up to the site around 2 and had a bunch of things I needed to finish for the pour anyway so I got set up while I was waiting for the inspector.
The inspector arrived promptly at 2:15 and proceeded to walk to the edge of the site. He turned and looks at me and says, “It looks like you know what you’re doing, pour away.” That was music to my ears. The final step before pouring is in place.I also asked him about the under slab plumbing. Did it really need to be cast iron pipe under the slab? He said no and that I must have gotten an old checklist from the building department. More music to my ears. That would have been such a pain to take on a cast iron job. At least for me it would have been. If you make a mistake with PVC you just cut it out and reglue a new piece on.
Once the building inspector left I really got into it. I started finishing off the little things I needed to do before this Saturday’s pour.I called the concrete plant and set up concrete for 8AM Saturday and called the pump company and set them up for 7:30. It takes about a half hour to prep the pump before concrete arrives.
One of the things that I really wanted to do was lock up this area where there is a step in the footing. I used #9 wire at the top of the footing and through the footing about 9 inches off the bottom. I put 3X4 stongbacks on either side of the forms and wrapped these with the #9wire. Once this is done you take your handy dandy lineman pliers and twist the #9 wire to tighten it up. Here’s a picture.
# 9 wire twisted to hold 3X4 strongback at step in footing.
The other thing I did Tuesday after work was pin the rock where it’s exposed to the footing. I didn’t have my camera that day but basically what you do is take a Hilti drill with a 3/4 inch bit on it and drill 8 inches into the rock. Once the hole is drilled you take a vacuum blower and blow any dust that is in the hole out. I brought a tube of Hilti HY150 epoxy with me from work and using the dispenser for it you squirt the epoxy into the drilled hole and insert a #5 bar. On a warm day the stuff sets up in less than a half hour. (You can use non-shrink grout in lieu of epoxy.The epoxy is a snap though) It was raining when I did this so I just did one hole at a time. I also epoxied some 1/2 inch coil rod in place as well. I used the coil rod to help brace a couple of the forms for safety reasons.Here’s a picture.
#5 bar pinned into the rock using Hilti HY150 epoxy.
By the end of the evening on Thursday I was pretty much ready for a Saturday pour. I had about two hours of work left to finish things up which I was planning to do Friday night or early on Saturday.
Forms ready for Saturday’s pour.
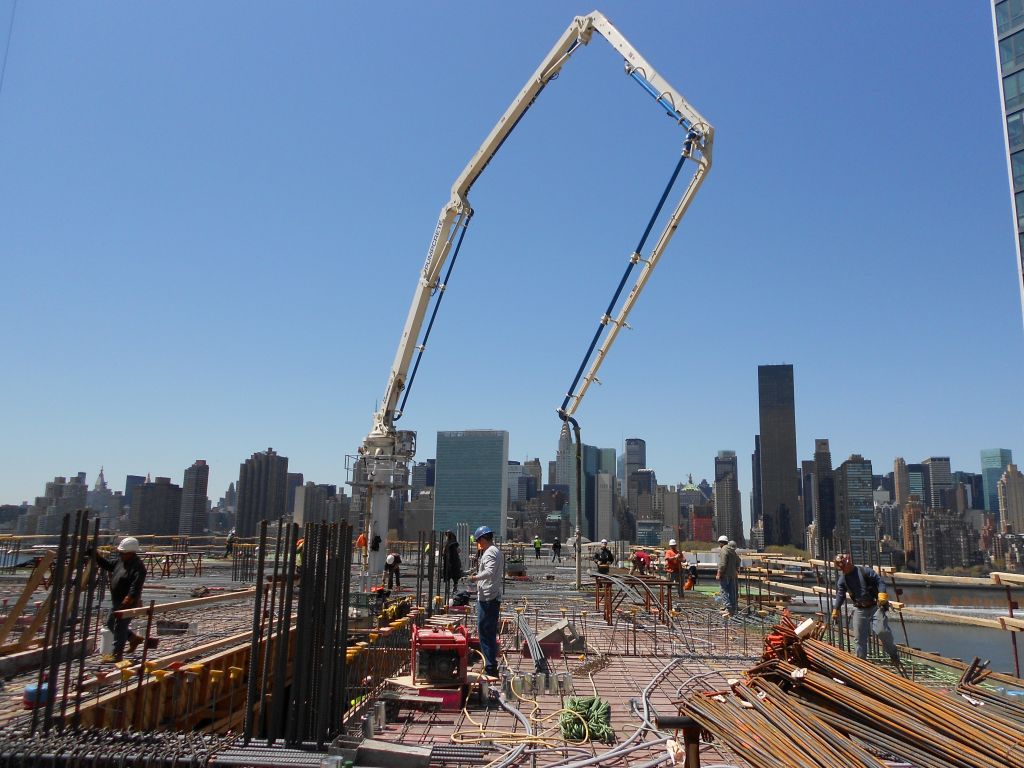
Then something happened on Friday that was most unexpected…and also quite unusual. We lost power to the placeing boom at work while we were pouring.This is a placing boom.
Placing boom: Concrete is pumped up the building and placed with this machine.
We actually lost power to the placing boom right before we started to prepour the columns on this job. As soon as I heard that I called the plant and told them to stop shipping concrete until they hear back from me. That part was fine. They had only shipped the grout truck that’s used to prime the pump and two ten yarders of 5950 psi concrete aka 5950 (pronounced fiftyninefifty in the business if you want to sound like you know what your talking about.) The electrician foreman Tony was working on it already so that was great and Johnny aka Johnnie Chiz, aka Chisel,aka Super Chiz was with him monitoring the situation. There was an electrical connection on the 15th floor that had gotten “fried” because water had run down into the fitting during the rain storm the day before. There was a slightly heated discussion about whose fault it was for not leaving a rain loop in the line but we were able to get past that. It took about twenty minutes to fix it and we were back in business and started to pump the concrete up the building. I called the plant back and released the balance of the concrete for the day which was only seventy yards. I also reminded them to put retarder in the last truck because it takes a while to clean out the line once you’re done pouring.( Retarder in a concrete mix slows the set time of the concrete once it is mixed. We use this in the summer all the time.)
Placing Boom 101:
For the uninitiated the concrete goes into a hopper in the street and gets pumped into a 5 inch riser pipe that goes straight up the building into the placing boom turret and into the placing boom itself. When you finish pouring you put a round sponge into the tip of the placing boom and blow it back down the riser pipe with compressed air into a box in the street. This cleans out the pipe for the next pour and you wind up with a box full of concrete that gets thrown out the next day.
What happens to the placing boom if the concrete starts to get hard? That’s when trouble really begins.
And things cease to be fun.
This is the short version: We lost power to the pump when we were almost done pouring 60 yards. The electrician was on it right away. He was on the deck. I met him on the 13th floor.”I found the problem and it will be fixed in ten minutes.” OK. You should have power. We still don’t have power. ..Let me try something else. It’ll take 5 minutes. I call Johnny Boo and tell him we have to get ready to move fast if this doesn’t work because the concrete is going to start to set up in the line.The next thing Tony the electrician tried didn’t work either. The placing boom can’t move we are totally screwed now. I waited too long to make a move. So much went on in the next half an hour I could write a book on it. (I keep forgetting that this is the short version.) When we went to blow back the line they couldn’t switch the diverter valve over.( The diverter valve is used for the blowback so the concrete goes into the box I mentioned before.) I broke open the line in the street before the diverter valve and the concrete started to come out of the line like 5 inch diameter sausages two to three feet long.(It really did look like sausage albeit concrete sausage) The concrete really started to pile up. I thought we were going to be a able to clear the line. At that moment I thought we were going to be fine.
Why didn’t the sponge ball come through at the bottom? Because the concrete in the boom never moved. The concrete that I had gotten in the street was all from the 22 stories of concrete in the riser pipe(It was a lot of concrete). Gravity had forced it all down the line. The last position of the boom was completly horizontal. The worst possible position. We lost the boom. We were doomed. I couldn’t believe it. We were done, finished, game over. What a mess. I called and cancelled the footing pour for the Hobbit House for Saturday. To say I was upset is an understatement…so were my wife and kids.
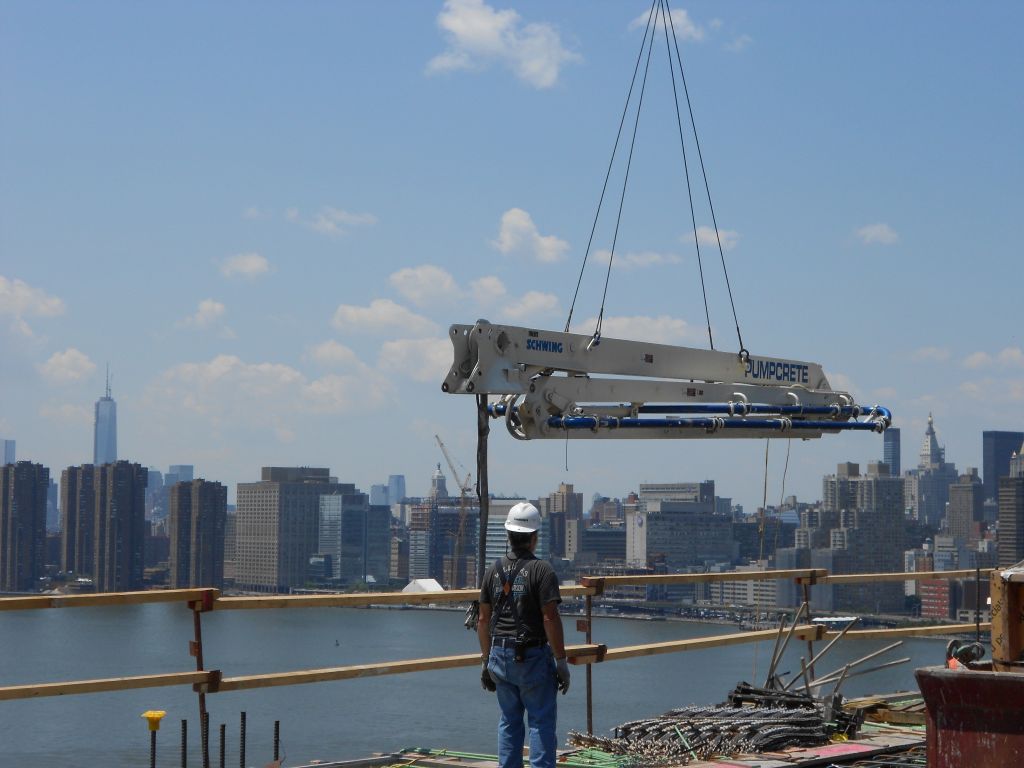
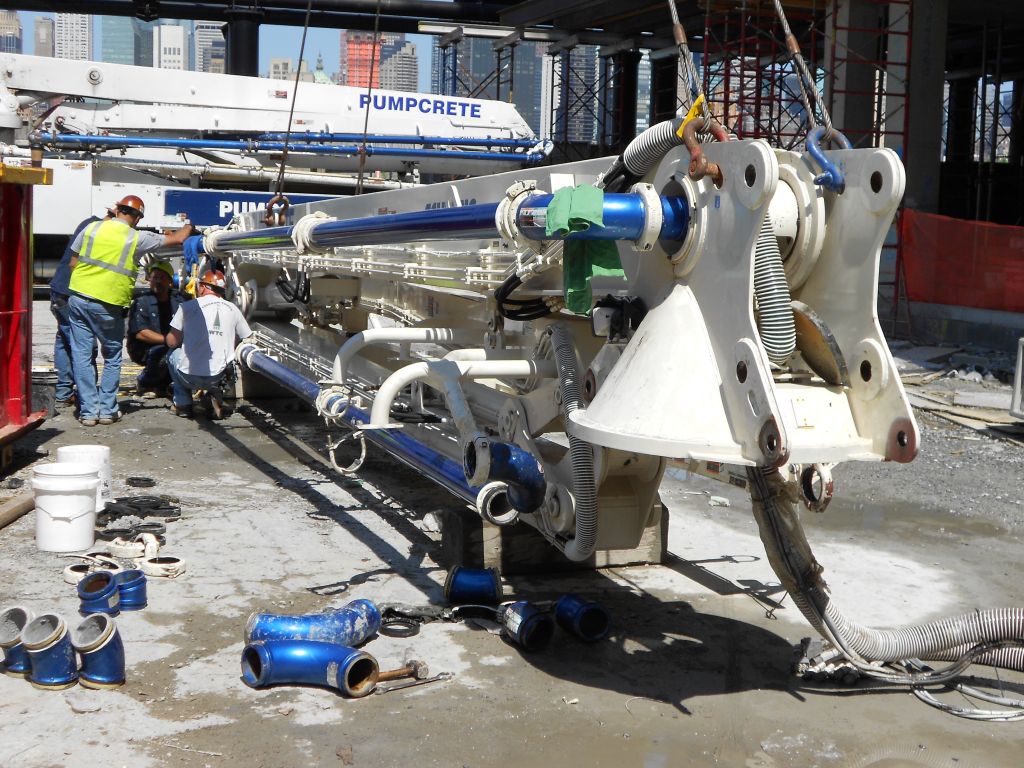
Saturday was spent taking the boom down to the street replacing all the lines and then reinstalling the boom. It took six hours. There were a couple of gliches during the day but we got it to work and everything seems to be OK. Here are some pictures.
Sending the placing boom into the street.( Freedom Tower in the backround.)Replacing the pipe on the boom.
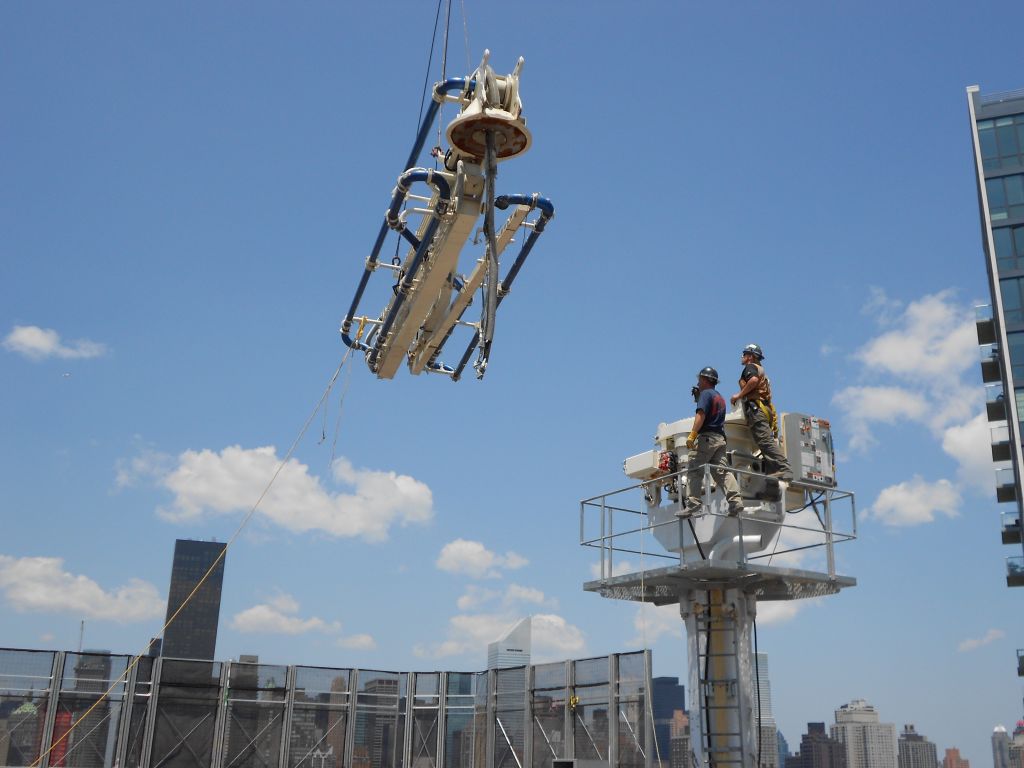
Reinstalling the placing boom on the turret.Johnny “Deck” signaling with Jeff the Hick assisting.
Well, we are ready to rock and roll for next weekend. Hopefully the weather will cooperate! (And my day job will go a little more smoothly!) Enjoy your week!
Most of you have seen “The Hobbit.” Remember the three trolls who stole the ponies? If you do, then you’ll understand this a bit better. If you haven’t seen the movie, imagine the ugliest guy you’ve ever seen and make him about 12 foot tall and 900 pounds. With bad manners as well…and bad breath too.
Bilbo’s trolls arrived today. They put me in a sack, tied it to a tree and then proceeded to use it as a human punching bag. This went on for approximately 8 hours. That didn’t really happen but that’s what I felt like after tying rebar all day Saturday. Man am I beat up. I’m just not used to that type of work. I crawled home and took two ibuprofen. I didn’t finish but I’m getting closer.
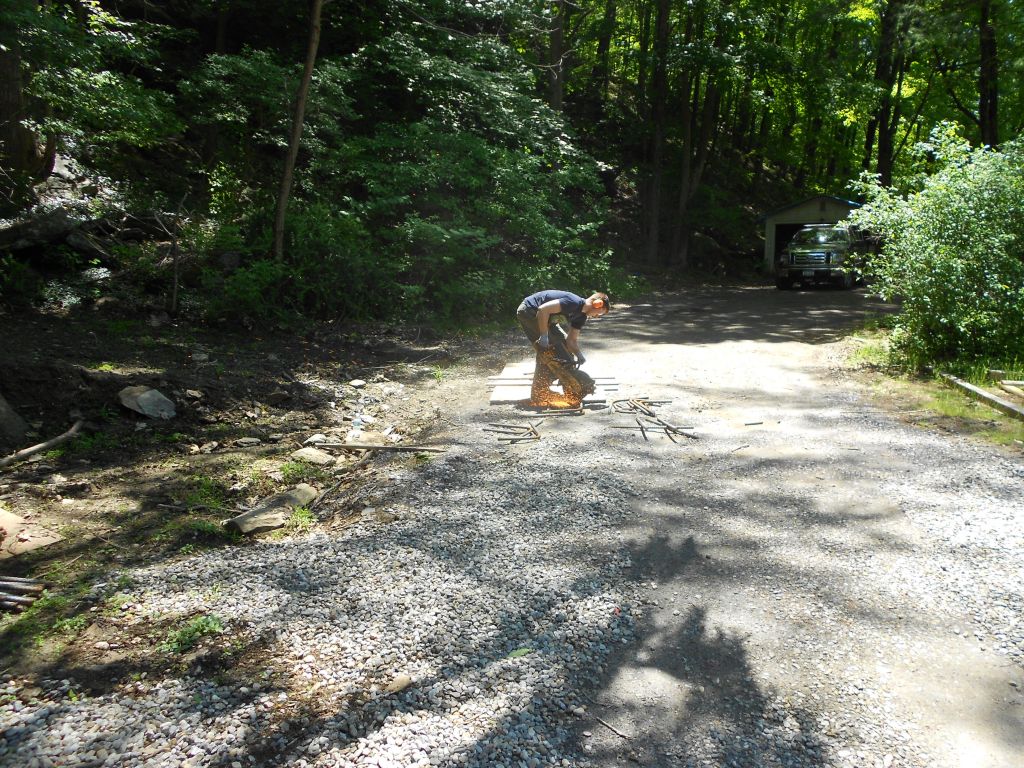
Ethan helped me out today. Actually quite a bit. He cleaned up and spent about 2 hours cutting the odds and ends rebar I needed. He also cut up this I beam that I forgot to get rid of when we demolished the original house. We’re going to take that and any left over rebar scraps to the scrap recycling center up in Wingdale. Hopefully we’ll get a few bucks for the stuff. Here’s a better picture of Ethan using the demo saw.
Ethan cutting up an I beam for scrap.
We got a visit from our first tropical storm of the year. Andrea raced up the East coast this week. We took some heavy rain Friday into Saturday morning. By the time I got started it had all cleared out. Thank goodness. Earlier in the week it was predicted that it would rain all day Saturday into Sunday, and I almost started to cry. The strean and waterfall were really raging. I got to thinking about water wheels and hydroelectric turbines. The site here isn’t well suited for solar power but maybe hydro power will work. It would be pretty cool to generate your own electricity. I mean look at this waterfall. There has got to be a way to get power out of something like this.
Waterfall after tropical storm Andrea had passed by.
I talked to Brian and Tim (aka “The Flash”) about fixing the wall rebar so it stays in place better.These guys are the wire lather foremen for the company I work for. They made up some U’s to spread the top of the vertical rebars. It worked really well. It helped spread the vertical rebars the proper distance apart. This way when we go to stand up the verticals for the walls later on everything is in the right place. I put them about 8 foot on center. Here’s a picture.
Rebar U’s help spread the wall dowels apart the correct distance.
I was by myself all morning and one of the things I had to do was tighten the banding wire around the East footing form. Like I said this stuff when it’s tensioned is super strong. This picture shows the banding wire biting into the footing form.
Banding wire tight to footing form.
I have about 4 hours of rebar work to do. I’m hoping to get it done Sunday. Even if I get done, I still have to come back Monday to pin and epoxy some rebar into the rock on the Northeast corner before I can call for an inspection. I forgot the Hilti drill at work on Friday. Would you believe I brought that Hilti drill home the last three weekends in a row and never used it? Oh well.
Sunday: My wife is so sick. She has some sort of 24 hour bug that she thinks she got at work. Everyone else is fine though. I hope she gets better soon. I miss her and the happiness she brings into the house. I wish I could do something for her. I thought she would be feeling better by noon on Sunday but she really doesn’t seem to be much better.
I went over to the house early today. 5am. I slept on the couch so my wife would have the bed to herself while she was sick. When I woke up I knew I wouldn’t go back to sleep so I just figured I would go to the house and finish the rebar up, which I did.
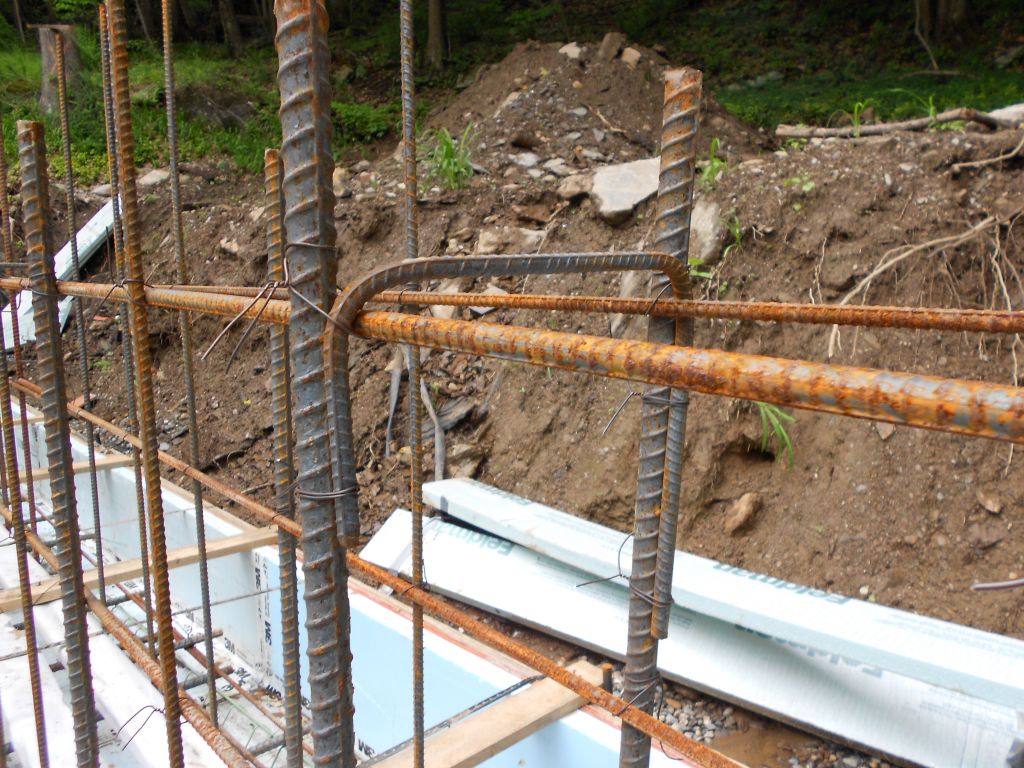
What I had to do was install the rebar for the retaining walls at the corners of the Hobbit house.The one corner was a little tricky. It also encompasses a retaining wall for a set of stairs. The picture is a bit confusing but the stairs are going to go up the side of the house to a small side yard at the roof level. I think I’m going to put a grill up there someday. There’s quite a nice view of the front yard as well. See if you get it.
Corner retaining wall rebar for future set of stairs.
For those of you who are familiar with commercial construction you might have wondered why I was using such heavy rebar. The drawings for this design pretty much call for all #5 rebars in the footing mat as well as the verticals. I used #8s because I got them for free. There was a mistake on the job I was on and all the #8 rebar had to get replaced with epoxy coated #8s. Tons and tons of rebar had to get taken out. What we could reuse we did but all the Z-bar #8s were going to get thrown out so I took them. I had Ethan cut them up for straights and L-bars. Believe it or not the Z-bars actually worked perfectly for the step footing rebar detail.
Z-bar detail in step footing.
Here’s the site at the end of the day Sunday.
Rebar nearly done.
I’m hoping I can leave work a little early on Monday. I really need to take care of the rock drilling detail before I can call for an inspection.The traffic from Queens is horrific but last Monday wasn’t so bad. If I do the drilling maybe I’ll add it to this post. Next weekend I would really like to pour this foundation. I need to schedule a concrete pump and concrete delivery for next Saturday. I have to set that up by mid week if I’m going to do it.
My editor is sick in bed so we’ll have to chaulk up any mispelled words or run on sentences in my column this week to me. I love my editor…get well soon!
This was a question I was once asked on a job interview for an engineering firm.
It really is too bad I can’t do an audio for you. But if I had, you could hear my imitation Brooklyn accent. Can I walk Rebar? What did you say? I mean are you talking to me? I don’t see anybody else here so I’m under the assumption(and assumption is a big word in Brooklyn so you can tell I’m a little more than street wise….but probably not a wiseguy if you catch my drift) that your talkin’ to me. I mean I just finished workin’ on a sixty story tower. Of course I can walk rebar. Any other stupid questions? (And you have to make a face while you’re saying all of this. Like if another dumb question is asked your gonna get beat up.)
I didn’t answer my interviewer like that though. It was just an imitation. The dwarves, elves and yes even hobbits can walk rebar quite well. All are sure footed and have a good sense of balance. I have had my share of falls on rebar as well and it is dangerous if you’re not careful. That being said we tied our first rebar mat this weekend and got started on the footing and wall rebar grids.
For the uninitiated rebar serves many purposes in construction.(Just a word or two on that before we get started) Reinforced concrete is concrete that is reinforced with steel bars. The steel bars aka rebar. Just keeping it simple rebar ( and this is a general statement here) in footings helps keep the concrete together. In other words if you didn’t have rebar in the footings there is a chance that the footing might settle and crack. If that happens there is a chance for settlement issues to develop. The rebar holds the footing togther so it all acts as one unit. Any tension or pulling will be taken up by the rebar. Another good point just for educational purposes: Concrete is good in compression, steel is good in tension. Translation: Concrete can withstand tremendous downward pressure. The concrete that we will be using in the footings will be 3000 psi concrete. If you remember the last post, that is basically the weight of my Toyota Corolla on a single square inch of this footing. Rebar on the other hand is terrible in compression. Just imagine a single piece of spagetti being held vertically on your dinner table with your finger(A dry out of the box piece). If you apply pressure to the spaget it will bend and eventually snap if you apply too much pressure. Steel is terrific if it is in tension or being pulled. This is why suspension bridges are basically a bridge deck being hung from steel wire ropes or cables. Obviously not spagetti.
Reinforced concrete is the combination of the best parts of both materials. I hope I’m not boring too many of you out there but you can do some really cool stuff with reinforced concrete if you understand the way the materials work togther. So how is it all put togther?
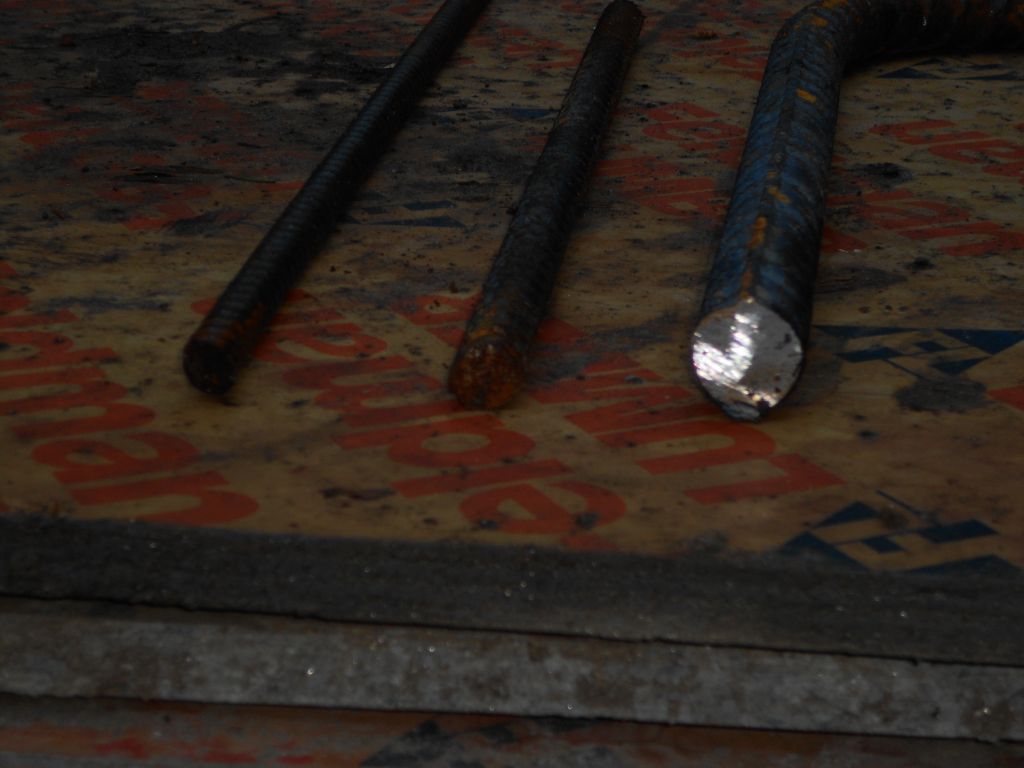
First off I just want to show you the different bar sizes. I know we talked about this before but rebar (in the US) is called out by it’s bar diameter size in eigths of an inch. A 1/2 inch diameter bar is 4 eigths so it would be called a #4 bar, 1 inch diameter bars are 8 eigths and would be called a # 8 bar. Rebar is designed by its steel cross sectional area. So our design details call for a certain sized bar on certain centers. Like #4’s at 12 inches on center. But you could use # 5’s at maybe 16 inches on center as a bar substitution and still maintain the structural elements the engineeers want. The total area of steel remains the same.( We do this all the time in high rise) Here’s a picture of some cross sections.
#4,#5,#8 rebars
So for the Hobbit house the rebar in the footings is really a big deal and is super important. It was one of the main concerns for the engineering firm who helped design this structure. So we have to follow the approved plans very carefully because this is going to be inspected for accuracy by the building department. Rebar cannot just be laid down on the insulation and tied, it has to be supported by chairs.(When you pour concrete on the steel the concrete is supposed to go all the way around the rebar. The chairs keep the rebar off the insulation the proper height) In this case I used epoxy coated rail chairs that are three inches high. A rebar mat or grid is laid on top of the chairs and tied with what we call tie wire. This way it doesn’t move as you pour the concrete. Here’s a picture.
Rail chair with rebar grid on top. The drawings called for 3 inch of concrete cover on the bottom rebar.
So if you have everything you need the mat goes in pretty quick. The only problem is the rebar doesn’t come to the worksite cut for your job. Usually it comes in long lengths and you have to cut it. Here we cut the rebar using a demolition saw with a carborundom blade(not really sure how to spell that). It’s loud, hot, heavy work and you have to have ear and eye protection on while doing it. Sparks fly so you have to be careful where you’re cutting and what direction the sparks are going. I lit my pants on fire once cutting rebar. (Embarassing, but true.) Ethan was my cut man, here he is going at it.
Cutting rebar with a demolition saw.
Once I had the first mat in we had to secure the forms and install the shear key. Remember the banding wire we put in before the insulation? Well now that comes into play.First we nailed 2×4’s across the footings 4 foot on center and then wrapped the banding wire tensioned and clipped it. Jude took care of that.
Using the banding machine to tension the banding wire. This will prevent the forms from “Blowing out”
The shear key is a structural element that helps prevent the poured concrete wall from moving when pressure is apllied laterally.(Like when we backfill the Hobbit house) It’s kind of hard to describe it but we used double 2x4s wrapped in plastic and this will make a depression in the top of the footing. When we pour the walls on top of the footing the shear key depression will help “lock in” the wall to the footing. We wrapped the 2x4s in plastic so they don’t get destroyed and it also is a bond breaker so we can get them out after we pour the concrete. I also tied the wall rebar to the shear key this helped speed up installation of the vertical rebars.
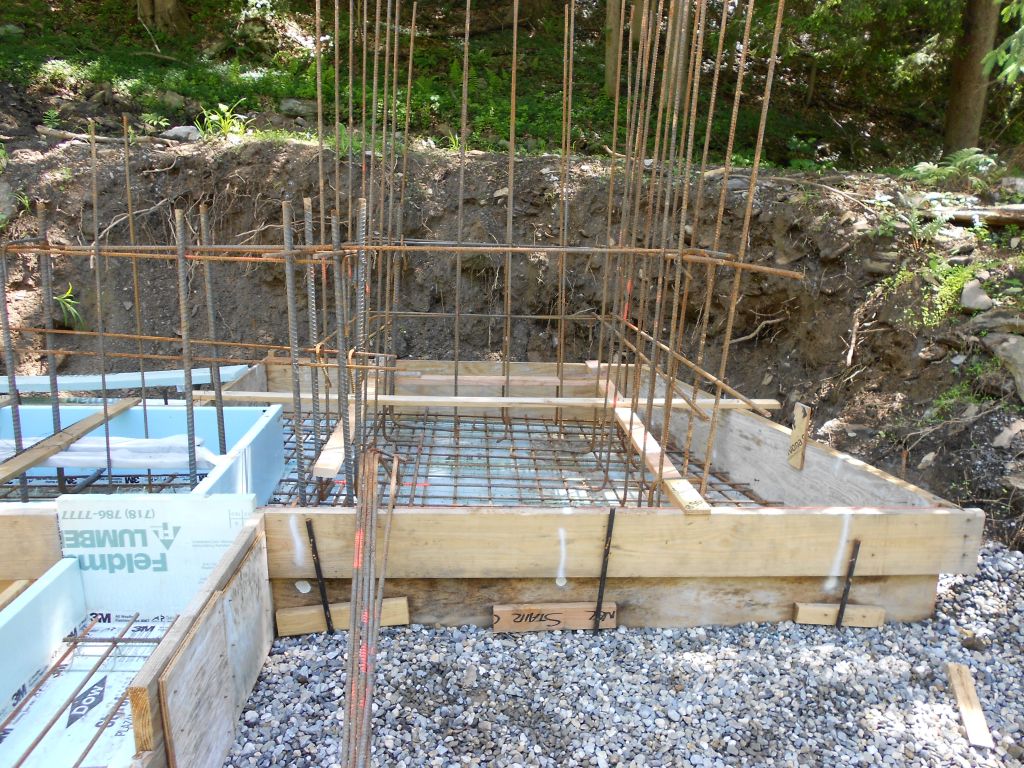
Shear key installed,rebar bottom mat installed
After the shear key it was just a matter of laying out and tying off the verticals as per the drawings.
Vertical wall rebal installed
Did you notice the banding wire? You can tell it’s in tension it can hold a lot of pressure. The 2×4’s look like they would hold the forms and in some instances they can but I have seen this situation go bad and when it does the screaming sesssion begins. When you have $4000 dollars worth of concrete showing up you only have a small window of time to mix and pour it. You better be ready.
Georgia and Terence were there finishing up a bunch of odds and ends.We got a lot done this weekend. Next weekend I should have no problem finishing up the rebar installation. After that we’ll get our inspection and then it will be pour day!!!!!!
West footing rebar installed.
Went to a graduation party at my brother’s house in Cold Spring Saturday afternoon. Which was good because it was really hot out Saturday-low 90’s. It actually cooled off nice by the time we got to the party. Just a quick shout out to my cousin’s husband Mike from Putnam Valley. We discussed it on the ride home Mike, and we all agree…Hobbits like pizza and a wood burning pizza oven might fit in quite well at Hobbit Hollow. You might get called in for your expertise on pizza ovens. Lunch is on me. Oh yeah I almost forgot….Mike…Netflix…The Fellowship of the Ring…The first ten minutes. That’s it…Then you’ll have a better idea of the back story here.
Memorial Day weekend 2012: Saturday morning 3AM. It’s raining so hard I think the skylight in my bathroom is going to implode. Here we go again,. Best laid plans of mice and men, right? I thought I was going to hit a homerun over here this weekend but I’m getting the feeling that’s not going to happen. I went back to bed. I actually fell back to sleep so Saturday wasn’t so bad after all. I did go over to the house late Saturday with my son Ethan. He cut some rebar up for the footings for about an hour while I did some miscellaneous stuff. It was productive.
The water was pouring into the site. The footing drain is working like a charm though. You would never know that it rained like over an inch here.
Water running down the hill and into the site.
Best part of Saturday: We all went to see “Star Trek:Into the Darkness”. It was great. Everyone in my family liked it. We all highly recommend it. You gotta love Spock.
I’m supposed to be building a Hobbit house. Ok, so Saturday was a bust. How did we do Sunday–> much better. I started the day insulating the footing forms. I’ve never insulated footings before so I wasn’t exactly sure how to approach it. I just put a general note on the drawings about insulating the footings. I thought that if I got a little too detailed it might get a little to confusing. Like I said, I didn’t even know how I was going to do it so why bother. Experience has taught me over the years that once you start, usually a good idea becomes apparent or somebody comes up with a good way of doing it. Why the heck are we insulating the footings to begin with? That’s a good question.
The dwarves of the first age began experimenting with footing insulation and eventually passed their knowledge of footing form insulation on to the Hobbits. So that’s why I decided to do it. Pretty simple.
Behind door number three we find the real answer to this question. This is one of the main facets for passive house compliance. No thermal bridging. If the footings are not insulated they could create a huge thermal bridge into the house. The short version: This would allow the warmth of the building to pass through the footing and into the cooler soil during the winter months. The same holds true for the slab. That will be insulated as well. What we are trying to create here is a huge thermos. Whatever is in the thermos be it hot or cold will have no egress to escape or be influenced by the temperature outside of the thermos. Another positive of footing insulation is it prevents condensation from forming on the walls. Just like a cold drink on a hot summer day water condenses on the outside surface of your glass where the cold glass and warm air meet. The same holds true for your basement. That’s one of the reasons why people have moisture issues in their basements.
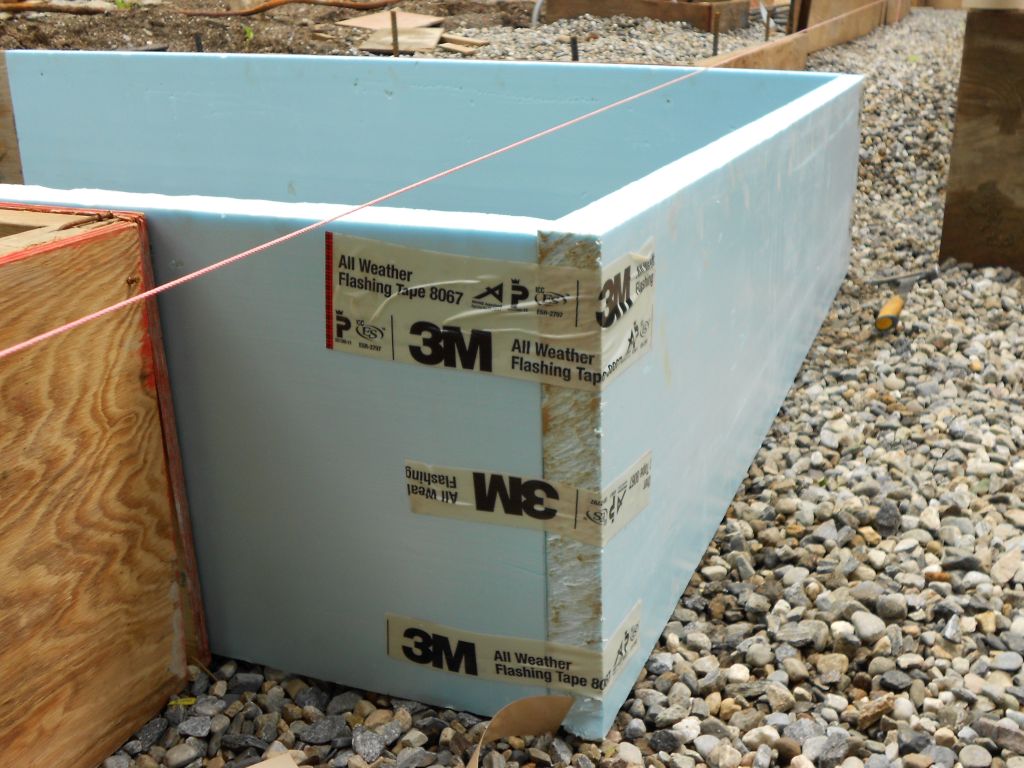
So back to Sunday. How do I begin? The Hobbit house we are building is basically two long parallel walls that are supporting a concrete arch. So it’s important that the footings for these walls are insulated. This is where I began; keeping an eye on the thermal envelope of the structure is critical. Here is a picture of where I started. Notice the string line. That line represents the outside edge of the slab. I need to have my insulation on the outside of that line. (Just so you know I transferred the batter board lines to the footings…it makes things easier). It’s hard to see from this angle but the line is right over the inside edge of the foam.
Main footing insulation.I used 3M 8067 flashing tape to hold the corners togther.
There really is so much to talk about and I know I’m going to leave something out. There are two different types of insulation that we are using right now. The insulation that is directly under the footings is 60 psi (pounds per square inch) extruded polystyrene or XPS insulation. This is critical because the weight of the house is going to be bearing on this insulation. If you put the 25 psi insulation in there it might crush which would lead to settlement issuses. 60 psi translates into 8640 pounds per square foot of footing. I own a Toyota Corolla. It weighs about 2700 pounds. So just for perspective you can park three Toyota Corollas on every square foot of this footing and the insulation will not crush. Impressive…most impressive. (Say it the way Darth Vader said it in the Empire Strikes Back and you’ll get my meaning.) The other insulation is 25 psi XPS which I used on the sides of the footing. Here there is really no strucural issue it is solely thermal.
Once I had the tricky parts done the hired help arrived and we went into production mode. Sides first then the bottoms.
Insulating the footing forms.
The next step (which I’m not sure was entirely necessary) was to tape the seams of the insulation. At the very least this keeps the individual pieces together and hopefully keeps moisture out if I complete the rest of it properly. I don’t know if any passive house people are out there but some feed back would be nice (and educational as well). It was pretty windy out on Sunday and boy is this tape sticky. Once Georgia and Terence got going though they motored through it.
Taping the seams.
Just a quick note on footings. I don’t know if you’ll be able to see this from the picture I took. The next picture is of a step in the footing. This occurs when there is an elevation change in the path of the footing. When I was digging the footing on the East side I hit solid rock. That footing is about 16 inches higher than the footing on the west side. To connect the footings I had to step it down from east to west. I’ll try and take a better picture later on.
Step in footing.
When we lock up the footings prior to the pour this will be a critical location. This has blowout potential written all over it. We will pour it a certain way when we make the pour.
Monday was my wonderful wife’s birthday. I did a small amount of work in the morning with Ethan and then spent the rest of the day with my lovely wife and family. Grilled for the first time for dinner. Burgers were excellent. Happy birthday Jo! …Love, Jim.
Welcome back. I hope all the free folk of Middle Earth are doing well. It sure seems like a long time since my last post. At least for me it does. Last Sunday was Mother’s Day here in the United States and we had two birthdays as well last weekend. My son Jude on Friday and Terence on Monday. So it was quite busy here last weekend and I didn’t really have a lot of time to spend on writing a post.(It really does take me a long time) Oh yeah, I almost forgot,we also had my wife’s family over for Sunday brunch. About 16 of us altogether. I cooked the eggs and bacon. I thought two pounds of bacon would be more then enough. I was wrong. Three pounds would have been more like it. I could not believe how much bacon these damn kids ate. I bit my tongue and said nothing. I mean it’s Mother’s Day. I mean the last thing I need is that battleaxe of a mother in law of mine yelling at me for not letting the kids have what they want. And bacon isn’t cheap either! This post is really starting to spiral downward. So let’s get started shall we. (And actually get along really well with my mother in law, I just had to throw that in there to break chops a bit.)
Where were we.The last post showed the begining of the footing forms etc. For all intents and purposes last Saturday was just a continuation of the same thing. I worked a full day last Saturday but boy what a miserable day it was. Overcast light rain on and off right from the start. I probably could have gotten more done if it was nicer out.Around 3:00 o’clock it started to rain pretty hard. When I heard thunder I knew it was time to wrap it up.
This weekend I wanted to finish the footing forms.. I was up early and got a good start. I was pretty much done by 10:30. I had my daughter Georgia go to the rental store and pick up the flat plate tamper again. Why? Well as I was setting the footing forms I noticed that in a lot of spots I had to excavate some of the gravel to get the form to the correct elevation. This means we placed the gavel too high. So what we had to do is remove gravel in some spots and add it to others. Once that was done we raked it level and then had to retamp the whole thing.
Retamping the gravel after fine tuning the gravel bed.
My daughter just returned from college this past week so it was her first day back at the site. She was pretty surprised at how much we had done since she was last here. One of the reasons I started this construction blog was to show people what building a house is really like. Most people just don’t know or understand how a house is built. So my daughter gets to the site and I had her and her brother wrap up the string lines I had up. She’s walking inside the formwork and says, “Wow this is so cool! So what are these things? Is this like where a hallway is going to go? ” Here’s a picture of where she was walking.
Is this a hallway?
I don’t know if that was a location joke (You had to be there.)but I got a kick out of it. Even though I thought it was funny it gets back to people really not understanding how things are put together. There’s a lot of dirty work to do out there and somebody has to do it. This is one of the functions of this blog.
One of the things I spoke of in a previous post was the problem of bracing the forms to withstand the pressure of the concrete.We are going to be doing a number of different things but as I said before we want to make sure everything is secure so we avoid having a “blowout ” during the pour. Some of this “securing ” is going to seem like overkill but I want to sleep well the night before the pour so we are going to be extra careful.
I used D-stakes to brace the forms but I don’t have enough of them to brace everything I need to. I used #5 rebar instead of them in other areas and clinched two 16 penny double head nails around them. At the bottom of the form I put a block and wedge to make up the space difference where the plank didn’t extend to the ground. This is important because this is where the most pressure will be when we pour the concrete and the plywood will move outwards until it hits the stake. Here’s a picture.
Rebar stake used to support form. Nails haven’t been clinched yet.Wedge has to be installed between block and rebar at bottom too.
Securing the top of the form is imortant as well. I’ve seen a number of forms bend outwards as the concrete was poured. We are not going to secure the top just yet. What we are going to do is set up for it now. Before we put in the insulation and the rebar we are going to place perforated banding wire on the bottom of the footing and leave enough overhang so we can loop it around the whole form. After we do all our work we will take this loop and tension it with what we call a banding machine and clip it tight. This is a picture of what it is going to look like when we use the tensioner.
Banding wire looped around footing form with tensioner pulling the wire tight.
Banding wire is really strong and great in tension. There are a couple of other areas we will use this later on.
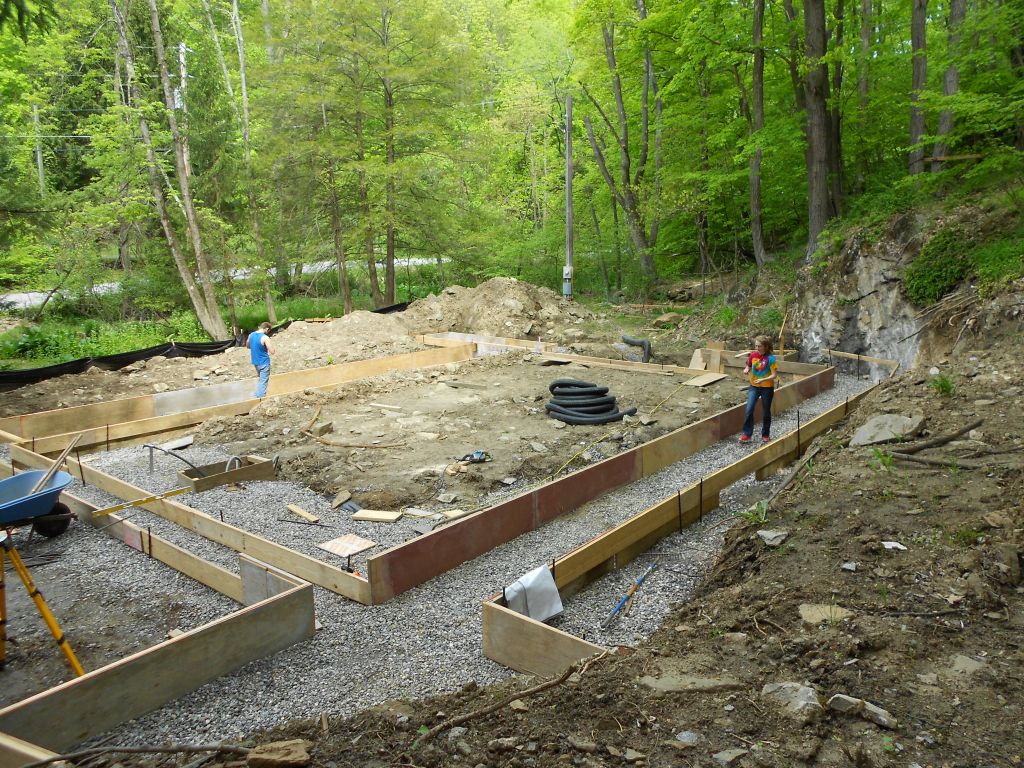
Here’s a picture of the site at the end of the day Saturday.
Formwork 95% done!
Next weekend I’m hoping to install the insulation and get the rebar going! Have a great week!